The Art of the Homemade Coconut Chocolate Bar: A Masterclass in Confectionery
There is something undeniably iconic about the pairing of tropical coconut and rich, snap-worthy chocolate. It is a flavor combination that has dominated confectionery aisles for decades, defined by the contrast between the moist, chewy, sweet coconut interior and the crisp, dark, or milky exterior. While mass-produced versions are staples of convenience stores, there is a profound difference when you make these bars at home.
Homemade coconut chocolate bars allow for complete control over the ingredients, the quality of the chocolate, and the ratio of coconut to sweetness. Whether you are aiming to recreate a classic Mounds or Bounty bar, or looking to elevate the concept with high-end dark chocolate and sea salt, this guide will walk you through the science, the technique, and the nuances of creating the perfect coconut chocolate bar in your own kitchen.
1. The Anatomy of the Perfect Bar
To master this confection, you must understand the two distinct layers that make it successful: the Coconut Center and the Chocolate Enrobing.
The Coconut Center (The “Paste”)
The heart of the bar is a mixture of shredded coconut and a binding agent. In professional confectionery, this is often a cooked sugar syrup or a specific fondant mixture. For home bakers, we rely on the magical properties of sweetened condensed milk or thick coconut cream combined with powdered sugar. The goal is a texture that is firm enough to hold its shape when dipped but moist enough to melt in your mouth.
The Chocolate Enrobing (The “Shell”)
The exterior is not just about flavor; it is about texture. A proper bar must have a “snap”—that satisfying acoustic feedback when you bite into it. This requires proper chocolate handling. If you simply melt a chocolate bar, it may bloom (turn white/streaky) or remain soft at room temperature. We will discuss how to achieve that professional finish without a temper machine.
2. Essential Ingredients: Quality Matters
Because this recipe has so few components, the quality of each is paramount.
- Shredded Coconut: Always use desiccated or fine-shredded coconut. Avoid large flakes, which make the bars difficult to shape and eat. If you prefer a “less sweet” profile, use unsweetened shredded coconut and adjust your sweetener (like maple syrup or honey) accordingly.
- The Binding Agent: * Sweetened Condensed Milk: The gold standard for that classic, chewy, fudgy center.
- Coconut Cream/Powdered Sugar: A vegan-friendly alternative that mimics the texture well.
- Chocolate: Avoid chocolate chips meant for cookies (like semi-sweet morsels), as they contain stabilizers that prevent them from melting smoothly. Instead, use high-quality couverture chocolate or high-grade chocolate bars (60% cocoa solids or higher for a sophisticated flavor).
- The “Secret” Enhancers: A pinch of sea salt in the coconut mixture is non-negotiable—it cuts the sweetness and brings out the nutty notes of the coconut. A tiny splash of pure vanilla extract adds depth.
3. The Methodology: A Step-by-Step Walkthrough
While the process is straightforward, precision is key to ensuring your bars look and taste professional.
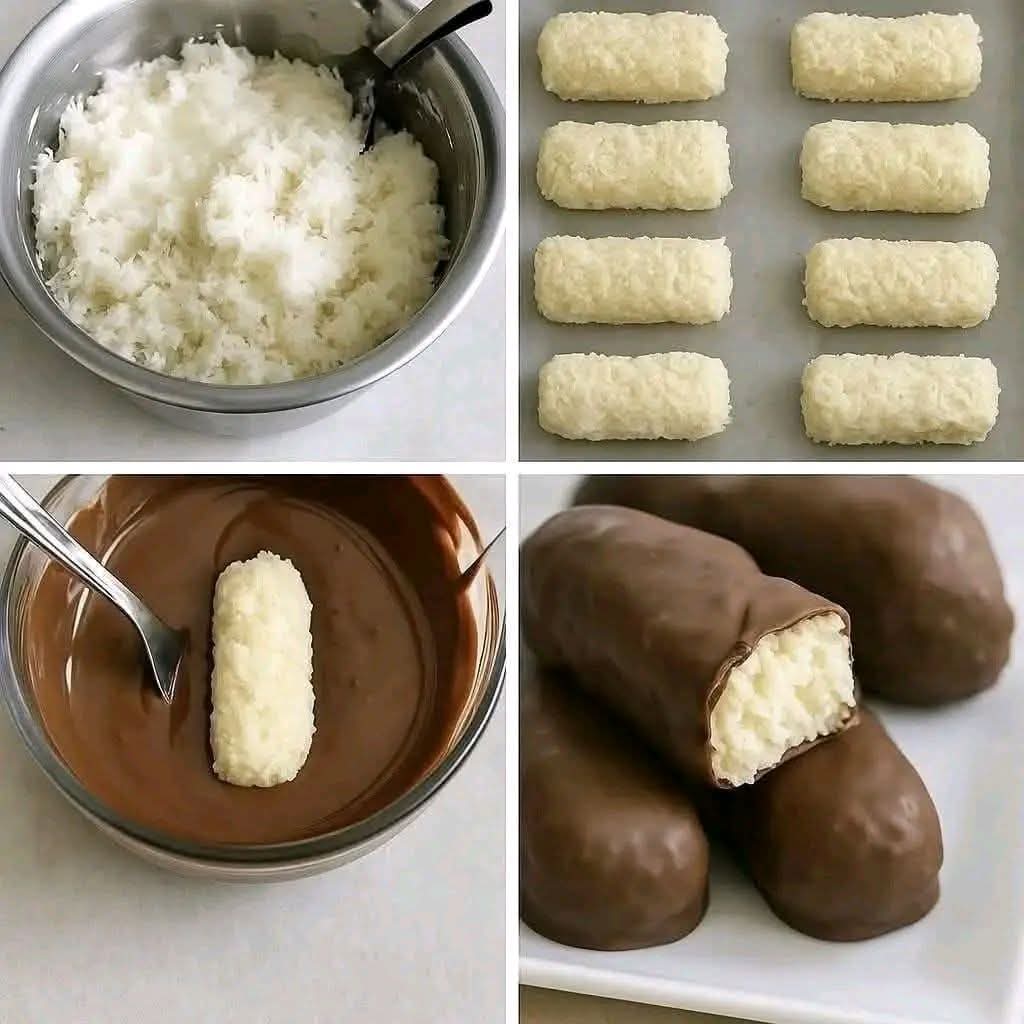
Phase 1: Creating the Coconut Core
- Mixing: In a large bowl, combine your shredded coconut with the binding agent (condensed milk or coconut cream). Add your salt and vanilla.
- Consistency Check: The mixture should feel like “wet sand.” It should hold together when squeezed in your hand. If it feels too wet, add a tablespoon more of shredded coconut. If it’s too crumbly, add a teaspoon of binding agent.
- Shaping: This is the most crucial step for aesthetics. Use a rectangular mold if you want perfect, uniform bars. Alternatively, line a baking tray with parchment paper and press the mixture down firmly into an even layer, about 1/2 inch thick.
- Chilling: The mixture must be cold before dipping. Freeze the slab or individual bars for at least 30–45 minutes. This creates a temperature differential that helps the chocolate set instantly upon contact.
Phase 2: Mastering the Chocolate Enrobing
- Melting: Use the double-boiler method (a glass bowl over a pot of simmering, not boiling, water). Never let the bowl touch the water, and never let steam into the chocolate, or it will “seize” (become grainy and thick).
- Thinning: If the chocolate is too thick, stir in one teaspoon of coconut oil. This improves the shine and helps the chocolate flow smoothly over the bars, resulting in a thinner, more professional shell.
- The Dip: Using a fork, place a cold coconut bar into the melted chocolate. Turn it to coat, then lift it out, tapping the fork against the side of the bowl to remove excess chocolate. If you skip this tap, you will have a thick, uneven puddle at the base of your bar.
- The Finish: Place the dipped bars on a sheet of parchment or wax paper to set.
4. Troubleshooting Common Failures
Even experienced bakers face challenges with confectionery. Here is how to fix them.
| Problem | Potential Cause | Solution |
|---|---|---|
| Seized Chocolate | Water/steam entered the bowl. | Add 1 tbsp of hot water/oil and whisk vigorously, or start over. |
| Crumbly Filling | Not enough binding agent. | Fold in more condensed milk or honey. |
| Streaky/White Coating | Chocolate was not tempered properly. | Ensure you don’t overheat the chocolate; add 1/4 of the chocolate after removing from heat to cool it down (seeding). |
| Uneven Shell | Too much chocolate/too slow dipping. | Work in batches; keep the bars frozen until the exact moment of dipping. |
5. Elevated Variations
Once you have mastered the classic bar, consider these variations to keep your kitchen experiments exciting:
- The “Almond Joy” Approach: Place a whole, toasted almond on top of the coconut rectangle before dipping. The crunch adds a necessary contrast to the soft coconut.
- The Vegan Alternative: Use full-fat canned coconut milk (reduced) and maple syrup as your binder. Pair with dairy-free dark chocolate chips (70%+ cocoa).
- The “Salted Caramel” Layer: Before dipping, add a thin layer of date-based caramel (blended dates and sea salt) on top of the coconut bar.
- Citrus Infusion: Add a teaspoon of fresh lime zest into the coconut mixture. The brightness of the lime pairs exceptionally well with dark chocolate.
6. Storage and Shelf Life
Because these bars contain natural ingredients (especially if you use coconut cream), they are perishable.
- Pantry: Not recommended, as the chocolate shell may soften at room temperature, and the coconut can spoil.
- Refrigerator: The ideal storage location. Place them in an airtight container with parchment paper between layers. They will stay fresh for 1–2 weeks.
- Freezer: These bars freeze beautifully. They can last up to 3 months. Let them sit at room temperature for 5 minutes before eating to let the coconut soften slightly.
7. Why Homemade Beats Store-Bought
Beyond the obvious pride of creation, homemade coconut chocolate bars offer distinct advantages:
- Ingredient Transparency: You control the source of your coconut and the quality of the cacao. You avoid the excessive high-fructose corn syrup, preservatives, and artificial flavors found in industrial-scale candy bars.
- Cost-Effectiveness: While high-quality chocolate is an investment, a batch of 20+ homemade bars is often significantly cheaper than purchasing 20 premium chocolate bars from a store.
- Customization: You can adjust the sugar levels. Commercial bars are often aggressively sweet; by making them yourself, you can dial back the sugar to suit your specific palate.
8. Final Thoughts for the Home Confectioner
Creating coconut chocolate bars is a practice in patience and temperature management. It is a rewarding process that transforms humble ingredients—shredded coconut and cocoa—into something elegant and satisfying.
Do not be discouraged if your first batch is not perfectly symmetrical. The flavor profile will likely outshine anything found in a candy aisle, regardless of the shape. Treat the process as a creative exercise. Experiment with the ratio of dark to milk chocolate, test the addition of nuts or sea salt, and refine your technique with every batch.
Remember, the goal is not perfection, but the joy of creating a treat that brings pleasure to yourself and those around you. Now that you have the blueprint, it is time to heat up your chocolate and start crafting your own signature bars.