Classic Fruit-Filled Puff Pastry Tarts: A Timeless and Delightful Recipe
Introduction
Fruit-filled puff pastry tarts are a classic dessert that combines the buttery, flaky texture of puff pastry with the sweet, juicy burst of fruit preserves or pie fillings. These tarts are perfect for any occasion, from casual family gatherings to elegant dinner parties. Their simplicity, versatility, and irresistible flavor make them a favorite among home bakers and professional chefs alike.
In this comprehensive guide, you will learn everything you need to know to create perfect fruit-filled puff pastry tarts—from the history and cultural significance of the dish to detailed ingredient lists, step-by-step instructions, cooking methods, nutritional benefits, and tips for lovers of this delightful treat.
History and Cultural Significance
Puff pastry has a rich history dating back to the Renaissance period in Europe. Its delicate layers and buttery flavor have made it a staple in French patisserie and beyond. Fruit tarts, in various forms, have been enjoyed for centuries as a way to showcase seasonal fruits and preserve their flavors.
The combination of puff pastry and fruit filling is a natural marriage of textures and tastes, celebrated in many cultures. These tarts are often associated with festive occasions, afternoon teas, and holiday celebrations.
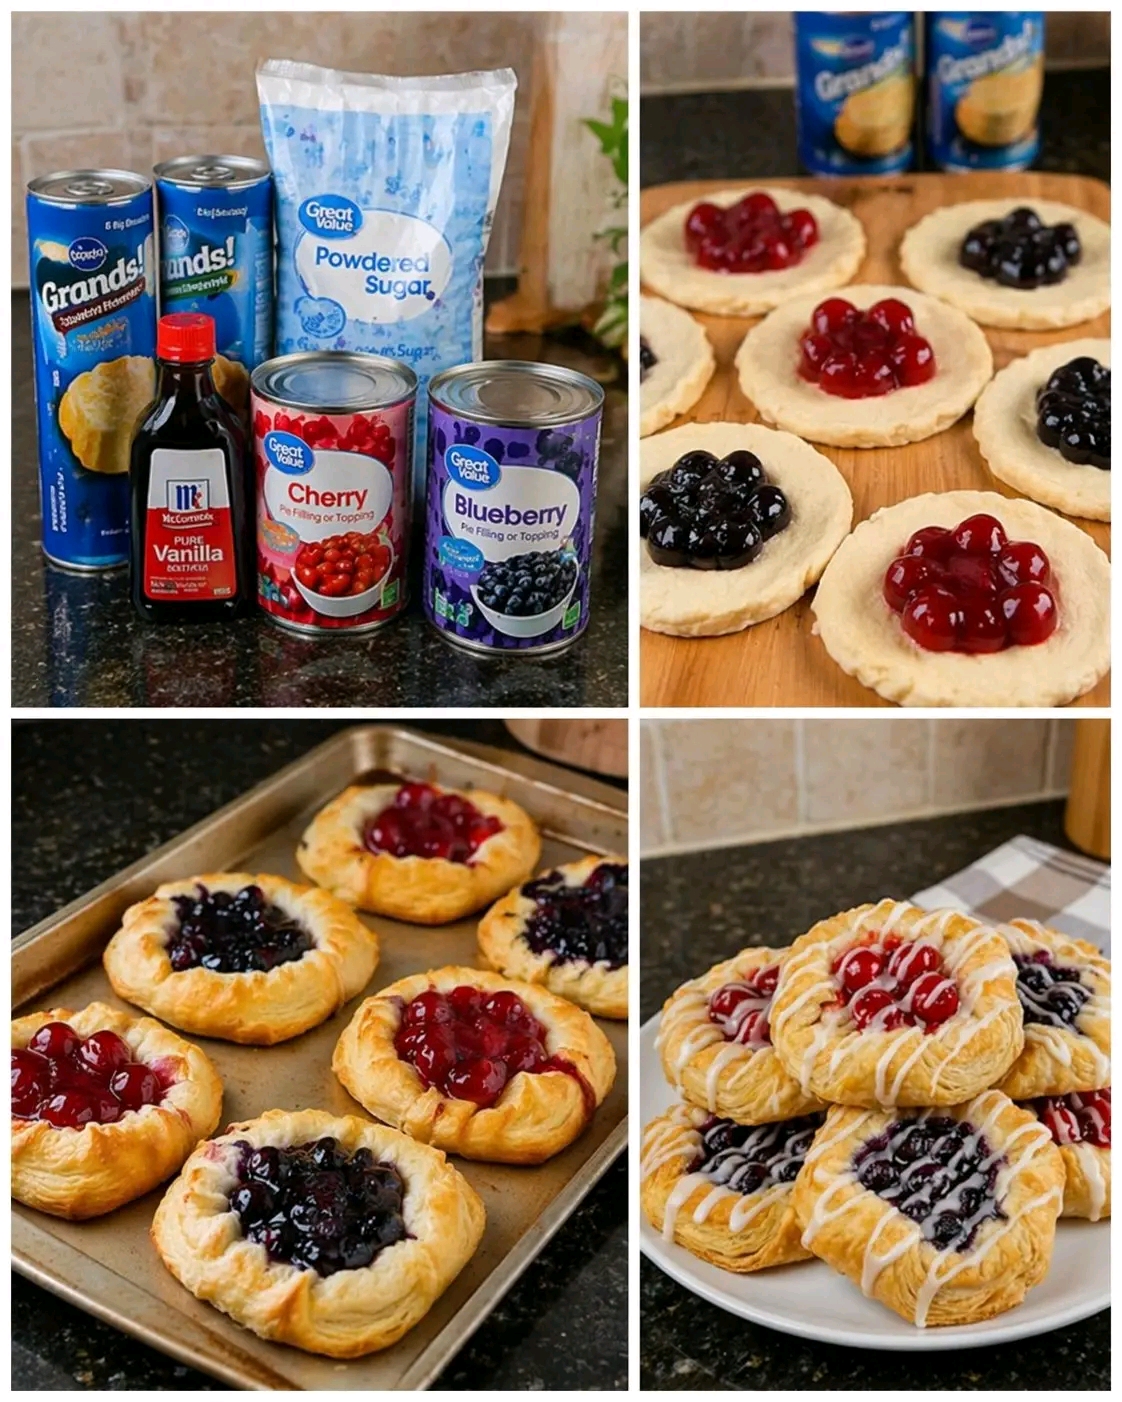
Ingredients
For the Puff Pastry
2 cans (each about 8 oz) refrigerated puff pastry sheets, thawed
For the Fruit Filling
1 can (21 oz) cherry pie filling
1 can (21 oz) blueberry pie filling
Optional: other fruit fillings such as apple, raspberry, or peach
For the Glaze and Topping
1 cup powdered sugar
2 tablespoons milk or lemon juice
1 teaspoon pure vanilla extract
Nutritional Benefits
While these tarts are a treat, they also offer some nutritional value:
Fruit Fillings: Provide vitamins, antioxidants, and dietary fiber.
Puff Pastry: Contains carbohydrates and fats, providing energy.
Portion Control: Small tarts allow for indulgence without overconsumption.
For a healthier twist, consider using homemade fruit fillings with less sugar or whole-grain puff pastry.
Equipment Needed
Baking sheet
Parchment paper or silicone baking mat
Rolling pin (optional)
Sharp knife or round cookie cutter
Mixing bowl
Whisk or fork
Cooling rack
Pastry brush (optional)
Step-by-Step Instructions and Methods
Step 1: Prepare the Puff Pastry
Thaw Puff Pastry: Remove puff pastry sheets from the refrigerator and let them thaw according to package instructions.
Preheat Oven: Preheat your oven to 400°F (200°C). Line a baking sheet with parchment paper or a silicone mat.
Roll Out Pastry: On a lightly floured surface, roll out each puff pastry sheet to smooth creases and slightly enlarge.
Cut Shapes: Using a round cookie cutter or a glass, cut circles approximately 3-4 inches in diameter.
Create Borders: Using a knife, lightly score a smaller circle inside each pastry round, about 1/2 inch from the edge, being careful not to cut all the way through. This will create a border that puffs up during baking.
Step 2: Assemble the Tarts
Place on Baking Sheet: Transfer the cut pastry rounds to the prepared baking sheet.
Add Fruit Filling: Spoon about 1-2 tablespoons of cherry or blueberry pie filling into the center of each pastry round, inside the scored border.
Optional Egg Wash: Brush the borders with a beaten egg for a golden finish.
Step 3: Bake the Tarts
Bake: Place the baking sheet in the preheated oven and bake for 15-20 minutes, or until the pastry is puffed and golden brown.
Cool: Remove from oven and transfer tarts to a cooling rack.
Step 4: Prepare the Glaze
Mix Glaze: In a small bowl, whisk together powdered sugar, milk or lemon juice, and vanilla extract until smooth.
Drizzle: Using a spoon or piping bag, drizzle the glaze over the cooled tarts.
Tips for Perfect Puff Pastry Tarts
Keep Pastry Cold: Work quickly and keep puff pastry cold to ensure maximum flakiness.
Don’t Overfill: Avoid overfilling to prevent soggy pastry and spills.
Even Sizing: Cut uniform pastry rounds for even baking.
Use Quality Fillings: Choose high-quality or homemade fruit fillings for best flavor.
Glaze Variations: Experiment with citrus zest or almond extract in the glaze.
Variations for Lovers of This Dish
Savory Tarts: Use fillings like spinach and feta, mushroom and cheese, or tomato and basil.
Mixed Fruit: Combine different fruit fillings for a colorful assortment.
Nut Toppings: Sprinkle chopped nuts or coconut flakes before baking.
Chocolate Drizzle: Add melted chocolate drizzle for extra indulgence.
Mini Tarts: Make bite-sized versions for parties or snacks.
Serving Suggestions
Serve warm or at room temperature.
Pair with coffee, tea, or dessert wine.
Accompany with fresh fruit or whipped cream.
Storing and Shelf Life
Store tarts in an airtight container at room temperature for up to 2 days.
Refrigerate for longer storage, up to 5 days, but pastry may lose crispness.
Reheat gently in the oven to restore flakiness.
Frequently Asked Questions
Q: Can I use frozen puff pastry?
A: Yes, thaw according to package instructions before use.
Q: How do I prevent soggy bottoms?
A: Use a hot oven and avoid overfilling. Baking on parchment helps.
Q: Can I make the glaze ahead?
A: Yes, store in the refrigerator and whisk before use.
Conclusion
Fruit-filled puff pastry tarts are a delightful and versatile dessert that combines flaky pastry with sweet, juicy fruit. Their ease of preparation and impressive presentation make them a favorite for bakers of all levels.
With this detailed recipe and tips, you can confidently create these delicious tarts to share with family and friends. Enjoy the process, savor the flavors, and celebrate the joy of baking!