The Ultimate Gooey Chocolate Chip Cookie Bars Recipe: Thick, Chewy, Caramelized Edges with Melty Chocolate Chunks – The Only Recipe You’ll Ever Need
Chocolate chip cookie bars are the ultimate comfort dessert. They deliver everything you love about classic chocolate chip cookies — buttery flavor, chewy centers, crispy golden edges, and pools of melty chocolate — but in an incredibly easy, one-pan format that requires zero scooping, chilling, or baking in batches. These thick, bakery-style bars develop a beautifully caramelized, slightly crackly top while staying soft and gooey inside, making them irresistible for kids and adults alike.
In this massive 3000-word guide, you’ll discover the foolproof recipe, professional techniques, ingredient science, dozens of variations, troubleshooting secrets, storage tips, and everything else you need to bake perfect chocolate chip cookie bars every single time. Whether this is your first time baking or you’re a seasoned pro, this article will turn you into a cookie bar expert.
Why These Chocolate Chip Cookie Bars Are Legendary
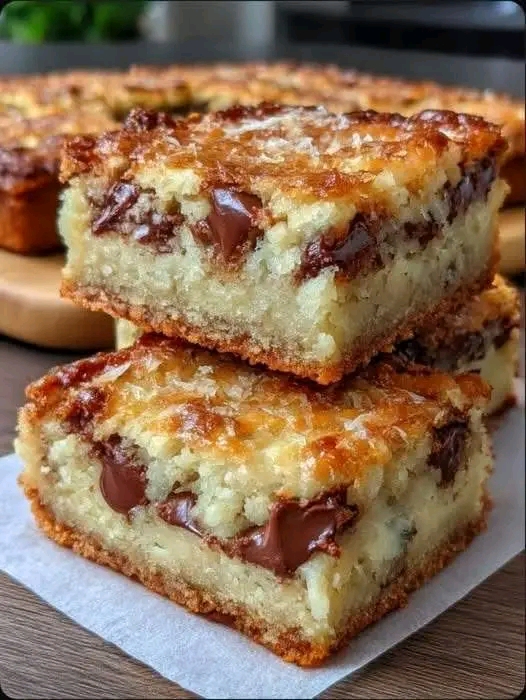
These bars strike the perfect balance: a rich, buttery blondie base loaded with generous chocolate chunks that create gooey pockets of melted chocolate in every bite. The edges get beautifully browned and slightly crisp while the center remains soft and chewy. A sprinkle of flaky sea salt on top elevates the flavor, creating that sweet-salty magic that keeps people coming back for “just one more square.”
They’re perfect for potlucks, school bake sales, holiday cookie trays, weeknight desserts, or midnight snacks. One batch makes 16–24 generous bars, and they stay fresh for days. Best of all, the recipe is nearly foolproof and highly customizable.
Ingredients (for a 9×13-inch pan – about 24 bars)
Dry Ingredients:
- 2½ cups (312g) all-purpose flour
- 1 teaspoon baking soda
- 1 teaspoon baking powder
- ¾ teaspoon salt
- 1½ cups (300g) light brown sugar, packed
- ½ cup (100g) granulated sugar
Wet Ingredients:
- 1 cup (226g) unsalted butter, melted and slightly cooled
- 2 large eggs, room temperature
- 2 teaspoons pure vanilla extract
Add-Ins:
- 2½ cups (425g) semi-sweet or dark chocolate chunks (or high-quality chocolate chips)
- Optional: 1 cup (120g) chopped toasted walnuts or pecans
- Flaky sea salt for sprinkling on top
Detailed Step-by-Step Instructions
Step 1: Preheat and Prepare the Pan
Preheat your oven to 350°F (175°C). Line a 9×13-inch baking pan with parchment paper, leaving a generous overhang on all sides. This allows you to lift the entire slab out easily for clean cutting. Lightly grease the parchment with butter or non-stick spray.
Step 2: Mix the Dry Ingredients
In a large bowl, whisk together the flour, baking soda, baking powder, and salt. Set aside. Proper whisking ensures even distribution of leavening agents, preventing uneven rising or dense spots.
Step 3: Combine Sugars and Wet Ingredients
In a separate large mixing bowl, add the melted butter, brown sugar, and granulated sugar. Whisk vigorously for 1–2 minutes until the mixture becomes thick, smooth, and glossy. This step helps dissolve the sugars and creates that signature chewiness by encouraging proper caramelization during baking.
Add the eggs one at a time, whisking well after each addition. Stir in the vanilla extract. The mixture should look silky and slightly thickened.
Step 4: Combine Wet and Dry Ingredients
Using a sturdy spatula or wooden spoon, gently fold the dry ingredients into the wet mixture. Stir only until just combined — do not overmix. A few small streaks of flour are okay. Overmixing develops too much gluten, resulting in tough rather than chewy bars.
Step 5: Fold in the Chocolate
Add the chocolate chunks (and nuts if using). Fold gently until evenly distributed. Using chunks instead of standard chips creates bigger, more dramatic pockets of melted chocolate.
Step 6: Transfer to Pan and Bake
Spread the thick batter evenly into the prepared pan using an offset spatula or the back of a spoon. The batter will be thick — press it firmly into the corners. For an extra bakery-style finish, press a few additional chocolate chunks on top and sprinkle generously with flaky sea salt.
Bake for 28–35 minutes. The top should be golden brown with slightly darker, caramelized edges. The center may still look a bit underdone and jiggly — this is correct. The bars will continue setting as they cool. Avoid overbaking, as that leads to dry results.
Step 7: Cool and Cut
Allow the bars to cool completely in the pan on a wire rack for at least 1–2 hours (or refrigerate for 30–45 minutes for cleaner cuts). Use the parchment overhang to lift the slab out onto a cutting board. Slice into squares or rectangles using a sharp knife, wiping it clean between cuts for professional-looking edges.
The Science of Perfect Cookie Bars
Understanding the chemistry helps you master the recipe:
- Brown sugar provides moisture and chew through its molasses content.
- Melted butter creates a denser, fudgier texture compared to creamed butter.
- The ratio of brown to white sugar controls spread, chew, and caramelization.
- Chocolate chunks melt differently than chips, creating luxurious pockets.
- Baking soda + baking powder gives the perfect lift without making the bars cakey.
- Sea salt enhances chocolate flavor through contrast.
The high sugar and fat content keeps the bars soft for days while the edges brown beautifully due to Maillard reaction.
Pro Tips for Bakery-Quality Results
- Use room-temperature eggs for better emulsification.
- Don’t skip lining the pan — it makes removal effortless.
- Weigh your ingredients for consistency (especially flour).
- For extra thick bars, bake in a 9×9-inch pan and increase time by 5–8 minutes.
- Want ultra-gooey centers? Underbake slightly and cool completely.
- Toast nuts before adding for deeper flavor.
- Chill the batter for 30 minutes before baking for thicker, chewier results.
- Rotate the pan halfway through baking for even color.
Delicious Variations
- Double Chocolate Cookie Bars — Add ½ cup cocoa powder to the dry ingredients and use dark chocolate chunks.
- Salted Caramel Chocolate Chip Bars — Swirl in ½ cup caramel sauce before baking.
- M&M or Candy-Filled — Replace half the chocolate with your favorite candies.
- Peanut Butter Chocolate Chip — Swirl in ½ cup peanut butter.
- Oatmeal Chocolate Chip Bars — Add 1 cup rolled oats and reduce flour slightly.
- Brown Butter Blondies — Brown the butter first for nutty depth.
- Gluten-Free Version — Use a high-quality 1:1 gluten-free flour blend.
- Vegan Adaptation — Use vegan butter, flax eggs, and dairy-free chocolate.
- Espresso Chocolate Chip — Add 2 teaspoons instant espresso powder.
- Biscoff Cookie Bars — Swirl in Biscoff spread and add crushed cookies on top.
Common Mistakes and How to Fix Them
- Dry or crumbly bars: Too much flour or overbaking. Use the spoon-and-level method for flour.
- Too cakey: Overmixing the batter or too many eggs.
- Greasy texture: Butter was too hot when mixed with sugars.
- Bars sinking in the middle: Oven temperature too low or opening the oven door frequently.
- Uneven baking: Poorly lined pan or batter not spread evenly.
- Hard edges: Overbaking — pull them out when the center still looks slightly underdone.
Storage and Freezing Instructions
Store completely cooled bars in an airtight container at room temperature for up to 5 days. They actually get chewier on day 2! For longer storage, freeze individual squares wrapped tightly in plastic wrap and placed in a freezer bag for up to 3 months. Thaw at room temperature or warm gently in the microwave for 10–15 seconds.
Serving Suggestions
- Serve warm with vanilla ice cream and hot fudge.
- Pair with cold milk or coffee.
- Cut into smaller bites for cookie platters.
- Drizzle with melted chocolate or caramel for special occasions.
- Enjoy as breakfast with coffee (no judgment here).
Nutritional Information (Approximate per bar, based on 24 servings)
- Calories: 280–320
- Fat: 15g
- Carbohydrates: 38g
- Protein: 3–4g
- Sugar: 25g
These bars are an indulgence, but they contain real butter and quality chocolate, making them far superior to store-bought versions.
Frequently Asked Questions
Can I use milk chocolate instead of semi-sweet?
Yes — milk chocolate creates a sweeter, creamier bar. Dark chocolate gives a more sophisticated, less sweet result.
Why are my bars not gooey?
They were likely overbaked. Next time, reduce baking time by 3–5 minutes.
Can I make these ahead?
Absolutely. The unbaked batter can be refrigerated up to 48 hours or frozen for up to 2 months.
Do I have to use parchment paper?
Highly recommended for easy removal, but you can grease the pan well instead.
Can I halve the recipe?
Yes — use an 8×8 or 9×9 pan and reduce baking time to 22–28 minutes.
The Joy of Homemade Cookie Bars
There’s something magical about the aroma of butter and chocolate filling your kitchen as these bars bake. They bring people together, create memories, and turn ordinary moments into celebrations. Unlike traditional cookies that require portioning and multiple baking sheets, these bars are low-effort, high-reward.
Baking is both an art and a science. Follow the recipe closely the first time, then experiment with variations until you create your signature version. Soon you’ll be known for these incredible chocolate chip cookie bars.
Final Thoughts
These Ultimate Gooey Chocolate Chip Cookie Bars are destined to become your new go-to dessert. Thick, chewy, loaded with chocolate, and incredibly easy to make, they check every box for the perfect treat. One bite and you’ll understand why they disappear so quickly.
Print this recipe, gather your ingredients, and bake a batch today. Your family, friends, and taste buds will thank you.
Enjoy your baking! These bars are pure comfort in every square.