The Ultimate Raspberry Pie Bars Recipe: Buttery Crust, Tart-Sweet Filling & Foolproof Instructions for Perfect Results Every Time
Raspberry pie bars are the ultimate crowd-pleasing dessert. They deliver all the comforting flavors of a classic raspberry pie — flaky, buttery crust, vibrant tart-sweet berry filling that bubbles and caramelizes at the edges — but in convenient, portable handheld squares. Perfect for potlucks, holiday gatherings, bake sales, afternoon tea, or simply treating yourself at home.
This comprehensive guide walks you through everything you need to create bakery-worthy raspberry pie bars. Whether you’re a beginner baker or an experienced home cook looking to perfect your technique, you’ll find detailed instructions, ingredient science, troubleshooting tips, delicious variations, and professional secrets to elevate your baking game.
Why You’ll Love These Raspberry Pie Bars
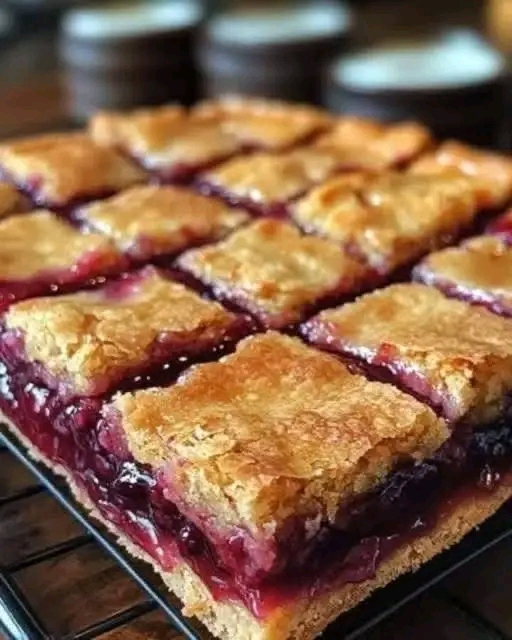
These bars strike the perfect balance: a tender shortbread-style base that doubles as a crumbly topping, enveloping a thick layer of homemade raspberry filling. The contrast between the golden, crisp crust and the juicy, glistening berry center is irresistible. They’re easier than making a full pie (no crimping or lattice required), travel beautifully, and can be made ahead of time.
One batch yields 16–24 generous squares depending on how you cut them, making them ideal for sharing. The recipe is forgiving yet rewarding, and the results look as stunning as they taste.
Ingredients (for a 9×13-inch pan)
For the Crust & Crumble Topping:
- 3 cups (375g) all-purpose flour
- 1 cup (200g) granulated sugar
- 1 teaspoon baking powder
- ½ teaspoon salt
- 1 cup (226g) cold unsalted butter, cubed
- 1 large egg
- 1 teaspoon pure vanilla extract
- Zest of 1 large lemon (optional but highly recommended)
For the Raspberry Filling:
- 4 cups (about 500–550g) fresh or frozen raspberries
- ¾ cup (150g) granulated sugar (adjust based on berry sweetness)
- ¼ cup (30g) cornstarch or ⅓ cup all-purpose flour
- 2 tablespoons fresh lemon juice
- 1 teaspoon vanilla extract
- Pinch of salt
- Optional: ½ teaspoon ground cinnamon or a dash of almond extract for depth
Optional Glaze (for extra bakery-style finish):
- 1 cup powdered sugar
- 2–3 tablespoons milk or lemon juice
- ½ teaspoon vanilla extract
Detailed Step-by-Step Instructions
Step 1: Prepare Your Workspace and Ingredients
Preheat your oven to 375°F (190°C). Line a 9×13-inch baking pan with parchment paper, leaving overhang on all sides for easy removal. This is crucial for clean cuts later.
Measure all ingredients before starting. Cold butter is essential for a tender, flaky crust — keep it in the refrigerator until the last moment.
Step 2: Make the Crust and Crumble Mixture
In a large mixing bowl, whisk together the flour, sugar, baking powder, and salt. Add the cold cubed butter. Using a pastry cutter, two forks, or your fingertips, work the butter into the dry ingredients until the mixture resembles coarse crumbs with some pea-sized pieces remaining.
This technique creates pockets of steam during baking, resulting in that signature buttery texture. Stir in the egg, vanilla extract, and lemon zest until the dough just comes together. It will be crumbly — that’s exactly what you want.
Divide the mixture: Press approximately two-thirds firmly into the bottom of the prepared pan to form an even base. Reserve the remaining one-third for the topping.
Step 3: Prepare the Luscious Raspberry Filling
In a medium saucepan, combine the raspberries, sugar, cornstarch (or flour), lemon juice, vanilla, salt, and any optional spices.
Cook over medium heat, stirring frequently. As the berries heat up, they will release their juices. Bring the mixture to a gentle boil and cook for 2–4 minutes until it thickens noticeably. The filling should coat the back of a spoon and have a glossy appearance.
Taste and adjust sweetness if needed. If using frozen raspberries, they may release more liquid — you can add an extra teaspoon of cornstarch if the filling seems too thin. Remove from heat and let cool slightly (about 5–10 minutes).
Step 4: Assemble the Bars
Spread the warm raspberry filling evenly over the pressed crust base using an offset spatula or the back of a spoon.
Take the reserved crumble mixture and sprinkle it evenly over the filling. Gently press some larger clumps for texture variation — you want a rustic, crumbly top rather than a smooth one.
Step 5: Bake to Golden Perfection
Place the pan in the preheated oven and bake for 35–45 minutes, or until the topping is golden brown and the filling is bubbling vigorously around the edges. Rotate the pan halfway through for even browning.
The bars may still seem slightly jiggly in the center when you remove them — they will continue to set as they cool.
Step 6: Cool Completely and Cut
Allow the bars to cool in the pan on a wire rack for at least 1–2 hours. For cleaner slices, refrigerate for an additional hour or until fully chilled. Use the parchment overhang to lift the entire slab out, then cut into squares using a sharp chef’s knife wiped clean between cuts.
Step 7: Optional Glaze
Whisk together powdered sugar, milk (or lemon juice), and vanilla until smooth. Drizzle over cooled bars for an elegant finish and extra sweetness.
The Science Behind Perfect Pie Bars
Understanding why this recipe works helps you become a better baker. The high butter-to-flour ratio creates tenderness. Sugar not only sweetens but also tenderizes and aids browning via caramelization. Cornstarch thickens the filling without making it cloudy or pasty, while lemon juice brightens the flavor and helps activate the pectin in the berries for better set.
Baking at 375°F provides enough heat to brown the crust beautifully while cooking the filling thoroughly without burning.
Pro Tips for Bakery-Quality Results
- Cold ingredients: Keep butter and egg cold for flakier texture.
- Don’t overwork the dough: Overmixing develops gluten and leads to tough bars.
- Berry choice: Fresh raspberries in season are ideal, but high-quality frozen work excellently year-round and often yield juicier filling.
- Thickening test: If you’re unsure about the filling consistency, spoon a small amount onto a chilled plate — it should hold its shape after a minute.
- Altitude adjustments: At higher elevations, increase baking temperature by 15–25°F and slightly reduce sugar.
- Make-ahead friendly: Assemble and refrigerate unbaked bars up to 24 hours, or freeze the entire pan before baking.
Delicious Variations to Try
- Mixed Berry Pie Bars — Use a combination of raspberries, blueberries, blackberries, and strawberries.
- Cherry Pie Bars — Substitute with pitted fresh or frozen cherries and add ¼ teaspoon almond extract.
- Lemon Raspberry Bars — Add extra lemon zest to the crust and filling for bright citrus notes.
- Peach Raspberry — Incorporate diced fresh peaches for a summery twist.
- Gluten-Free Version — Use a 1:1 gluten-free flour blend and add ½ teaspoon xanthan gum.
- Vegan Adaptation — Replace butter with cold vegan butter sticks and use a flax egg.
- Crumble-Only Version — Skip the bottom crust pressing and make a full crumble for a more rustic dessert.
Common Mistakes and How to Avoid Them
- Soggy bottom: Ensure the base is pressed very firmly and the filling isn’t overly watery.
- Runny filling: Cook the berry mixture long enough and don’t skip the cornstarch.
- Dry or crumbly bars: Measure flour correctly (spoon and level, never scoop) and don’t overbake.
- Burnt edges: Tent with foil if the top browns too quickly.
- Difficult slicing: Always cool completely (preferably chill) before cutting.
Storage and Freezing Instructions
Store cooled bars in an airtight container at room temperature for up to 2 days, or in the refrigerator for up to 5–6 days. For longer storage, freeze individual squares wrapped in plastic and placed in a freezer bag for up to 3 months. Thaw overnight in the refrigerator.
Serving Suggestions
- Warm slightly and serve with vanilla ice cream or whipped cream.
- Pair with fresh berries and mint for an elegant presentation.
- Enjoy with morning coffee or afternoon tea.
- Pack in lunchboxes or take to picnics.
Nutritional Information (Per Serving, Approximate)
Based on 24 bars:
Calories: 210–240
Carbohydrates: 32g
Fat: 9g
Protein: 2–3g
Fiber: 2g
Sugar: 18g
Values vary based on exact ingredients and portion size. These bars offer antioxidants from the raspberries along with the comforting satisfaction of a homemade treat.
Frequently Asked Questions
Can I use jam instead of fresh berries?
Yes — use about 2 cups of good-quality raspberry jam thinned with a little lemon juice. It’s a quick shortcut but won’t have quite the same fresh flavor.
Why is my crust not browning?
Oven temperature may be off or the bars need a few extra minutes. Brushing the top lightly with egg wash before baking can help.
Can I make this in a smaller pan?
Yes. Halve the recipe for an 8×8-inch pan and reduce baking time slightly.
Are these bars very sweet?
You can reduce sugar in both crust and filling by ¼ cup each if you prefer a tarter result.
The Joy of Homemade Baking
There’s something deeply satisfying about pulling a pan of golden, fragrant raspberry pie bars from the oven. The house fills with the scent of butter and berries, and everyone gathers around hoping for the first taste. These bars remind us that the best desserts don’t need to be complicated — just made with care and quality ingredients.
Baking is both science and art. Follow the steps precisely the first time, then make the recipe your own through variations and adjustments. Soon you’ll develop intuition for when the filling is perfectly thickened or the crumble is just right.
Final Thoughts
These Ultimate Raspberry Pie Bars are destined to become a family favorite and a go-to recipe in your collection. They combine the nostalgia of homemade pie with modern convenience and stunning presentation. One bite delivers the perfect harmony of textures and flavors: buttery, crisp, juicy, tart, and sweet all at once.
Print this recipe, bookmark it, and make it your signature dessert. Whether for special occasions or ordinary Tuesdays, these bars turn any day into a celebration.
Enjoy your baking! These bars are guaranteed to impress.