Lemon Crumble Bars Recipe: The Ultimate Tangy-Sweet Dessert You’ll Make Again and Again
If you love the bright, zesty flavor of fresh lemons combined with a buttery, crumbly topping that melts in your mouth, these Lemon Crumble Bars are about to become your new favorite treat. This classic dessert combines a rich, velvety lemon curd filling with a tender shortbread base and a generous layer of golden crumble on top. Every bite delivers the perfect balance of sweet and tart, with a satisfying texture that makes it impossible to stop at just one square.
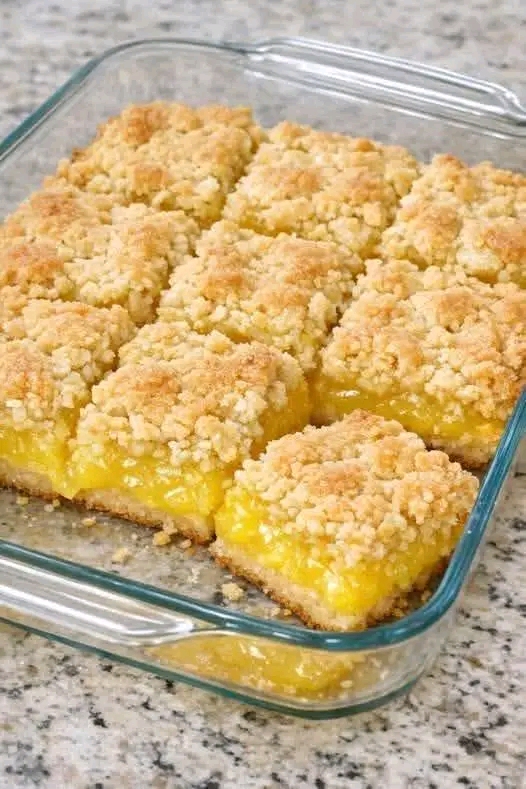
Lemon bars have been a beloved dessert for generations, but adding a buttery crumble topping takes them to a whole new level. Unlike traditional lemon bars with a simple powdered sugar dusting, these crumble bars offer an irresistible contrast: a soft, gooey lemon center sandwiched between a crisp base and crunchy, golden crumbs. They’re perfect for spring and summer gatherings, potlucks, holiday parties, or simply as an afternoon pick-me-up with a cup of tea or coffee.
In this comprehensive guide, you’ll find everything you need to make bakery-quality lemon crumble bars at home. We’ll walk through the full recipe step by step, share pro tips for the best results, explore delicious variations, discuss storage and freezing methods, answer frequently asked questions, and even provide nutritional information so you can enjoy this treat with confidence.
Whether you’re a beginner baker or an experienced home cook, this detailed recipe will help you create perfect lemon crumble bars every single time. Let’s dive in!
Why You’ll Love These Lemon Crumble Bars
There are countless reasons to fall in love with this recipe:
- Perfect Flavor Balance: The bright, tangy lemon curd is perfectly balanced by the sweet, buttery crumble and shortbread base.
- Irresistible Texture: A crisp bottom crust, luscious lemon filling, and crunchy crumble topping create a multi-layered experience in every bite.
- Make-Ahead Friendly: These bars taste even better the next day after the flavors have had time to meld.
- Crowd-Pleasing Dessert: They’re elegant enough for dinner parties yet casual enough for family gatherings or school bake sales.
- Customizable: Easy to adapt with different citrus fruits, add-ins, or dietary modifications.
- Simple Ingredients: Made with pantry staples you likely already have on hand.
Once you try these lemon crumble bars, you’ll understand why they’ve become a staple in many kitchens around the world.
Ingredients for Lemon Crumble Bars
This recipe makes approximately 16 generous squares in a 9×13-inch baking dish. All measurements are in both US customary and metric for your convenience.
For the Shortbread Base and Crumble Topping (shared mixture):
- 3 cups (375g) all-purpose flour
- 1 cup (200g) granulated sugar
- 1 teaspoon baking powder
- ½ teaspoon salt
- 1 cup (226g) unsalted butter, cold and cut into small cubes
- 1 large egg, lightly beaten
- 1 teaspoon pure vanilla extract
- Zest of 2 large lemons (optional but highly recommended for extra flavor)
For the Lemon Curd Filling:
- 6 large egg yolks (reserve the whites for another use if desired)
- 2 whole large eggs
- 2 cups (400g) granulated sugar
- 1 cup (240ml) fresh lemon juice (about 6–8 large lemons)
- Zest of 4 large lemons (finely grated)
- ½ cup (113g) unsalted butter, cut into small pieces
- ¼ teaspoon salt
- 3 tablespoons cornstarch (for extra stability and to prevent weeping)
Optional Garnishes:
- Powdered sugar for dusting
- Fresh lemon slices or zest
- Whipped cream or vanilla ice cream for serving
Pro Tip: Always use fresh lemon juice and zest rather than bottled juice. The flavor difference is significant and worth the extra effort.
Equipment Needed
- 9×13-inch glass or metal baking pan
- Parchment paper
- Large mixing bowls
- Medium saucepan
- Whisk
- Rubber spatula
- Sharp knife for cutting bars
- Citrus zester or microplane
- Lemon juicer (optional but helpful)
Step-by-Step Instructions for Making Lemon Crumble Bars
Step 1: Prepare the Baking Pan
Preheat your oven to 350°F (175°C). Line a 9×13-inch baking pan with parchment paper, leaving an overhang on two opposite sides. This will make it easy to lift the cooled bars out of the pan for clean cutting. Lightly grease the parchment with butter or non-stick spray.
Step 2: Make the Shortbread Base and Crumble Topping Mixture
In a large mixing bowl, whisk together the flour, sugar, baking powder, and salt until well combined.
Add the cold cubed butter to the dry ingredients. Using a pastry cutter, two forks, or your fingertips, work the butter into the flour mixture until it resembles coarse crumbs with some pea-sized pieces remaining. The mixture should look sandy but hold together when pressed.
Stir in the beaten egg, vanilla extract, and lemon zest (if using) until the dough just comes together. Do not overmix.
Divide the mixture roughly in half: use about 60% for the base and reserve 40% for the crumble topping. Press the larger portion firmly and evenly into the bottom of the prepared pan to form a solid crust. Use the bottom of a measuring cup or glass to create an even layer.
Place the remaining crumble mixture in the refrigerator while you prepare the filling. Chilling helps keep the crumble pieces distinct and prevents them from melting into the filling.
Step 3: Prepare the Lemon Curd Filling
In a medium saucepan (not over heat yet), whisk together the egg yolks, whole eggs, sugar, cornstarch, and salt until smooth and pale.
Gradually whisk in the fresh lemon juice and lemon zest until everything is fully incorporated.
Place the saucepan over medium heat and cook the mixture, whisking constantly, until it thickens and begins to bubble gently. This usually takes 8–12 minutes. Do not let it boil vigorously, or the eggs may curdle.
Once thickened (it should coat the back of a spoon and leave a clear trail when you run your finger across it), remove the pan from the heat. Add the butter pieces one at a time, whisking until each piece is completely melted and the curd is smooth and glossy.
Strain the lemon curd through a fine-mesh sieve into a clean bowl to remove any bits of cooked egg or large zest pieces. This step ensures a silky-smooth filling.
Let the curd cool for about 10 minutes while you finish the base.
Step 4: Assemble the Bars
Pour the slightly cooled lemon curd evenly over the pressed shortbread base. Use an offset spatula or the back of a spoon to spread it into an even layer.
Remove the reserved crumble mixture from the refrigerator. Break it into small, irregular pieces with your fingers and sprinkle it generously over the lemon filling. Try to distribute the crumble evenly, but don’t press it down too firmly—leaving some pieces larger creates a beautiful rustic texture.
Step 5: Bake the Lemon Crumble Bars
Place the pan in the preheated oven and bake for 35–45 minutes, or until the crumble topping is golden brown and the lemon filling is set but still has a slight jiggle in the center.
The edges should be lightly browned, and the crumble should look crisp and inviting.
Step 6: Cool and Chill
Remove the pan from the oven and place it on a wire rack. Allow the bars to cool completely to room temperature (about 1–2 hours). The filling will continue to set as it cools.
Once at room temperature, cover the pan with plastic wrap and refrigerate for at least 2 hours (preferably 4 hours or overnight). Chilling makes the bars much easier to cut cleanly and improves the flavor.
Step 7: Cut and Serve
Using the parchment overhang, lift the entire slab of bars out of the pan and place it on a cutting board.
Use a sharp chef’s knife to cut into 16 equal squares (or more smaller pieces if serving a larger crowd). For the cleanest cuts, wipe the knife with a damp cloth between slices.
Dust the tops lightly with powdered sugar just before serving for an elegant finish. Serve chilled or at room temperature with optional whipped cream or a scoop of vanilla ice cream.
Pro Tips for Perfect Lemon Crumble Bars
- Temperature Matters: Keep the butter cold when making the crumble mixture. Cold butter creates steam pockets during baking, resulting in a flakier, more tender texture.
- Don’t Skip the Chill: Refrigerating the assembled bars before cutting is crucial. Warm lemon filling will ooze everywhere if you try to cut too soon.
- Fresh Lemons Only: Bottled lemon juice lacks the bright, aromatic compounds found in fresh fruit. The zest is especially important for that signature lemon flavor.
- Even Layers: Take time to press the base evenly. Uneven thickness can lead to some areas over-baking while others remain underdone.
- Watch the Oven: Ovens vary. Start checking at 35 minutes. The bars are done when the filling no longer looks wet and the crumble is deeply golden.
- Prevent Curdling: Whisk constantly while cooking the curd and remove from heat as soon as it thickens. Straining at the end catches any accidental cooked egg bits.
- Make It Ahead: These bars taste even better the next day. The flavors meld beautifully overnight in the refrigerator.
Delicious Variations to Try
Berry Lemon Crumble Bars: Swirl ½ cup of fresh raspberry or blueberry puree into the lemon curd before pouring over the base. The berries add beautiful color and complementary tartness.
Orange or Lime Crumble Bars: Substitute orange or lime juice and zest for the lemon. Lime creates a more tropical flavor, while orange offers a sweeter, milder citrus note.
Coconut Lemon Bars: Add ½ cup shredded coconut to the crumble mixture and sprinkle toasted coconut on top after baking.
Gluten-Free Version: Replace the all-purpose flour with a 1:1 gluten-free baking flour blend. Ensure your baking powder is gluten-free as well.
Vegan Lemon Crumble Bars: Use plant-based butter, replace eggs in the curd with a combination of cornstarch and aquafaba or commercial egg replacer, and use non-dairy milk if needed for adjustments.
Lavender Lemon Bars: Add 1 teaspoon dried culinary lavender to the lemon curd while cooking, then strain it out. This creates a sophisticated floral note.
Shortbread Cookie Crust Alternative: For a different base, press store-bought or homemade shortbread cookies (crushed) mixed with melted butter into the pan.
How to Store Lemon Crumble Bars
Room Temperature: These bars can stay at cool room temperature for up to 1 day if your kitchen isn’t too warm.
Refrigerator: Store in an airtight container in the refrigerator for up to 5 days. The filling stays perfectly set and the crumble remains crisp for several days.
Freezer: Lemon crumble bars freeze beautifully. Cut into individual squares, wrap each tightly in plastic wrap, then place in a freezer-safe bag or container. They will keep for up to 3 months.
To thaw: Place frozen bars in the refrigerator overnight. For quicker thawing, let them sit at room temperature for 30–45 minutes. Dust with fresh powdered sugar after thawing.
Pro Storage Tip: Place a sheet of parchment paper between layers of bars in the container to prevent them from sticking together.
Nutritional Information (Per Serving)
Based on 16 servings:
- Calories: Approximately 385
- Total Fat: 18g
- Saturated Fat: 11g
- Cholesterol: 135mg
- Sodium: 145mg
- Total Carbohydrates: 52g
- Dietary Fiber: 1g
- Sugars: 35g
- Protein: 5g
Note: Nutritional values are estimates and can vary based on exact ingredients and portion sizes. For more precise calculations, use your preferred nutrition calculator with the specific brands you use.
These bars are indulgent, so enjoy them as an occasional treat. One square paired with fresh fruit can help balance the richness.
Frequently Asked Questions About Lemon Crumble Bars
Can I use bottled lemon juice instead of fresh?
While technically possible, fresh lemon juice is strongly recommended. Bottled juice often has a muted, metallic taste that affects the final flavor.
Why did my lemon filling turn out runny?
The most common reasons are undercooking the curd, not adding enough cornstarch, or cutting the bars before they have fully chilled and set.
Can I make these bars in advance for a party?
Yes! They’re ideal for making 1–2 days ahead. Store covered in the refrigerator and dust with powdered sugar right before serving.
How do I prevent the crumble from sinking into the filling?
Make sure the crumble mixture is cold when you sprinkle it on top. Larger, irregular pieces are less likely to sink than fine crumbs.
My crumble topping didn’t brown evenly. What went wrong?
Oven hot spots or an unevenly spread topping can cause this. Rotate the pan halfway through baking and break the crumble into varied sizes for better texture and color.
Are these bars very sweet or very tart?
They strike a beautiful balance. The sugar in the curd tempers the tartness of the lemons, while the shortbread and crumble add sweetness. Adjust sugar by ¼ cup if you prefer more or less tartness.
Can I double the recipe?
Yes, but bake in two separate 9×13 pans or use a larger sheet pan and adjust baking time accordingly. Do not try to bake a double batch in one deep pan, as the center may not set properly.
Serving Suggestions
Lemon crumble bars are incredibly versatile:
- Serve chilled straight from the refrigerator for the cleanest presentation.
- Pair with a hot cup of Earl Grey or chamomile tea.
- Add a dollop of lightly sweetened whipped cream or a scoop of vanilla bean ice cream.
- Garnish with thin lemon slices, extra zest, or fresh mint leaves for a restaurant-style finish.
- Include on a dessert platter alongside brownies, chocolate chip cookies, and fruit tarts.
The History and Origins of Lemon Bars
Lemon bars as we know them today became popular in the United States in the early 20th century, with recipes appearing in newspapers and cookbooks by the 1950s and 1960s. The addition of a crumble topping is a more modern twist that combines elements of fruit crumbles and classic lemon squares.
The bright citrus flavor has made lemon desserts timeless. Lemons were historically prized for their ability to brighten rich or heavy dishes, and that tradition continues in modern baking.
Final Thoughts
These Lemon Crumble Bars deliver everything you could want in a citrus dessert: bright flavor, beautiful texture, and that satisfying “homemade” quality that impresses family and friends. With detailed instructions, plenty of tips, and multiple variations, this recipe is designed to set you up for success no matter your baking experience.
Once you master the basic version, feel free to experiment with different citrus fruits, add-ins, or dietary adaptations. Baking should be fun and creative, and these bars are the perfect canvas for your personal touch.