Seven Layer Taco Salad: The Ultimate Crowd-Pleasing Layered Mexican-Inspired Dish
Are you looking for a show-stopping dish that combines the bold flavors of tacos with the freshness of a salad, all presented in a stunning layered format? The Seven Layer Taco Salad is exactly that—a vibrant, colorful, and incredibly delicious creation that turns ordinary ingredients into an extraordinary centerpiece for any gathering. Whether you’re hosting a family dinner, preparing for a potluck, a game day party, a Cinco de Mayo celebration, or simply craving something fun and satisfying for weeknight meals, this taco salad delivers on every level: taste, texture, presentation, and ease of preparation.
This isn’t just another salad. It’s a complete meal in a bowl, featuring layers of seasoned ground beef, crisp vegetables, crunchy tortilla chips, creamy dressings, and gooey cheese. Each bite offers a perfect harmony of spicy, savory, fresh, and creamy elements that will have everyone coming back for seconds—or thirds. Best of all, it’s highly customizable, making it suitable for various dietary preferences and taste buds.
In this comprehensive guide, we’ll dive deep into everything you need to know about creating the perfect Seven Layer Taco Salad. From its origins and cultural inspirations to detailed step-by-step instructions, ingredient breakdowns, variations, serving suggestions, storage tips, nutritional information, and even troubleshooting common issues, this article covers it all. By the end, you’ll be equipped to make this dish like a pro and impress your guests every single time.
The History and Appeal of Layered Salads
Layered salads have a rich history in American cuisine, particularly in the Midwest and Southern regions where “seven-layer salads” became popular in the 1970s and 1980s. Traditionally, these consisted of lettuce, peas, bacon, hard-boiled eggs, cheese, and mayonnaise-based dressings, often served in clear glass bowls to showcase the colorful stripes.
The taco version takes this concept and infuses it with Mexican-American flavors. While not strictly “authentic” Mexican cuisine (tacos in Mexico are typically simpler, with corn tortillas, meat, onions, cilantro, and salsa), the Seven Layer Taco Salad represents the vibrant fusion that defines Tex-Mex and California-style Mexican food. It draws inspiration from walking tacos, taco bowls, and loaded nachos, but presents everything in a more elegant, shareable format.
Why has this dish endured and gained popularity? First, its visual appeal is undeniable. When assembled in a large, clear glass trifle bowl or deep salad bowl, the distinct layers create a rainbow of colors—greens from lettuce and avocado, reds from tomatoes and bell peppers, oranges from cheese and peppers, browns from seasoned beef, and whites from creamy dressings. It’s Instagram-worthy before Instagram even existed.
Second, the contrast in textures keeps every bite interesting. You get crunch from tortilla chips and fresh veggies, creaminess from sour cream and cheese, chew from the meat, and juiciness from diced tomatoes. Third, it’s incredibly practical for entertaining. You can prepare most components ahead of time and assemble just before serving, minimizing last-minute stress.
Finally, it’s a crowd-pleaser because it appeals to both adults and kids. The flavors are familiar yet exciting, and the interactive nature of scooping through layers makes eating fun.
Why Seven Layers Specifically?
The “seven layer” designation isn’t set in stone—some recipes use five, eight, or even more layers depending on preference. However, seven has become a classic number, mirroring the traditional seven-layer salad. In the taco version, the layers typically include:
- A base of crushed tortilla chips for crunch and structure.
- Seasoned ground beef for hearty protein.
- A creamy layer, often refried beans or a sour cream mixture (though beans are sometimes omitted in lighter versions).
- Fresh chopped lettuce for crispness.
- Diced vegetables like tomatoes, bell peppers, or onions.
- Shredded cheese for richness and melt-in-your-mouth appeal.
- Toppings like diced avocado, more tomatoes, cilantro, or olives for freshness and color.
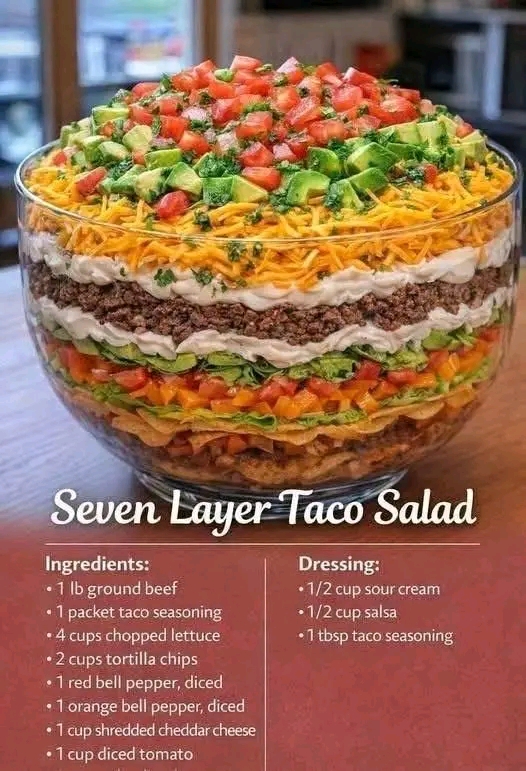
In the recipe featured in the image, the layers appear as follows (from bottom to top, as is traditional for these salads):
- Crushed or whole tortilla chips at the very bottom for a crunchy foundation.
- A layer of seasoned ground beef.
- A creamy white layer (likely a sour cream or ranch-style dressing mixed with taco seasoning).
- More ground beef or a second meat layer? Wait, looking closely, it seems structured as:
- Bottom: Tortilla chips
- Then vegetables (lettuce, diced bell peppers, tomatoes)
- Another chip or similar layer
- Ground beef
- Creamy dressing/sour cream
- Shredded cheddar cheese
- Topped generously with diced tomatoes, avocado, and cilantro
The exact order can vary, but the key is creating distinct, visible bands that hold their shape when scooped.
The beauty of seven layers is balance. Too few, and it feels incomplete; too many, and it becomes messy and hard to eat. Seven strikes the perfect middle ground.
Complete Ingredients List (Serves 8-12 as a Main Dish or 16+ as a Side)
For the Beef Layer:
- 1 lb (450g) ground beef (80/20 or 85/15 lean-to-fat ratio works best for flavor)
- 1 packet (about 1 oz or 28g) taco seasoning mix (or homemade: chili powder, cumin, paprika, garlic powder, onion powder, oregano, salt, pepper, and a pinch of cayenne)
- 1/2 cup water or beef broth (for simmering)
- Optional: 1 small onion, finely diced; 2 cloves garlic, minced
For the Creamy Layers/Dressing:
- 1/2 cup sour cream
- 1/2 cup salsa (mild, medium, or hot depending on preference)
- 1 tablespoon taco seasoning
- Optional: 1/4 cup mayonnaise or ranch dressing for extra creaminess; 1 can (16 oz) refried beans, warmed (for an additional hearty layer)
Fresh Vegetable Layers:
- 4 cups chopped romaine or iceberg lettuce (romaine holds up better)
- 1 red bell pepper, diced
- 1 orange or yellow bell pepper, diced
- 1 cup diced tomatoes (Roma or cherry tomatoes work well; drain excess juice)
- 1-2 avocados, diced (add just before serving to prevent browning)
- 1/2 cup chopped fresh cilantro (or more to taste)
Crunch and Cheese Layers:
- 2 cups tortilla chips, lightly crushed (or whole chips for more dramatic crunch; use sturdy restaurant-style chips)
- 1 cup shredded cheddar cheese (sharp cheddar recommended; Mexican blend also works)
- Optional additions: 1 can black olives, sliced; 1/2 cup diced red onion; jalapeños for heat
Optional Garnishes for the Top Layer:
- Extra diced tomatoes
- Diced avocado
- Chopped green onions
- Fresh cilantro leaves
- Lime wedges for serving
- Hot sauce or additional salsa on the side
For Homemade Taco Seasoning (Makes Enough for This Recipe + Extra):
- 2 tablespoons chili powder
- 1 tablespoon ground cumin
- 1 teaspoon paprika (smoked if available)
- 1 teaspoon garlic powder
- 1 teaspoon onion powder
- 1/2 teaspoon dried oregano
- 1/2 teaspoon salt
- 1/4 teaspoon black pepper
- 1/4 teaspoon cayenne pepper (adjust for spice level)
This homemade version allows you to control sodium and heat levels, which is especially useful if serving to children or those with dietary restrictions.
Step-by-Step Instructions for Assembly
Step 1: Prepare the Seasoned Ground Beef (15-20 minutes)
In a large skillet over medium-high heat, brown the ground beef, breaking it up with a wooden spoon or spatula. If using onions and garlic, add them first and sauté until translucent, about 3-4 minutes, then add the beef.
Once the beef is no longer pink (about 7-8 minutes), drain excess fat if necessary (leave a little for flavor). Sprinkle in the taco seasoning packet (or homemade mix) and stir well. Add 1/2 cup water or broth, bring to a simmer, and cook for 5-7 minutes until the liquid reduces and the mixture thickens slightly. The beef should be flavorful and moist but not soupy.
Set aside to cool slightly. You can prepare this up to 2 days in advance and refrigerate.
Step 2: Prepare the Creamy Dressing (5 minutes)
In a small bowl, mix together 1/2 cup sour cream, 1/2 cup salsa, and 1 tablespoon taco seasoning until smooth. Taste and adjust seasoning. If using refried beans, warm them in a saucepan or microwave and season lightly with taco seasoning or cumin.
This dressing adds tang and binds the layers without making everything soggy.
Step 3: Prep All Fresh Ingredients (10-15 minutes)
- Wash and chop the lettuce into bite-sized pieces. Pat dry if needed to prevent wilting.
- Dice the bell peppers, tomatoes, and onions. For tomatoes, remove seeds and excess pulp to avoid excess moisture.
- Shred the cheese if not using pre-shredded (freshly shredded melts better and has superior flavor).
- Dice the avocado last, right before assembly, and toss with a little lime juice to prevent oxidation.
- Lightly crush the tortilla chips—aim for pieces about the size of a quarter for good crunch without turning to dust.
Step 4: Assemble the Layers in a Clear Glass Bowl
Choose a large, deep, clear glass bowl (trifle bowl or large salad bowl, at least 3-4 quarts capacity) so guests can see the beautiful layers. Start from the bottom:
Layer 1: Tortilla Chips
Spread 2 cups of lightly crushed tortilla chips evenly across the bottom. This creates a crunchy base that absorbs some flavors without getting completely soggy.
Layer 2: Fresh Vegetables (Lettuce and Peppers)
Add a generous layer of chopped lettuce (about half the total). Top with diced red and orange bell peppers for color and sweetness. This provides freshness and crunch.
Layer 3: More Crunch or Beans (Optional)
If using refried beans, spread them here as a hearty, creamy barrier. Otherwise, add another thin layer of tortilla chips or skip to the next.
Layer 4: Seasoned Ground Beef
Spoon half or all of the cooled seasoned beef evenly over the previous layers. Press gently to create an even surface. For a true “seven layer” feel, you can split the beef into two thinner layers with something in between.
Layer 5: Creamy Dressing
Spread the sour cream-salsa mixture evenly over the beef. This acts as a “seal” that helps hold the upper layers and adds moisture.
Layer 6: Cheese
Sprinkle 1 cup of shredded cheddar cheese in an even layer. The cheese adds richness and helps separate the creamy elements from the fresh toppings.
Layer 7: Top Fresh Layer
Finish with the remaining lettuce if any, then pile high with diced tomatoes, diced avocado, chopped cilantro, and any other garnishes like sliced olives or green onions. For maximum visual impact, make the top colorful and abundant—diced red tomatoes and green avocado create a festive look.
Pro tip: When spreading each layer, go all the way to the edges of the bowl to create clean, distinct stripes visible from the sides. Use the back of a spoon or an offset spatula for even distribution without disturbing lower layers.
Total assembly time once ingredients are prepped: 10 minutes.
Variations and Customizations
The Seven Layer Taco Salad is endlessly adaptable. Here are some popular variations:
Vegetarian Version
Replace ground beef with:
- Plant-based ground “meat” crumbles seasoned with taco spices
- Black beans or pinto beans mixed with corn and extra seasoning
- Grilled portobello mushrooms or cauliflower “rice” for a low-carb option
Add an extra layer of refried beans or guacamole for heartiness.
Healthier/Lighter Version
- Use ground turkey or chicken instead of beef
- Opt for low-fat sour cream or Greek yogurt in the dressing
- Increase vegetable layers and reduce cheese and chips
- Use baked tortilla chips or crushed baked corn chips
- Add more greens like spinach or kale (massaged first for tenderness)
Spicy Version
- Add diced jalapeños or serrano peppers to vegetable layers
- Use hot salsa and extra cayenne in the seasoning
- Include a layer of pepper jack cheese
- Top with pickled red onions or sliced fresh chiles
Seafood Twist
For a coastal California-inspired version, replace beef with seasoned shrimp, crab meat, or even canned tuna mixed with taco spices.
Low-Carb/Keto Version
- Omit tortilla chips entirely or use pork rinds crushed as a substitute
- Increase avocado and cheese layers
- Use lettuce wraps or serve in individual lettuce cups instead of one big bowl
Make-Ahead Taco Salad Bar
Instead of layering everything, set up ingredients in separate bowls and let guests build their own. This is perfect for larger parties or picky eaters.
Other creative additions:
- Corn kernels (fresh, frozen/thawed, or canned)
- Quinoa or rice for a heartier base
- Mango or pineapple for sweet contrast
- Different cheeses: cotija, queso fresco, or Monterey Jack
Serving Suggestions and Pairings
Serve the Seven Layer Taco Salad as a main course for casual dinners or as a substantial side at barbecues and potlucks. It pairs beautifully with:
- Grilled meats like carne asada, chicken fajitas, or fish tacos
- Classic sides: Mexican rice, refried beans, elote (street corn), or guacamole with chips
- Beverages: Margaritas, Mexican beers (Corona, Modelo), horchata, or fresh limeade
- Desserts: Churros, flan, or tres leches cake to complete the Mexican theme
For portioning, use a large serving spoon to scoop deep, ensuring each serving gets a bit of every layer. Warn guests that the salad is best eaten with a fork, as it can be messy.
Presentation tips:
- Chill the bowl slightly before assembly for a refreshing contrast
- Garnish the entire top with lime wedges around the edge
- Place the bowl on a colorful platter with extra chips and salsa on the side
- For individual servings, use clear mason jars or small trifle glasses—adorable for parties
Storage and Make-Ahead Tips
The Seven Layer Taco Salad is best assembled and served the same day because the chips will soften over time and avocado will brown. However, you can prepare components in advance:
- Cook and season the beef: Up to 3 days ahead, store in an airtight container in the refrigerator.
- Chop vegetables (except avocado and tomatoes): 1-2 days ahead, store in separate containers with paper towels to absorb moisture.
- Prepare dressing: Up to 3 days ahead.
- Shred cheese: 1-2 days ahead.
To store leftovers:
- Cover tightly with plastic wrap or transfer to an airtight container.
- Refrigerate for up to 2 days. The lower layers (chips and beef) will soften but remain tasty, similar to leftover nachos.
- For best quality, eat within 24 hours.
- Do not freeze—this salad does not freeze well due to the fresh vegetables and dairy.
Tip for reviving leftovers: Add fresh crushed chips and diced avocado on top before serving again.
Nutritional Information (Approximate, Per Serving)
Serving size: About 1.5-2 cups (assuming 10 servings total)
- Calories: 380-450
- Protein: 18-22g (from beef and cheese)
- Carbohydrates: 25-35g (from chips and veggies)
- Fat: 22-28g (from beef, cheese, avocado, sour cream)
- Fiber: 5-7g (thanks to vegetables and avocado)
- Sodium: 800-1200mg (depending on seasoning and chips—use low-sodium options to reduce)
This makes it a balanced meal with protein, healthy fats, and vegetables. To lighten further, increase veggies and decrease chips/cheese.
Note: Exact values vary based on specific brands and customizations. Use a nutrition calculator for precise tracking if needed.
Common Mistakes and Troubleshooting
Even simple layered salads can go wrong. Here are fixes for common issues:
Problem: Soggy chips
Solution: Use sturdy chips and assemble no more than 1-2 hours before serving. Crush lightly rather than into fine crumbs.
Problem: Watery salad
Solution: Drain tomatoes well, pat lettuce dry, and avoid overusing wet ingredients like salsa in lower layers.
Problem: Layers sliding or mixing
Solution: Press each layer gently and use the creamy dressing as a “glue” in the middle. Chill the bowl for 15-30 minutes after assembly if time allows.
Problem: Bland flavors
Solution: Taste and adjust seasoning in the beef and dressing. Fresh lime juice, extra cilantro, and good-quality cheese make a big difference.
Problem: Too spicy for some guests
Solution: Offer mild versions and provide hot sauce or jalapeños on the side for those who want heat.
Problem: Bowl too small
Solution: Use a very large bowl or make two smaller ones. Overcrowding leads to messy layers.
Frequently Asked Questions
Can I make this gluten-free?
Yes! Most tortilla chips are gluten-free (check labels), and taco seasoning packets often are too, or use homemade. Ensure sour cream and salsa have no hidden gluten.
Is it possible to make this dairy-free?
Absolutely. Use dairy-free sour cream (cashew-based or coconut), skip cheese or use vegan shreds, and ensure seasoning is dairy-free.
How far in advance can I assemble it?
For best texture, assemble 30-60 minutes before serving and refrigerate. Components can be prepped days ahead.
What if I don’t have a clear bowl?
Any large bowl works, though you lose the visual layered effect. A glass trifle bowl really elevates the presentation.
Can kids help make this?
Yes! Older kids can help chop (with supervision), layer ingredients, and mix the dressing. It’s a fun family activity.
What other proteins work well?
Ground turkey, chicken, chorizo, shredded rotisserie chicken, or even leftover taco meat from previous meals.
Conclusion: Make This Seven Layer Taco Salad Your New Go-To Dish
The Seven Layer Taco Salad is more than just food—it’s an experience. It’s colorful, flavorful, texturally exciting, and brings people together around the table. With its simple ingredients, straightforward preparation, and impressive presentation, it’s the perfect recipe for both novice cooks and seasoned entertainers.
Whether you stick to the classic version with ground beef, tortilla chips, and cheddar or experiment with vegetarian, spicy, or low-carb variations, this dish is sure to become a favorite in your recipe rotation. The combination of familiar taco flavors in a fresh salad format makes it versatile enough for everyday meals yet special enough for celebrations.
Next time you’re planning a gathering or simply want to elevate taco night, skip the individual tacos and go for this stunning layered masterpiece. Your family and friends will be impressed by the beautiful presentation, and you’ll love how easy it is to put together once you have the components ready.
Gather your ingredients, clear a spot in your refrigerator for prep, and get ready to create something delicious. Don’t forget to squeeze fresh lime over individual servings for that bright, zesty finish that ties everything together perfectly.
Buen provecho! Enjoy your Seven Layer Taco Salad, and may your layers always stay distinct, your flavors bold, and your gatherings filled with laughter and great food.