How to Clean Gas Stove Burner Caps Naturally: A Simple Method for Removing Grease, Burnt Food, and Stubborn Residue
A gas stove works hard every day, and the burner caps are among the parts that collect the most grease, food splashes, soot, and burnt-on residue. Over time, these deposits can make burner caps look dull and dirty, clog the small openings around the burner, and sometimes cause an uneven flame.
The good news is that you do not always need expensive specialty cleaners to give removable burner caps a thorough cleaning. A simple household cleaning routine using warm water, baking soda, a soft brush, and a little dish soap can help loosen many common kitchen residues.
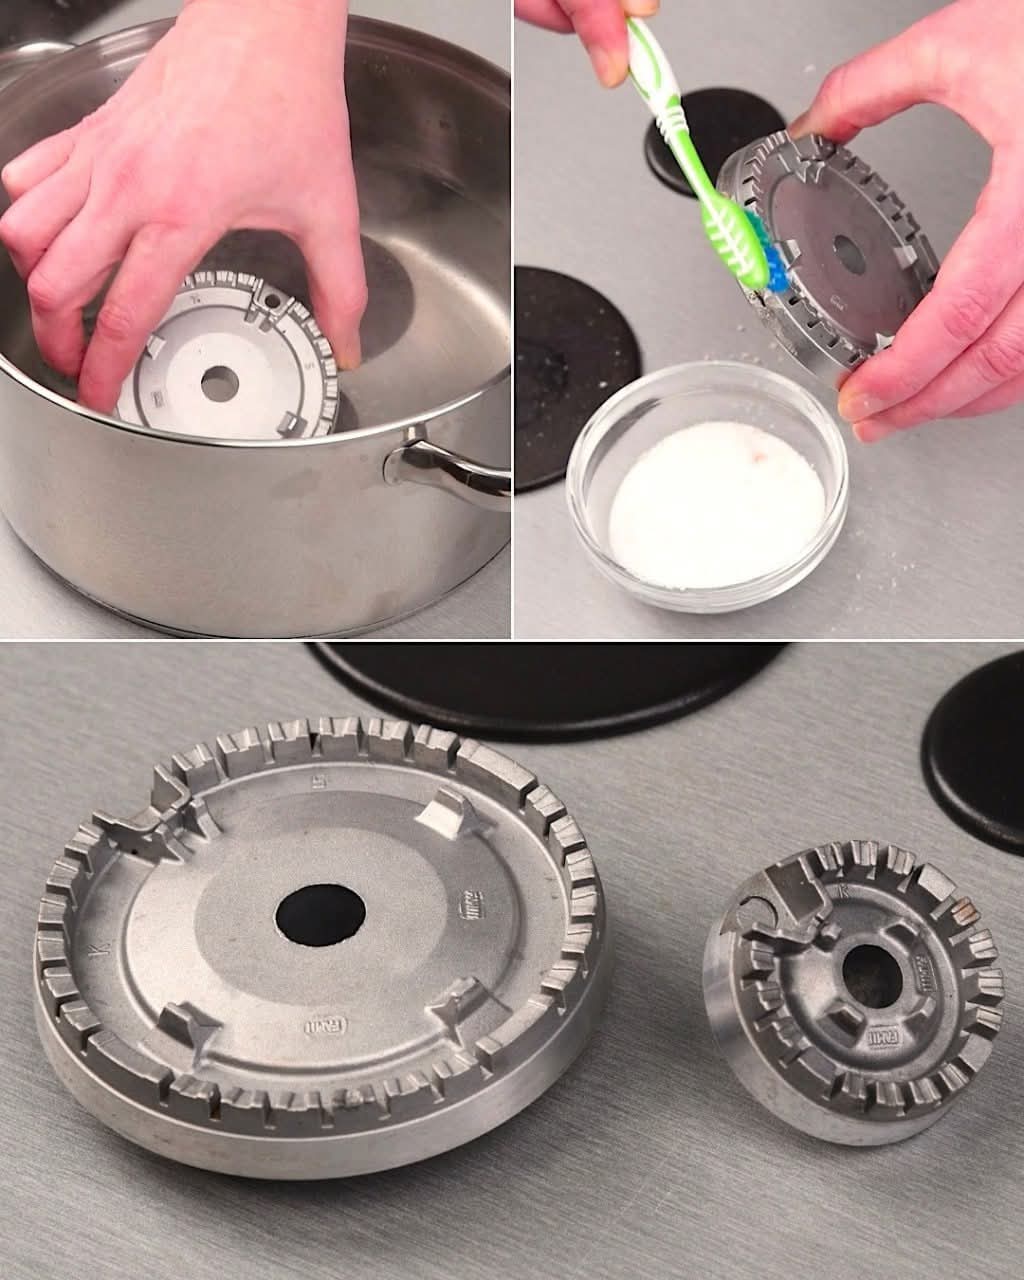
The image accompanying this article shows a practical cleaning approach: removable gas burner components are taken off the stove, placed in a container, and cleaned with a toothbrush and a white cleaning mixture. The key idea is simple—remove the parts safely, loosen the residue, gently scrub, rinse thoroughly, and allow everything to dry completely before reinstalling it.
This guide explains the method in detail, including what you need, how to clean the burner caps, what mistakes to avoid, and how to keep your gas stove cleaner for longer.
Why Gas Stove Burner Caps Get So Dirty
Burner caps are exposed to almost everything that happens on the stovetop.
When cooking, tiny droplets of oil can travel through the air and settle on the burner. Sauces can boil over, milk can spill, pasta water can splash, and food particles can fall onto the cooking surface.
When the stove is hot, these substances can bake onto the metal.
A small amount of grease may initially be easy to wipe away. However, if it is left for several cooking sessions, heat can transform it into a harder, sticky layer that becomes much more difficult to remove.
Repeated heating can create several types of residue:
- Grease and cooking oil
- Burnt food particles
- Sauce and seasoning deposits
- Starch from pasta or rice water
- Soot and combustion residue
- Mineral deposits from water
- Sticky film from everyday cooking
This is why wiping the visible stovetop surface is not always enough. The removable burner components also deserve regular attention.
What You Need for This Cleaning Method
One advantage of this approach is that the supplies are inexpensive and commonly available.
Basic supplies
- Baking soda
- Warm water
- A small amount of dishwashing liquid
- An old soft toothbrush or small cleaning brush
- A bowl or container
- A soft sponge or microfiber cloth
- An old towel or clean kitchen towel
For particularly greasy parts, a little more dish soap can be useful.
You may also use a wooden toothpick for carefully removing loose debris from appropriate openings, but never force anything into a burner opening or use a sharp metal object that could damage the component.
Before You Start: Safety First
Cleaning a gas stove requires more care than cleaning an ordinary countertop.
Before touching the burner components, make sure the stove is completely switched off and cool.
Never attempt to clean burner parts immediately after cooking.
Follow these basic precautions:
- Turn off every burner.
- Make sure there is no flame.
- If your appliance instructions recommend shutting off the gas supply for cleaning, follow those instructions.
- Allow all components to cool completely.
- Remove the burner caps gently.
- Keep electrical ignition components away from excessive water.
- Never reinstall wet burner parts.
- Make sure everything is correctly positioned before using the stove again.
If your stove has removable grates, burner caps, rings, or other components, check the manufacturer’s instructions before soaking them. Different appliances use different materials and designs.
Step 1: Remove the Burner Caps Carefully
The first important step is removing the removable burner components.
Most burner caps simply lift away, but the exact construction differs from one stove to another.
Do not force a component if it appears stuck.
If grease has accumulated around the edges, gently wiggle the part rather than pulling aggressively.
Once removed, place the burner caps on a towel or in a bowl.
It can be helpful to take a quick photograph of the burner arrangement before removing multiple components. This makes it easier to remember where each part belongs.
Some burners are different sizes, and installing the wrong cap in the wrong location can affect how the burner sits.
Step 2: Prepare a Simple Cleaning Solution
The white mixture shown in the image can be recreated as a simple baking-soda cleaning paste or slurry.
Baking soda is commonly used for household cleaning because its mild abrasive quality can help loosen surface residue without being as harsh as many heavy-duty abrasive products.
To prepare a basic mixture, combine:
- 2–3 tablespoons of baking soda
- Enough warm water to create a thick paste
- A small amount of dish soap
The mixture should be thick enough to cling to the dirty surface.
You do not need a huge amount.
For light cleaning, you can also make a thinner solution by mixing baking soda with warm water and a small amount of dish soap.
Step 3: Soak or Pre-Soak the Removable Parts
For greasy burner caps, soaking can make the entire job easier.
Place the removable parts in a bowl or suitable container and cover them with warm water.
Add a small amount of dish soap.
Allow them to sit for approximately 15–30 minutes, depending on how dirty they are.
The goal is not to magically dissolve everything. Instead, soaking helps soften dried food and loosen greasy deposits so that less scrubbing is required.
For heavy buildup, you may need to repeat the process.
Important:
Do not assume every burner component should be soaked.
Some stove manufacturers specify that certain parts should not be submerged. Always follow your appliance’s care instructions when they differ from a general cleaning method.
Also, avoid soaking the ignition electrode or electrical components.
Step 4: Apply Baking Soda to Stubborn Areas
After soaking, remove one burner cap at a time.
Sprinkle a small amount of baking soda over stubborn areas or apply your baking-soda paste directly.
Allow it to sit for several minutes.
This gives the mixture time to work against the residue.
There is no need to leave it for hours. A short contact period followed by gentle brushing is usually a better approach.
If the residue is extremely hard, repeat the process instead of aggressively scraping the surface.
Step 5: Scrub With a Soft Toothbrush
This is one of the most useful parts of the method shown in the photograph.
An old toothbrush is small enough to reach around the edges and into detailed areas of a burner component.
Apply the baking-soda mixture to the brush and gently work around the burner cap.
Use small circular movements.
Concentrate on:
- Greasy areas
- Burnt-on food
- The outer rim
- Recessed areas
- Areas around the flame openings
- Underside surfaces where residue has collected
Avoid aggressive force.
The objective is to loosen the residue rather than scratch the metal.
A soft brush is particularly useful because it provides mechanical cleaning while remaining relatively gentle.
Why a Toothbrush Works So Well
A kitchen sponge is excellent for flat surfaces, but burner components often contain grooves, ridges, edges, and small spaces.
A toothbrush can reach these areas much more effectively.
The bristles can move into narrow spaces and loosen deposits that a large sponge might simply slide over.
This is also a good way to recycle an old toothbrush that is no longer suitable for dental use.
Of course, clearly label it as a cleaning brush and keep it separate from personal hygiene items.
Step 6: Pay Attention to the Burner Openings
One of the most important areas of a gas burner is the region where the flame exits.
Food particles and grease can accumulate around the openings.
A dirty burner may sometimes produce an irregular flame, delayed ignition, or areas where the flame appears weaker.
However, cleaning these openings requires care.
Do not aggressively poke the holes with needles, knives, metal picks, or other sharp objects.
You could damage the burner component or alter the openings.
Instead, use the cleaning method recommended by your stove manufacturer. If the openings are visibly blocked and normal cleaning does not resolve the problem, consult the appliance manual or a qualified technician.
Step 7: Rinse Thoroughly
Once the residue has been removed, rinse the removable parts thoroughly with clean water.
This step is extremely important.
You do not want baking soda, dish soap, loosened food residue, or other cleaning material left behind.
Rinse until the water runs clear and there is no obvious slippery soap film.
For parts that should not be submerged, use a damp cloth according to the manufacturer’s cleaning instructions rather than immersing them.
Step 8: Dry Completely
Never rush this step.
Place the cleaned burner caps on a clean, dry towel.
Allow them to air-dry completely.
You can gently wipe them with a clean towel to speed up the process, but make sure moisture has disappeared from grooves and recessed areas.
Gas burner components should be completely dry before being put back into position.
Residual water can interfere with ignition and can contribute to uneven operation immediately after cleaning.
Step 9: Clean the Area Under the Burner
While the removable components are drying, take the opportunity to clean the stove surface beneath them.
This is where many people stop too early.
Removing the visible burner cap may reveal a surprising amount of grease and food debris underneath.
Use a soft cloth or sponge with warm water and a small amount of dish soap.
Wipe away loose residue.
For stubborn areas, a small amount of baking-soda paste can be used on suitable surfaces, but avoid applying abrasive products indiscriminately.
Be especially careful around ignition components and other parts that should not become saturated with water.
Step 10: Reassemble Everything Correctly
Once every removable part is clean and completely dry, put the stove back together.
Each burner component should sit properly in its designated position.
The burner cap should be level rather than tilted.
If a cap is not sitting correctly, remove it and check whether food debris, moisture, or an incorrectly positioned component is preventing it from sitting properly.
Do not force anything into place.
Correct assembly is important for proper burner operation.
What About Baking Soda and Vinegar?
Many homemade cleaning recipes recommend combining baking soda and vinegar.
Although the fizz can look impressive, the reaction is primarily an acid-base reaction. Mixing the two immediately reduces the individual cleaning properties of each ingredient.
For greasy burner components, you often do not need the dramatic fizz.
A simple baking-soda paste with water and a little dish soap can be more practical for gentle scrubbing.
If you choose to use vinegar elsewhere on the stove, follow the appliance manufacturer’s recommendations and never mix cleaning chemicals indiscriminately.
In particular, never mix bleach with vinegar, ammonia, or other household cleaners, because dangerous gases can be produced.
Can Baking Soda Remove Burnt-On Grease?
Baking soda can help loosen and remove many common kitchen residues, especially when combined with warm water, soaking, and gentle mechanical scrubbing.
However, it is important not to exaggerate what it can do.
Extremely old carbonized deposits may not disappear after one treatment.
Sometimes the best strategy is:
soak → apply cleaner → wait → brush → rinse → repeat.
Repeated gentle cleaning is generally preferable to using excessive force.
What You Should Avoid When Cleaning Burner Caps
A clean stove is desirable, but the wrong cleaning method can cause damage.
Avoid steel wool unless specifically approved
Steel wool and harsh scouring pads can scratch certain finishes.
Avoid sharp metal tools
Knives, needles, and metal picks can damage burner openings and surfaces.
Avoid excessive water near ignition components
Water and electrical components are not a good combination.
Avoid reinstalling wet parts
Allow everything to dry thoroughly.
Avoid unknown chemical mixtures
Combining household cleaners can produce harmful reactions.
Avoid forcing stuck parts
If something does not come off easily, check the manual rather than applying excessive force.
Avoid using abrasive products on delicate finishes
Some stove surfaces can be scratched or discolored.
How Often Should You Clean Gas Burner Caps?
The ideal frequency depends on how often you cook and how much spills occur.
For a busy household, a quick wipe after cooking can prevent buildup from becoming severe.
A deeper cleaning can be performed every few weeks or whenever the burner caps visibly become greasy.
If you frequently cook foods that splatter oil or boil over, you may need to clean them more often.
A useful routine is:
After everyday cooking
Wipe the cooled stovetop surface.
Weekly
Inspect burner areas for grease and food particles.
Every few weeks
Remove and clean suitable removable burner components.
After a major spill
Clean the affected area as soon as the stove is completely cool.
Regular light maintenance is much easier than trying to remove months of accumulated residue.
Signs That Your Burner Needs Attention
A dirty burner does not always look dramatically different.
Pay attention to changes in operation.
Possible signs include:
- Uneven flame distribution
- Weak flame in certain areas
- Difficulty igniting
- Clicking that continues longer than usual
- Visible food or grease around the burner
- Soot appearing on cookware
- Unusual burner appearance
- Burner caps that no longer sit correctly
These symptoms do not necessarily mean dirt is the cause.
Gas appliances can develop mechanical or combustion problems that require professional attention.
If you notice unusual gas smells, persistent ignition problems, abnormal flames, or other concerning behavior, stop using the appliance and follow the manufacturer’s safety instructions.
What a Healthy Gas Flame Usually Looks Like
A properly operating gas burner generally produces a stable flame appropriate to the appliance’s design.
The exact appearance varies by gas type and appliance.
If the flame suddenly changes substantially, do not automatically assume that cleaning alone will solve the problem.
Persistent yellow or irregular flames, unusual odors, soot, or other abnormalities should be taken seriously.
The appliance manual is the best starting point, and professional service may be necessary.
Cleaning is maintenance—not a substitute for repairing a faulty gas appliance.
A Simple Cleaning Routine for Busy Kitchens
If you do not have time for a long cleaning session, use this quick routine.
First, wait until the stove is cool.
Remove the burner caps that are designed to be removable.
Place them in warm soapy water if the manufacturer’s instructions permit soaking.
While they soak, wipe the surrounding stove surface.
Then apply a small amount of baking-soda paste to stubborn areas.
Use an old toothbrush to gently scrub.
Rinse thoroughly.
Dry completely.
Finally, reinstall the parts carefully.
This process can often be completed without expensive products.
How to Prevent Burner Caps From Becoming Extremely Dirty
Prevention is easier than restoration.
One of the simplest habits is cleaning spills as soon as practical after cooking—but only once the surface has cooled enough to clean safely.
When food spills onto a hot burner, it can quickly become baked-on residue.
Using appropriately sized cookware can also reduce splashing.
Do not fill pots excessively, particularly when cooking foods that foam or expand.
When frying, use lids or splatter guards when appropriate.
These simple habits can significantly reduce the amount of grease reaching the burner.
Why Regular Cleaning Matters
Cleaning burner components is not only about appearance.
A well-maintained stove is easier to inspect.
When surfaces are covered in thick grease and food residue, it becomes harder to notice changes in burner condition.
Regular cleaning also prevents old residue from repeatedly heating and accumulating.
Most importantly, keeping the appliance maintained according to the manufacturer’s instructions helps you notice potential problems earlier.
However, cleaning should always be considered part of routine maintenance rather than a guarantee of improved fuel efficiency or perfect combustion.
Can You Use Lemon?
Lemon is popular in natural cleaning routines because of its pleasant smell and acidic nature.
However, there is no need to add lemon to every cleaning mixture.
For ordinary greasy burner caps, dish soap, warm water, and baking soda can be enough.
If you use lemon or another acidic ingredient, avoid mixing it with incompatible household chemicals.
Simple cleaning methods are often safer because there are fewer ingredients to manage.
Can You Use Dish Soap Alone?
Absolutely.
For fresh grease, dish soap and warm water may be all you need.
In fact, it is often better to start with the mildest effective cleaning method.
Use baking soda when additional help is needed for stuck-on residue.
A good cleaning philosophy is:
Start gentle and increase the effort gradually.
There is rarely a reason to begin with the strongest chemical or most abrasive tool.
A Natural-Looking Cleaning Method Without Expensive Products
The method represented in the image is appealing because it uses simple household materials.
A basic process looks like this:
- Cool the stove completely.
- Remove appropriate burner caps.
- Soak them in warm soapy water if permitted.
- Make a paste from baking soda and water.
- Apply it to stubborn residue.
- Gently scrub with an old toothbrush.
- Rinse thoroughly.
- Dry completely.
- Clean the surrounding stove surface.
- Reinstall each burner component correctly.
This method is inexpensive and straightforward.
It is also easy to repeat whenever the burner caps begin to look dirty.
Frequently Asked Questions
Can I soak all gas stove burner parts?
Not necessarily.
Different appliances use different materials and designs. Some removable metal parts may tolerate soaking, while other components should not be submerged.
Always check your stove’s manufacturer’s instructions.
Can I use baking soda on my burner caps?
Baking soda can be useful for cleaning many metal surfaces, but compatibility depends on the material and finish. Use it gently and avoid aggressive scrubbing.
Can I clean burner openings with a toothpick?
Do not assume that inserting objects into burner openings is safe. Follow the manufacturer’s instructions for clearing blocked ports.
Why does my burner still have an uneven flame after cleaning?
The cause may be something other than surface dirt. Incorrect assembly, blocked burner ports, gas supply issues, ignition problems, or other appliance faults may be involved.
If the problem persists, consult the appliance manual or a qualified professional.
How long should burner caps dry?
There is no universal time because drying depends on the material, temperature, humidity, and design. The important point is that they should be completely dry before reinstallation.
Is vinegar necessary?
No. Vinegar is optional for many household cleaning tasks. Baking soda, warm water, and dish soap may be sufficient for routine burner cleaning.
The Biggest Mistake: Waiting Until the Burner Is Covered in Grease
One of the easiest ways to make stove cleaning difficult is to postpone it indefinitely.
A small amount of grease is easy to remove.
A thick, repeatedly heated layer is much harder.
That is why frequent light cleaning is so valuable.
Instead of spending an hour trying to remove old residue, spend a few minutes periodically wiping the stove and checking the burner components.
The difference can be significant.
Final Thoughts
The gas burner caps shown in the image may look heavily soiled, but removable burner components can often be refreshed with a simple and methodical cleaning routine.
The most useful combination is not a mysterious miracle ingredient. It is proper disassembly, warm water, dish soap, baking soda when appropriate, gentle brushing, thorough rinsing, and complete drying.
An old toothbrush is particularly convenient because its small bristles can reach grooves and detailed areas that are difficult to clean with a regular sponge.
The most important part of the process, however, is safety.
Always work on a completely cool stove, avoid unnecessary water around ignition and electrical components, never use sharp tools to attack burner openings, and follow the instructions supplied with your particular appliance.
If a burner continues to behave unusually after cleaning, do not keep experimenting with household remedies. Gas appliances involve combustion and should be inspected professionally when there is a persistent operational problem.
A clean stove does not have to require expensive products or complicated procedures. With a little regular maintenance and the right technique, you can keep removable burner components looking cleaner and make routine kitchen cleaning much easier.
Remember: clean gently, rinse thoroughly, dry completely, and always put safety before appearance.
Quick Cleaning Checklist
- Turn off the stove completely.
- Wait until all parts are cool.
- Remove only the components designed to be removed.
- Check the manufacturer’s cleaning instructions.
- Soak suitable parts in warm soapy water.
- Apply baking-soda paste to stubborn residue.
- Gently scrub with a soft toothbrush.
- Do not use sharp metal objects in burner openings.
- Rinse removable parts thoroughly.
- Dry every component completely.
- Clean the surrounding stovetop carefully.
- Reinstall each part in its correct position.
- Check that burner caps sit level.
- If the flame remains abnormal, seek professional advice.
A few minutes of regular attention can make a big difference. Instead of allowing grease and burnt food to accumulate for months, make burner cleaning part of your normal kitchen routine. Your stove will be easier to maintain, easier to inspect, and much more pleasant to use.