How to Deep Clean a Dirty Mop Naturally: The Lemon and Baking Soda Method for a Fresher, Cleaner Mop
A clean home starts with clean tools, and one of the most overlooked cleaning tools in the house is the humble mop. We use mops to remove dirt, dust, food spills, footprints, grease, and countless other messes from our floors. But after repeated use, the mop itself can become surprisingly dirty.
A mop head can hold onto grime, unpleasant odors, grease, detergent residue, and microorganisms. If it is repeatedly used without being properly washed and dried, it may eventually spread dirt around the home instead of removing it.
The good news is that you do not always need expensive specialty products to give a washable mop head a thorough refresh. Simple household ingredients such as baking soda, lemon, warm water, and regular laundry detergent can be used as part of a practical cleaning routine.
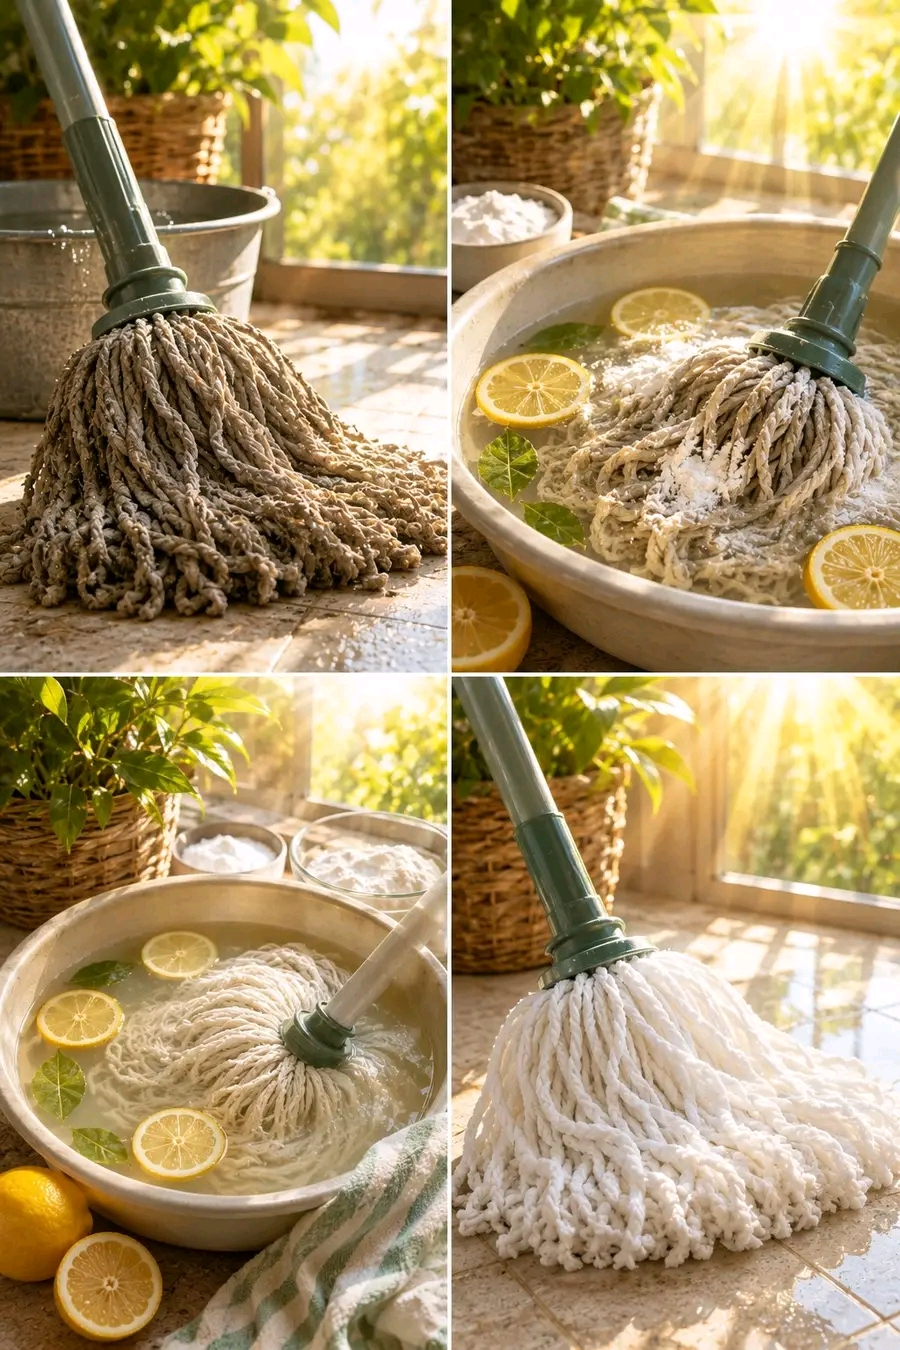
The method shown in the image is especially useful as a visual reminder that cleaning the cleaning tool matters too. A mop can be soaked, scrubbed, rinsed, and dried properly so that it is ready for the next floor-cleaning session.
In this detailed guide, you will learn how to clean a dirty mop, remove stubborn residue and odors, whiten a light-colored mop head, maintain it between uses, and avoid common mistakes that can cause mop heads to deteriorate.
Why Cleaning Your Mop Matters
When you mop the floor, the mop head collects whatever is on that floor.
Dust, crumbs, mud, grease, hair, food particles, and cleaning-product residue can become trapped between the fibers. If the mop is then stored while damp, it can develop an unpleasant smell.
This creates a simple cycle:
Dirty floor → dirty mop → inadequate rinsing → damp storage → unpleasant mop → dirty floor.
Breaking this cycle requires cleaning the mop itself.
A properly maintained mop should be rinsed after use, washed regularly, thoroughly dried, and replaced when the fibers are permanently damaged or heavily worn.
Cleaning your mop is particularly important when it has been used in kitchens, bathrooms, entryways, or areas where there is a lot of grease and dirt.
The Lemon and Baking Soda Mop-Cleaning Method
This method combines several simple steps rather than relying on one ingredient to do everything.
Ingredients
- 1 large bucket or basin
- Warm water
- 2–4 tablespoons baking soda
- 1–2 lemons
- A small amount of regular laundry detergent
- Clean water for rinsing
- Rubber gloves, if desired
- A clean brush, optional
- A clean towel, optional
The exact amount of water and ingredients does not have to be perfect. The goal is to create enough warm cleaning solution to completely cover the washable mop head.
What Does Baking Soda Do?
Baking soda, also called sodium bicarbonate, is a mild alkaline household ingredient commonly used for cleaning and deodorizing.
When used on a washable mop, it can help loosen some residues and reduce unpleasant odors.
It is not a magical disinfectant, however. Baking soda should be viewed as a cleaning and deodorizing ingredient rather than a substitute for an appropriate disinfectant when disinfection is specifically required.
One of its biggest advantages is simplicity.
A small amount can be added to warm water to create a soaking solution that helps refresh a mop head before washing and rinsing.
What Does Lemon Do?
Fresh lemon is commonly used in household cleaning because of its pleasant citrus scent and acidic nature.
Lemon juice can help with some mineral deposits and certain residues, while the fresh scent can make a cleaning solution smell more pleasant.
However, lemon juice should not be treated as a guaranteed disinfectant. If your goal is to disinfect a surface or cleaning tool, use a product specifically labeled for that purpose and follow its instructions.
For routine deodorizing and refreshing, lemon can be a useful addition to a mop-cleaning routine.
Step-by-Step Guide to Cleaning Your Mop
Step 1: Remove Loose Dirt
Before soaking the mop, remove as much loose dirt as possible.
Take the mop outdoors if practical and shake it gently. You can also rinse it under running water.
Remove:
- Hair
- Threads
- Large pieces of dirt
- Food particles
- Leaves
- Sand
- Dust
- Other visible debris
This prevents the soaking water from becoming unnecessarily dirty.
Step 2: Prepare the Basin
Fill a large bucket or basin with warm water.
The water should be comfortably hot but not so hot that it can damage the mop fibers or burn your hands.
If the mop manufacturer’s instructions specify a maximum water temperature, follow those instructions.
Add approximately 2–4 tablespoons of baking soda.
Stir the water until the baking soda is mostly dispersed.
Step 3: Add Lemon
Squeeze the juice of one or two lemons into the water.
You can also add a few lemon slices for a fresh appearance and aroma, as shown in the image.
There is no need to use a large quantity of lemon juice.
The purpose is to complement the cleaning process rather than create a highly concentrated acidic solution.
Step 4: Add a Small Amount of Detergent
For a washable microfiber or cotton mop head, add a small amount of ordinary laundry detergent.
Do not use excessive detergent.
Too much detergent can leave residue behind, which may make the mop feel sticky or attract additional dirt.
A small amount is generally enough for a soaking step.
Step 5: Soak the Mop
Place the mop head into the solution and make sure the fibers are completely wet.
Allow it to soak for approximately 20–30 minutes.
For a heavily soiled mop, you can extend the soaking time, but always consider the manufacturer’s care instructions.
Do not automatically leave every mop soaking overnight. Some mop heads contain materials, adhesives, metal components, or construction methods that may not tolerate prolonged soaking.
Step 6: Agitate the Mop
After soaking, gently work the mop fibers with your hands while wearing gloves.
You can also use a soft cleaning brush to work through areas with visible buildup.
Pay special attention to the ends of the fibers, where dirt can become trapped.
You may notice the water becoming cloudy or gray.
That is a sign that dirt and residue are being released from the mop.
Do not be tempted to use excessive force. Aggressive scrubbing can damage microfiber or cause cotton fibers to break apart.
Step 7: Rinse Thoroughly
Drain the dirty water and rinse the mop several times using clean water.
This is one of the most important parts of the entire process.
A mop is not truly clean if it still contains detergent, loosened dirt, baking soda, or other residue.
Continue rinsing until the water coming from the mop is relatively clear and there is little or no visible foam.
If possible, rinse under running water.
Step 8: Wring Out Excess Water
Remove as much excess water as possible.
If your mop has a wringer mechanism, use it according to the manufacturer’s instructions.
Avoid twisting delicate microfiber mop heads aggressively.
Excessive twisting can damage fibers and reduce the mop’s effectiveness.
The goal is to remove excess moisture while keeping the mop head intact.
Step 9: Dry the Mop Completely
This is arguably the most important maintenance step.
Hang the mop in a well-ventilated area where air can circulate freely around the fibers.
Sunlight can also be useful for drying washable household textiles, although prolonged intense sunlight may fade or degrade some materials.
Never store a mop while it is still wet in a closed bucket, cupboard, or poorly ventilated room.
A damp mop is much more likely to develop unpleasant odors.
Why a Mop Can Smell Bad
A bad-smelling mop does not necessarily mean that the mop is permanently ruined.
Odors can develop when organic debris, detergent residue, moisture, and microorganisms remain trapped in the mop fibers.
If the mop is rinsed poorly and stored wet, the problem can become worse.
Common causes include:
1. Insufficient rinsing
Soap and dirt remain trapped in the fibers.
2. Poor drying
The mop stays damp for hours.
3. Cleaning greasy floors
Kitchen grease can accumulate in the mop head.
4. Too much detergent
Excess detergent can leave a residue that attracts more dirt.
5. Old mop fibers
A mop that has been used for a very long time may simply need replacement.
6. Closed storage
Putting a damp mop inside a bucket or cabinet prevents proper ventilation.
How to Remove Grease From a Mop
Kitchen floors can be especially challenging because cooking oils and grease can accumulate on the mop.
For a washable mop head, start by rinsing away loose debris.
Then soak it in warm water with a small amount of laundry detergent or an appropriate dishwashing detergent, depending on the mop manufacturer’s recommendations.
Work the fibers gently.
Rinse thoroughly.
If necessary, repeat the process.
Baking soda can be incorporated into the cleaning routine for deodorizing and helping loosen some residues, but detergent is generally more useful for breaking up oily grime.
How to Whiten a White Mop Head
A white mop head can become gray or yellow over time.
This does not necessarily mean it is impossible to clean. However, discoloration can sometimes become permanent because fibers gradually wear and absorb pigments.
For washable white cotton mop heads, you can begin with warm water, detergent, and baking soda.
Soak the mop, gently agitate it, and rinse thoroughly.
If the manufacturer permits oxygen-based laundry bleach, that can be another option for appropriate washable white fabrics.
Always read the care label first.
Do not assume that every white mop can safely be treated with bleach.
Important Safety Warning About Cleaning Ingredients
One common mistake when creating homemade cleaning solutions is mixing multiple chemicals without understanding their reactions.
Never mix chlorine bleach with lemon juice, vinegar, ammonia, or other acidic cleaning ingredients.
Potentially dangerous gases can be produced.
If you want to use bleach, use it separately and exactly according to the product label.
For a simple homemade routine, there is no need to combine bleach with lemon or other acids.
Safety should always come before trying to make a cleaning solution “stronger.”
Can You Use Vinegar Instead of Lemon?
Yes, vinegar is another common household cleaning ingredient, but it should be used thoughtfully.
For routine cleaning, diluted white vinegar can help with certain mineral deposits and odors.
However, vinegar should not be mixed with chlorine bleach.
It is also not suitable for every floor type, and acidic cleaners can damage some natural stone surfaces such as marble and limestone.
When cleaning the mop itself, check the manufacturer’s recommendations and avoid assuming that a natural ingredient is automatically safe for every material.
Can Baking Soda and Lemon Be Used Together?
They can be used as part of the same overall cleaning routine, but there is an important detail.
Baking soda is alkaline, while lemon juice is acidic. When they come into direct contact, they react and produce fizzing.
That dramatic bubbling may look powerful, but the reaction also neutralizes much of the acid and alkaline properties.
For practical cleaning, it can make more sense to use them thoughtfully rather than assuming that more fizz means better cleaning.
For example, you can use a baking-soda-based soaking solution and then use lemon separately as part of a rinse or deodorizing step, provided the mop material allows it.
How Often Should You Clean Your Mop?
The ideal frequency depends on how often you use it.
After every use
- Remove visible debris.
- Rinse the mop thoroughly.
- Wring out excess water.
- Hang it to dry.
Weekly
If the mop is used frequently, give it a deeper wash.
After particularly dirty jobs
Clean it immediately after mopping:
- Mud
- Heavy kitchen grease
- Pet messes
- Bathroom floors
- Outdoor areas
- Spills involving food
Replace when necessary
If the mop remains stained, smells bad despite thorough cleaning, has damaged fibers, or no longer cleans effectively, replacement may be the better option.
The Best Way to Store a Mop
Correct storage is just as important as washing.
After cleaning, hang the mop so the head can dry completely.
Avoid leaving it:
- In a bucket of dirty water
- In a closed plastic bag
- In a sealed cupboard while wet
- On a damp floor
- Compressed tightly inside a container
Air circulation is your friend.
A simple wall hook can make a big difference.
Common Mop-Cleaning Mistakes
Mistake 1: Leaving the Mop in Dirty Water
This is one of the worst habits.
Once you finish mopping, the dirty water contains everything you have removed from the floor.
Leaving the mop sitting in that water gives dirt and residue more time to remain in the fibers.
Mistake 2: Using Too Much Soap
More detergent does not automatically mean a cleaner mop.
Excess detergent can be difficult to rinse away and may leave a film.
Use an appropriate amount.
Mistake 3: Not Rinsing Enough
A mop should be thoroughly rinsed after washing.
If you can still see lots of foam or feel a slippery detergent residue, keep rinsing.
Mistake 4: Storing It Wet
Even a beautifully washed mop can smell bad if it is stored wet.
Always prioritize complete drying.
Mistake 5: Using Harsh Chemicals on Every Mop
Different mop heads are made from different materials.
Microfiber, cotton, sponge, synthetic fibers, and mixed materials may have different care requirements.
Read the manufacturer’s instructions whenever available.
Microfiber Mop vs. Cotton Mop
Not all mop heads should be treated exactly the same way.
Microfiber Mops
Microfiber is designed to trap fine particles efficiently.
Many microfiber mop heads can be machine washed.
Avoid fabric softener if the manufacturer’s instructions advise against it, because softener can coat the fibers and reduce their performance.
Avoid high heat unless the care instructions specifically permit it.
Cotton Mops
Cotton mop heads can absorb a large amount of water and may tolerate traditional washing methods well.
However, they still need thorough rinsing and drying.
Cotton can retain odors when left damp.
Sponge Mops
Sponge mop heads require special attention because they can deteriorate with harsh chemicals, prolonged soaking, or excessive heat.
Always follow the manufacturer’s care instructions.
A Simple Deep-Cleaning Routine
Here is an easy routine to remember:
Rinse → Soak → Wash → Rinse → Wring → Dry.
Rinse
Remove loose dirt immediately after use.
Soak
Use warm water with an appropriate cleaning solution.
Wash
Agitate gently to loosen trapped grime.
Rinse
Remove all cleaning residue.
Wring
Remove excess water.
Dry
Hang completely before storage.
This simple sequence can help extend the useful life of a washable mop.
Natural Cleaning Does Not Mean Chemical-Free
It is worth remembering that everything is made of chemicals, including lemon juice and baking soda.
The important question is whether an ingredient is appropriate for the task and used safely.
Natural ingredients can be useful for routine household cleaning, deodorizing, and maintenance, but they are not automatically stronger or safer than commercial cleaning products.
For situations where sanitation or disinfection is specifically required, choose a suitable product and follow its label directions.
Benefits of Keeping Your Mop Clean
1. Better Cleaning Performance
A clean mop can pick up dirt more effectively than one loaded with old residue.
2. Fresher Smell
Proper washing and drying can help reduce unpleasant odors.
3. Longer Mop Life
Regular maintenance may help prevent excessive buildup and premature deterioration.
4. Better Household Hygiene
A clean tool is preferable when cleaning surfaces throughout your home.
5. Less Product Waste
Maintaining your mop can reduce the need to replace it unnecessarily.
Cleaning the Mop Bucket
Do not forget the bucket.
A dirty mop placed into a dirty bucket is not receiving a proper cleaning.
After using the bucket:
- Empty the dirty water.
- Rinse the bucket.
- Wash it with an appropriate detergent.
- Rinse again.
- Allow it to dry completely.
If the bucket has a narrow bottom or textured surface, dirt can accumulate in corners.
Pay attention to these areas.
What About the Mop Handle?
The mop handle is also touched frequently and can accumulate dirt.
Wipe it down with an appropriate household cleaner.
If the handle is metal, avoid leaving it wet for long periods if the material or finish is susceptible to corrosion.
If it is plastic, a simple damp cloth with detergent may be sufficient for routine cleaning.
How to Make Mop Cleaning Easier
The easiest cleaning routine is the one you will actually follow.
Keep a few basic supplies together:
- Bucket
- Baking soda
- Laundry detergent
- Clean cloth
- Rubber gloves
- Mop-cleaning brush
- Drying hook
Having everything ready makes deep cleaning much less of a chore.
Lemon-Scented Mop Refresh
If you simply want to freshen a washable mop after routine use, you do not need an elaborate mixture.
Fill a basin with warm water.
Add a modest amount of baking soda and a small quantity of detergent.
Add some fresh lemon juice if appropriate for the mop material.
Soak briefly, rinse extremely well, wring out the mop, and hang it somewhere ventilated.
The goal is a clean mop—not an excessively complicated homemade chemical mixture.
When Should You Throw Away Your Mop?
Sometimes cleaning is not enough.
Consider replacing a mop when:
- The fibers are falling apart.
- The mop no longer absorbs or picks up dirt properly.
- It remains unpleasant-smelling after thorough washing and drying.
- The head has developed permanent damage.
- Mold-like growth remains after appropriate cleaning.
- The mop is visibly deteriorated.
- It can no longer be properly washed.
A replacement mop is often inexpensive compared with repeatedly trying to rescue a badly worn cleaning tool.
Frequently Asked Questions
Can I soak my mop overnight?
It depends on the material and manufacturer’s instructions. For many washable mop heads, a shorter soak of 20–30 minutes is sufficient. Prolonged soaking is not necessary for routine cleaning and may damage certain materials.
Does lemon disinfect a mop?
Lemon juice has acidic properties, but it should not be treated as a guaranteed disinfectant. If disinfection is required, use an appropriate disinfectant according to its label.
Does baking soda remove bad smells?
Baking soda can help with odors and some residues, making it useful as part of a cleaning routine.
Can I put my mop in the washing machine?
Some washable mop heads are machine washable, while others are not. Check the manufacturer’s instructions before putting one in a washing machine.
Should I use hot water?
Warm water is usually a practical choice for washing. Avoid extremely hot water unless the mop manufacturer specifically says it is safe.
Why does my clean mop still smell?
The most common reasons are incomplete rinsing, trapped residue, insufficient drying, or an old mop head.
Can I use bleach?
Only if the mop material and manufacturer permit it. Never mix bleach with lemon juice, vinegar, ammonia, or other incompatible cleaners.
A Weekly Mop-Care Checklist
Use this quick checklist once a week:
☐ Remove hair and debris
☐ Rinse the mop thoroughly
☐ Prepare warm cleaning water
☐ Add a suitable amount of detergent
☐ Use baking soda if desired
☐ Add lemon only when appropriate
☐ Soak for about 20–30 minutes
☐ Gently agitate the fibers
☐ Rinse until water is clear
☐ Wring out excess moisture
☐ Hang in a ventilated area
☐ Clean and dry the bucket
☐ Inspect the mop for damage
This simple routine can make your regular floor-cleaning process more hygienic and efficient.
The Bigger Lesson: Clean Your Cleaning Tools
We often focus on cleaning countertops, floors, bathrooms, kitchens, windows, and furniture.
But the tools we use to perform those jobs also need attention.
A mop is repeatedly exposed to dirt and moisture. Treating it as disposable after every use is unnecessary, but treating it as if it never needs cleaning is equally problematic.
Regular maintenance is the middle ground.
Rinse it.
Wash it.
Dry it.
Store it properly.
Replace it when it is genuinely worn out.
Final Thoughts
A dirty mop can undermine an otherwise good cleaning routine. Fortunately, keeping a washable mop fresh does not have to be complicated.
A combination of warm water, a small amount of detergent, baking soda, and lemon can be incorporated into a simple deep-cleaning routine for many washable mop heads. The most important steps, however, are not the ingredients themselves—they are thorough rinsing, proper wringing, complete drying, and appropriate storage.
Remember that homemade cleaning methods have limitations. Lemon and baking soda can be useful household ingredients, but they should not be presented as universal disinfectants. When a surface or cleaning tool requires genuine disinfection, use an appropriate labeled product and follow its directions.
Most importantly, never mix bleach with lemon juice, vinegar, ammonia, or other incompatible cleaning substances.
The next time you finish mopping the floor, do not simply put the mop back in the corner. Give the mop head a good rinse, wash it regularly, squeeze out the excess water, and hang it somewhere with plenty of airflow.
A few minutes of maintenance can make your cleaning tools last longer, smell fresher, and perform better.
A clean home deserves clean cleaning tools—and your mop deserves to be cleaned too.
Quick Recipe-Style Version
Natural Mop Refresh
Ingredients:
- Warm water
- 2–4 tablespoons baking soda
- 1–2 lemons
- Small amount of laundry detergent
Instructions:
- Remove loose dirt and debris from the mop.
- Fill a basin with warm water.
- Add baking soda and a small amount of detergent.
- Add fresh lemon juice if suitable for the mop material.
- Place the mop head in the solution.
- Soak for approximately 20–30 minutes.
- Gently agitate or brush the fibers.
- Drain the dirty solution.
- Rinse the mop several times with clean water.
- Wring out excess moisture.
- Hang the mop in a well-ventilated location.
- Allow it to dry completely before storing.
Important Reminder
Never mix chlorine bleach with lemon juice, vinegar, ammonia, or other acidic cleaners. Always check the mop manufacturer’s care instructions before using any homemade cleaning treatment.
Final Cleaning Tip
The secret is not simply the lemon or baking soda. The real secret is the complete routine:
Clean it → rinse it well → dry it completely → store it properly.
That is how you keep your mop ready for the next cleaning day.