Decadent Chocolate Mousse Cake with Ladyfingers: A Complete Step-by-Step Recipe
If you are a chocolate lover searching for a dessert that combines creamy, silky mousse with the delicate texture of ladyfingers, this Decadent Chocolate Mousse Cake is an ideal choice. It’s a no-bake or minimal-bake dessert that looks elegant and tastes divine, perfect for special occasions or whenever you want to treat yourself.
This recipe will guide you through every detail—from selecting ingredients, preparing the mousse, assembling the cake with ladyfingers, to finishing with a luscious chocolate glaze. Whether you are an experienced baker or a beginner, this comprehensive guide will help you create a stunning cake that impresses both in flavor and presentation.
Table of Contents
Introduction to Chocolate Mousse Cake
Ingredients Breakdown
Essential Equipment
Preparing the Ladyfingers Base
Making the Silky Chocolate Mousse
Assembling the Cake Layer by Layer
Preparing the Chocolate Glaze
Final Assembly and Chilling
Serving Suggestions and Storage Tips
Variations and Customizations
Troubleshooting Common Problems
Nutritional Information
Frequently Asked Questions
Final Thoughts and Tips
1. Introduction to Chocolate Mousse Cake
Chocolate mousse cake is a luxurious dessert that combines the airy, creamy texture of mousse with the firm yet tender bite of ladyfingers. The ladyfingers act as a sponge-like base and layer, absorbing some of the mousse’s richness while maintaining structure. The chocolate glaze on top adds a glossy finish and an extra layer of chocolate intensity.
This cake is perfect for chocolate enthusiasts who want a dessert that’s rich but not overly heavy. It’s also a great make-ahead dessert since it requires chilling time to set properly, making it ideal for parties and gatherings.
2. Ingredients Breakdown
For the Ladyfinger Base and Layers:
200 grams (about 20 pieces) ladyfinger biscuits (savoiardi)
Optional: 1/4 cup coffee or milk for dipping (to soften ladyfingers slightly)
For the Chocolate Mousse:
300 grams dark chocolate (70% cocoa recommended), chopped
400 ml (1 2/3 cups) heavy whipping cream, cold
3 large eggs, separated
100 grams (1/2 cup) granulated sugar
1 teaspoon vanilla extract
Pinch of salt
For the Chocolate Glaze:
150 grams dark chocolate, chopped
100 ml (about 1/2 cup) heavy cream
1 tablespoon unsalted butter (optional, for shine)
3. Essential Equipment
Mixing bowls (large and medium)
Electric mixer or stand mixer (for whipping cream and beating eggs)
Double boiler or microwave-safe bowl (for melting chocolate)
Spatula (rubber or silicone)
8-inch (20 cm) springform pan or cake ring
Plastic wrap or cling film
Saucepan (for glaze)
Whisk
Measuring cups and spoons
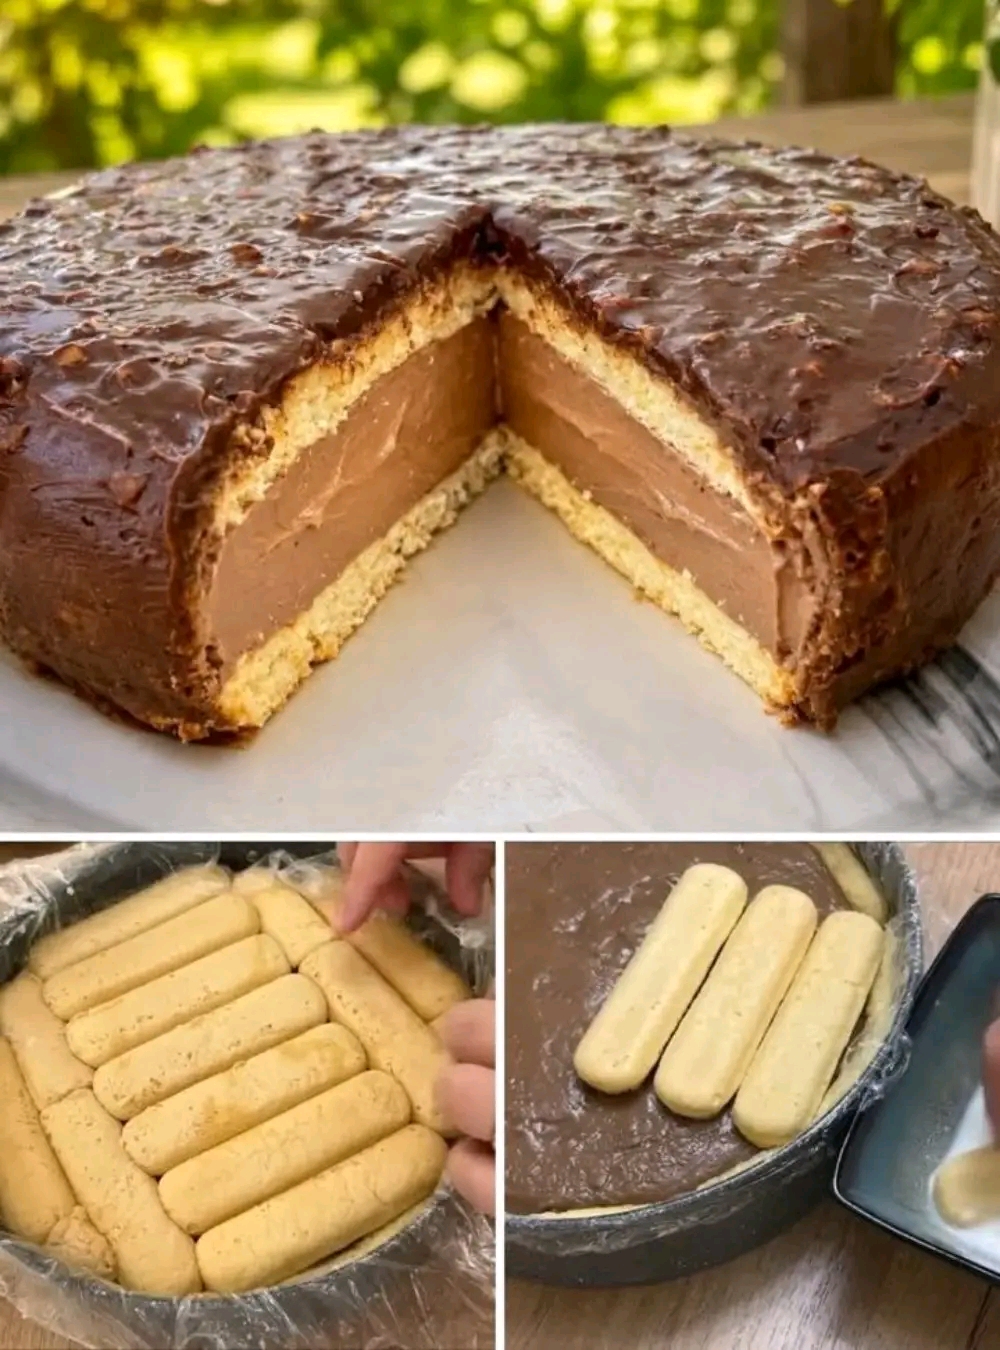
4. Preparing the Ladyfingers Base
Step 1: Line the Pan
Line the bottom and sides of your springform pan with plastic wrap or parchment paper for easy removal.
Step 2: Arrange Ladyfingers
Place ladyfingers upright around the sides of the pan, pressing gently to form a ring. Then, lay ladyfingers flat on the bottom to cover the base completely, as shown in the images.
Step 3: Optional Soaking
If you prefer a softer texture, briefly dip ladyfingers in coffee or milk before placing them. Do not soak too long to avoid sogginess.
5. Making the Silky Chocolate Mousse
Step 1: Melt the Chocolate
Using a double boiler or microwave, melt the chopped dark chocolate until smooth. Set aside to cool slightly.
Step 2: Whip the Cream
In a chilled bowl, whip the heavy cream until soft peaks form. Refrigerate until needed.
Step 3: Beat Egg Yolks and Sugar
In another bowl, whisk the egg yolks with half the sugar until pale and creamy.
Step 4: Beat Egg Whites
In a clean bowl, beat the egg whites with a pinch of salt until soft peaks form. Gradually add the remaining sugar and beat until stiff peaks form.
Step 5: Combine Ingredients
Fold the melted chocolate into the egg yolk mixture gently. Then fold in the whipped cream carefully to maintain airiness. Finally, fold in the beaten egg whites in batches, ensuring the mousse remains light and fluffy.
6. Assembling the Cake Layer by Layer
Step 1: Pour Mousse Over Ladyfinger Base
Pour half of the chocolate mousse over the ladyfinger base in the pan and spread evenly.
Step 2: Add Another Ladyfinger Layer
Place another layer of ladyfingers on top of the mousse, pressing lightly.
Step 3: Add Remaining Mousse
Pour the remaining mousse over the ladyfingers and smooth the top.
Step 4: Cover and Chill
Cover the cake with plastic wrap and refrigerate for at least 4 hours, preferably overnight, to allow the mousse to set.
7. Preparing the Chocolate Glaze
Step 1: Heat Cream
In a small saucepan, heat the heavy cream until it just begins to simmer.
Step 2: Pour Over Chocolate
Pour the hot cream over the chopped chocolate in a bowl. Let it sit for 2-3 minutes.
Step 3: Stir Until Smooth
Gently stir the mixture until the chocolate is fully melted and the glaze is smooth. Add butter if using, and stir until incorporated.
Step 4: Cool Slightly
Allow the glaze to cool slightly before pouring over the chilled mousse cake.
8. Final Assembly and Chilling
Step 1: Remove Cake from Pan
Carefully lift the cake out of the pan using the plastic wrap or parchment paper.
Step 2: Pour Glaze
Place the cake on a serving plate and pour the chocolate glaze evenly over the top and sides.
Step 3: Chill Again
Return the cake to the refrigerator for at least 1 hour to allow the glaze to set.
9. Serving Suggestions and Storage Tips
Serve chilled with a dollop of whipped cream or fresh berries for contrast.
Store the cake in an airtight container in the refrigerator for up to 3 days.
Avoid freezing as the mousse texture may be compromised.
10. Variations and Customizations
Flavor Variations: Add a splash of liqueur (e.g., coffee, orange, or hazelnut) to the mousse for an adult twist.
Fruit Additions: Layer fresh raspberries or strawberries between mousse layers.
Nutty Touch: Sprinkle chopped toasted nuts on top before glazing.
Dairy-Free: Use coconut cream and dairy-free chocolate alternatives.
11. Troubleshooting Common Problems
Mousse Too Runny: Ensure egg whites and cream are whipped properly; chill mousse before assembling.
Cake Collapsing: Avoid over-soaking ladyfingers and handle mousse gently.
Glaze Not Shiny: Add butter or corn syrup to the glaze for extra gloss.
12. Nutritional Information (Approximate per slice)
Nutrient Amount
Calories 450-500 kcal
Carbohydrates 40 g
Protein 6 g
Fat 30 g
Saturated Fat 18 g
Sugar 30 g
Fiber 3 g
13. Frequently Asked Questions
Q: Can I use store-bought mousse instead of making it?
A: Yes, but homemade mousse offers better texture and flavor.
Q: How long does the cake last?
A: Best consumed within 3 days refrigerated.
Q: Can I prepare this cake in advance?
A: Absolutely, it tastes even better after resting overnight.
14. Final Thoughts and Tips
This chocolate mousse cake with ladyfingers is a perfect blend of textures and flavors, combining the lightness of mousse with the subtle crunch of ladyfingers and the richness of chocolate glaze. It’s a dessert that impresses visually and delights the palate.
Take your time with each step, especially folding the mousse ingredients to keep it airy. The chilling time is crucial for the mousse to set properly, so plan ahead.
Enjoy making and sharing this indulgent treat with your loved ones!