The Ultimate Layered Chocolate Cake Recipe: A Step-by-Step Guide to a Classic Delight
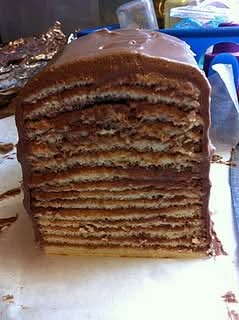
Layered cakes have long been a symbol of celebration, indulgence, and culinary artistry. The cake in the image showcases a beautifully layered chocolate cake with thin, even layers and rich chocolate filling, a style beloved in many cultures, especially in Eastern Europe and Russia, where such cakes are often made with care and tradition.
This article will guide you through the process of making this exquisite layered chocolate cake from scratch. You will learn about the ingredients, preparation techniques, assembly, and tips to achieve the perfect texture and flavor. Whether you are baking for a special occasion or simply want to treat yourself, this recipe will help you create a stunning cake that tastes as good as it looks.
Introduction: The Charm of Layered Cakes
Layered cakes are more than just desserts; they are a celebration of texture, flavor, and patience. The thin layers of cake alternated with luscious chocolate filling create a harmonious balance that delights the palate.
This style of cake is often associated with traditional recipes passed down through generations. The thin layers allow for a delicate crumb and a rich, moist bite, while the chocolate filling adds depth and sweetness.
Ingredients Overview
For the Cake Layers
4 large eggs
1 cup (200g) granulated sugar
1 cup (120g) all-purpose flour, sifted
1/4 cup (25g) cocoa powder, sifted
1 teaspoon baking powder
1/4 teaspoon salt
1 teaspoon vanilla extract
For the Chocolate Filling
1 cup (240ml) heavy cream
8 oz (225g) dark chocolate, chopped
2 tablespoons unsalted butter
1/4 cup (30g) powdered sugar (optional, for sweetness)
For the Chocolate Glaze (Optional)
4 oz (115g) dark chocolate
1/4 cup (60ml) heavy cream
1 tablespoon butter
Equipment Needed
Mixing bowls
Electric mixer or whisk
Sifter for flour and cocoa
Baking sheets or thin layer pans
Saucepan
Spatula
Cake stand or serving plate
Knife for slicing
Step-by-Step Instructions
Step 1: Prepare the Cake Layers
Preheat Oven: Preheat your oven to 350°F (175°C). Line baking sheets or thin layer pans with parchment paper.
Beat Eggs and Sugar: In a large bowl, beat the eggs and sugar together until the mixture is pale, thick, and fluffy. This may take 5-7 minutes with an electric mixer.
Sift Dry Ingredients: In a separate bowl, sift together the flour, cocoa powder, baking powder, and salt.
Combine: Gently fold the dry ingredients into the egg mixture in batches, being careful not to deflate the batter.
Add Vanilla: Stir in the vanilla extract.
Bake Thin Layers: Spread the batter evenly into thin layers on the prepared baking sheets. Bake for 8-10 minutes or until a toothpick inserted comes out clean.
Cool Layers: Remove from oven and let layers cool completely on wire racks.
Step 2: Prepare the Chocolate Filling
Heat Cream: In a saucepan, heat the heavy cream until it just begins to simmer.
Add Chocolate: Remove from heat and add chopped dark chocolate and butter.
Stir: Let sit for a minute, then stir until smooth and glossy.
Sweeten: Add powdered sugar if desired and mix well.
Cool: Allow the filling to cool to a spreadable consistency.
Step 3: Assemble the Cake
Layering: Place one cake layer on your serving plate.
Spread Filling: Spread a thin, even layer of chocolate filling over the cake layer.
Repeat: Continue layering cake and filling until all layers are used, finishing with a layer of filling on top.
Chill: Refrigerate the assembled cake for at least 2 hours to set.
Step 4: Prepare the Chocolate Glaze (Optional)
Heat Cream: Warm the heavy cream until simmering.
Add Chocolate and Butter: Remove from heat, add chocolate and butter, and stir until smooth.
Glaze Cake: Pour the glaze over the chilled cake, spreading evenly.
Chill Again: Refrigerate until the glaze is set.
Tips for Perfect Layered Chocolate Cake
Thin Layers: Baking thin layers ensures even cooking and delicate texture.
Gentle Folding: Preserve air in the batter for a light crumb.
Chocolate Quality: Use high-quality chocolate for filling and glaze.
Cooling: Cool layers completely before assembling to prevent melting the filling.
Chilling: Proper chilling helps the cake set and makes slicing easier.
Variations and Creative Ideas
Nutty Layers: Add finely chopped nuts to the filling for crunch.
Coffee Infusion: Add espresso powder to the batter or filling for mocha flavor.
Fruit Filling: Incorporate raspberry or cherry jam between layers.
Whipped Cream: Use whipped cream instead of chocolate filling for a lighter cake.
Vegan Version: Substitute eggs with flax eggs and use dairy-free chocolate and cream.
Serving Suggestions
Serve slices with fresh berries or a dusting of powdered sugar.
Pair with a cup of coffee or dessert wine.
Ideal for birthdays, anniversaries, or festive occasions.
Storing and Shelf Life
Store the cake covered in the refrigerator for up to 5 days.
Bring to room temperature before serving for best flavor.
Cake layers can be baked ahead and frozen for up to 1 month.
Frequently Asked Questions
Q: Can I bake all layers at once?
A: It’s best to bake thin layers separately for even cooking.
Q: How do I prevent the cake from drying out?
A: Use moist fillings and store the cake covered.
Q: Can I use milk chocolate instead of dark chocolate?
A: Yes, but adjust sugar levels as milk chocolate is sweeter.
Conclusion: Mastering the Art of Layered Chocolate Cake
This layered chocolate cake recipe combines tradition, technique, and rich flavors to create a dessert that impresses both visually and gastronomically. With patience and care, you can craft a cake that becomes the centerpiece of any celebration.
Enjoy the process, savor the results, and share the joy of baking with loved ones!