Heavenly Fruit Cream Cake: A Step-by-Step Recipe for a Light, Fluffy, and Fruity Delight
If you’re looking for a dessert that combines the lightness of a fluffy cake with the refreshing burst of fruit and the creamy indulgence of whipped cream, this Heavenly Fruit Cream Cake is the perfect choice. This recipe is a crowd-pleaser, ideal for family gatherings, celebrations, or simply a weekend treat. It’s a cake that looks impressive but is surprisingly easy to make, with a soft sponge base, luscious whipped cream, and a medley of juicy fruits.
In this extensive guide, I will walk you through every step of the process, from selecting the best ingredients to tips for perfecting the texture and flavor. Whether you’re a seasoned baker or a beginner, this recipe will help you create a stunning cake that tastes as good as it looks.
Table of Contents
Introduction to the Fruit Cream Cake
Ingredients Overview
Equipment Needed
Preparing the Sponge Cake Base
Making the Whipped Cream Filling
Choosing and Preparing the Fruits
Assembling the Cake
Baking and Cooling Tips
Serving Suggestions and Storage
Variations and Tips for Customization
Troubleshooting Common Issues
Nutritional Information
Frequently Asked Questions
Final Thoughts
1. Introduction to the Fruit Cream Cake
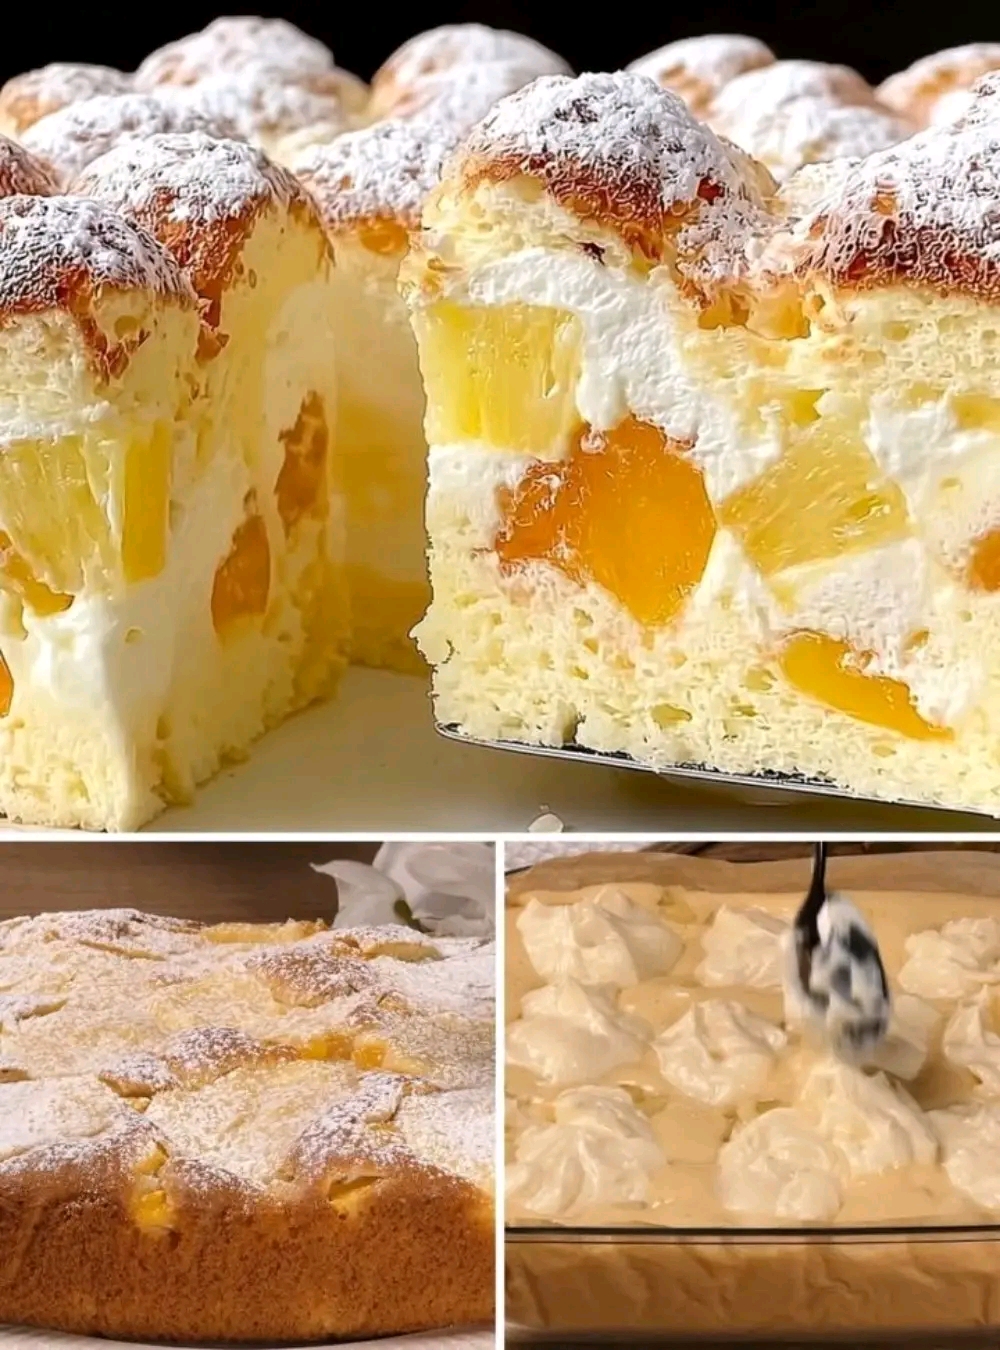
This cake is a delightful combination of airy sponge, rich whipped cream, and fresh or canned fruits. The sponge is light and fluffy, almost like a cloud, providing the perfect base for the creamy filling. The fruits add natural sweetness and a refreshing contrast, making each bite vibrant and satisfying.
The inspiration for this cake comes from classic European fruit cakes and cream-filled desserts, but with a modern twist that emphasizes simplicity and freshness. It’s perfect for spring and summer when fruits are at their peak, but can be enjoyed year-round with canned or frozen fruits.
2. Ingredients Overview
For the Sponge Cake:
4 large eggs (room temperature)
150 grams (3/4 cup) granulated sugar
150 grams (1 1/4 cups) all-purpose flour
1 teaspoon baking powder
1/4 teaspoon salt
1 teaspoon vanilla extract
60 ml (1/4 cup) whole milk
60 ml (1/4 cup) vegetable oil or melted butter
For the Whipped Cream Filling:
500 ml (2 cups) heavy whipping cream (cold)
100 grams (1/2 cup) powdered sugar (adjust to taste)
1 teaspoon vanilla extract
Optional: 1 tablespoon cream cheese or mascarpone for stability
For the Fruit Filling:
1 cup canned peaches, drained and chopped (or fresh peaches)
1 cup canned pineapple chunks, drained (or fresh pineapple)
Optional: other fruits like mandarin oranges, strawberries, or kiwi
For Decoration:
Powdered sugar for dusting
3. Equipment Needed
Mixing bowls (large and medium)
Electric mixer or stand mixer (for whipping cream and beating eggs)
Sifter or fine mesh sieve (for flour and powdered sugar)
Spatula (rubber or silicone)
9×13 inch (23×33 cm) baking pan or similar size
Parchment paper (for lining the pan)
Cooling rack
Measuring cups and spoons
Knife and cutting board (for fruit preparation)
4. Preparing the Sponge Cake Base
Step 1: Preheat and Prepare the Pan
Preheat your oven to 175°C (350°F). Line your baking pan with parchment paper, ensuring the paper extends slightly beyond the edges for easy removal of the cake later.
Step 2: Separate the Eggs
Separate the egg whites from the yolks carefully. Place the whites in a large clean bowl and the yolks in another.
Step 3: Beat the Egg Yolks
Add half of the sugar (75 grams) to the egg yolks and beat with an electric mixer until the mixture becomes pale, thick, and creamy. This process incorporates air and helps the sponge rise.
Step 4: Mix Wet Ingredients
Add the vanilla extract, milk, and vegetable oil (or melted butter) to the yolk mixture. Mix gently until combined.
Step 5: Sift Dry Ingredients
Sift together the flour, baking powder, and salt. Gradually fold the dry ingredients into the wet mixture using a spatula. Be careful not to overmix; fold just until combined to keep the batter light.
Step 6: Beat Egg Whites
Using a clean mixer bowl, beat the egg whites until soft peaks form. Gradually add the remaining sugar (75 grams) and continue beating until stiff peaks form. This meringue is crucial for the cake’s light texture.
Step 7: Fold Egg Whites into Batter
Gently fold the beaten egg whites into the batter in three additions. Use a spatula and fold carefully to avoid deflating the mixture. The batter should be light and airy.
Step 8: Bake the Sponge
Pour the batter into the prepared pan and smooth the top. Bake for 25-30 minutes or until a toothpick inserted in the center comes out clean. The cake should be golden brown and spring back when touched lightly.
Step 9: Cool the Cake
Remove the cake from the oven and let it cool in the pan for 10 minutes. Then transfer it to a cooling rack to cool completely before assembling.
5. Making the Whipped Cream Filling
Step 1: Chill Your Equipment
For best results, chill the mixing bowl and beaters in the refrigerator for at least 15 minutes before whipping the cream.
Step 2: Whip the Cream
Pour the cold heavy cream into the chilled bowl. Start beating on medium speed until it begins to thicken.
Step 3: Add Sugar and Vanilla
Gradually add powdered sugar and vanilla extract while continuing to beat. If you want a more stable cream that holds shape longer, add a tablespoon of cream cheese or mascarpone at this stage.
Step 4: Beat to Stiff Peaks
Continue beating until stiff peaks form. Be careful not to overbeat, or the cream will turn grainy and start to separate.
6. Choosing and Preparing the Fruits
Step 1: Select Your Fruits
For this cake, peaches and pineapples are classic choices, but you can customize with your favorite fruits. Fresh fruits should be ripe but firm to avoid excess moisture.
Step 2: Prepare the Fruits
If using canned fruits, drain them well to avoid sogginess. Chop fruits into bite-sized pieces for easy layering. If using fresh fruits, peel and chop accordingly.
Step 3: Optional Fruit Preparation
For some fruits like strawberries or kiwi, you may want to macerate them with a little sugar and lemon juice to enhance flavor and soften texture.
7. Assembling the Cake
Step 1: Slice the Sponge
Once the cake is completely cool, slice it horizontally into two even layers using a serrated knife.
Step 2: Add the First Layer of Cream
Spread a generous layer of whipped cream over the bottom sponge layer.
Step 3: Add Fruit Layer
Distribute half of the prepared fruits evenly over the cream.
Step 4: Add More Cream
Add another layer of whipped cream on top of the fruits to help hold the next sponge layer.
Step 5: Place the Second Sponge Layer
Carefully place the second sponge layer on top, pressing gently to secure.
Step 6: Top with Cream and Fruits
Spread the remaining whipped cream on top and decorate with the remaining fruits. You can also pipe cream dollops for a decorative touch.
Step 7: Chill the Cake
Refrigerate the assembled cake for at least 2 hours to allow the cream to set and the flavors to meld.
8. Baking and Cooling Tips
Avoid opening the oven door frequently during baking to prevent the cake from collapsing.
Use room temperature eggs for better volume in the sponge.
Ensure the cake is completely cool before adding cream to prevent melting.
Chill the cake after assembly to help the cream firm up and make slicing easier.
9. Serving Suggestions and Storage
Serve chilled for the best texture and flavor.
Garnish with fresh mint leaves or a light dusting of powdered sugar before serving.
Store leftovers in an airtight container in the refrigerator for up to 3 days.
Avoid freezing the cake as the cream and fruit texture may degrade.
10. Variations and Tips for Customization
Flavor Variations: Add lemon zest or almond extract to the sponge for a different aroma.
Fruit Variations: Use berries, mango, or banana depending on season and preference.
Cream Variations: Substitute some whipped cream with pastry cream or custard for a richer filling.
Dietary Adjustments: Use gluten-free flour blends or dairy-free cream alternatives as needed.
11. Troubleshooting Common Issues
Dense Cake: Overmixing the batter or underbeating egg whites can cause a dense texture.
Cream Not Whipping: Ensure cream and equipment are cold; use fresh heavy cream with at least 35% fat.
Soggy Cake: Drain fruits well and avoid excess moisture in cream.
Cake Collapsing: Avoid opening the oven door early and ensure proper folding technique.
12. Nutritional Information (Approximate per serving)
Nutrient Amount
Calories 350-400 kcal
Carbohydrates 45 g
Protein 5 g
Fat 18 g
Saturated Fat 10 g
Sugar 30 g
Fiber 2 g
13. Frequently Asked Questions
Q: Can I use frozen fruits?
A: Yes, but thaw and drain them well to avoid excess moisture.
Q: How long does the cake keep?
A: Best consumed within 2-3 days refrigerated.
Q: Can I make the cake ahead?
A: Yes, assemble a day before serving for best flavor melding.
Q: What if I don’t have heavy cream?
A: Use whipping cream with at least 30% fat, but results may vary.
14. Final Thoughts
This Heavenly Fruit Cream Cake is a testament to how simple ingredients can come together to create something extraordinary. The balance of airy sponge, sweet cream, and juicy fruits makes it a versatile dessert that can be adapted to many tastes and occasions. With patience and care, you’ll master this recipe and impress your friends and family with a cake that’s as beautiful as it is delicious.
Enjoy baking and savor every bite of this delightful creation!