The Ultimate Guide to Perfect Sunshine Orange Muffins: A Masterclass in Citrus Baking
There is a profound, almost magical alchemy that occurs when you introduce fresh citrus into a baked good. The moment the volatile essential oils of a freshly grated orange peel hit a bowl of sweet, buttery batter, the entire kitchen is transformed into a fragrant, sun-drenched orchard. In the vast and diverse world of morning pastries and afternoon tea treats, few things can rival the sheer, unadulterated joy of a perfectly baked Orange Muffin.
Picture this: a beautifully domed, golden-brown muffin, its tender, incredibly moist crumb acting as a canvas for the vibrant, sweet-tart explosion of fresh orange flavor. It is a bite of pure sunshine. Whether you are seeking a magnificent addition to a lavish Sunday brunch spread, packing a lunchbox with a homemade delight, or simply craving a comforting, aromatic treat to pair with your afternoon Earl Grey tea, these Orange Muffins are the ultimate culinary answer.
In this exhaustive, comprehensive masterclass, we are not simply going to give you a list of ingredients and a baking time. We are going to explore the fundamental food science of baking with citrus. We will dissect every single ingredient to understand its precise role, master the techniques required to guarantee a sky-high muffin dome, and provide you with a foolproof, bakery-quality recipe that will elevate your home baking to unprecedented, professional heights.
Prepare your mixing bowls, preheat your ovens, and let us embark on the journey to baking the perfect batch of Sunshine Orange Muffins.
Chapter 1: The Marvelous Science of Citrus in Baking
To truly master the Orange Muffin, one must first understand the anatomy of the orange itself and how its different components interact with heat, sugar, and flour. The flavor of an orange does not come from a single source, and harnessing its full potential requires a strategic approach.
The Anatomy of the Peel: Flavedo vs. Albedo
When we talk about infusing a batter with orange flavor, we must look to the skin of the fruit. The peel is divided into two distinct layers:
The Flavedo: This is the outermost, brightly colored orange layer. It contains thousands of microscopic, highly concentrated essential oil glands. These oils (primarily limonene) carry the pure, intense, floral, and aromatic essence of the orange. They contain zero acidity and zero bitterness.
The Albedo: This is the thick, spongy, stark-white layer located immediately beneath the flavedo. The albedo acts as a protective shock absorber for the fruit. Gastronomically, it is intensely bitter and chalky.
The secret to a world-class orange muffin is extracting maximum oil from the flavedo while avoiding the albedo entirely. This is why a high-quality microplane grater is an absolutely non-negotiable tool in your kitchen arsenal.
The Aromatic Emulsion (The “Rubbing” Technique)
Merely dropping orange zest into your batter is a missed opportunity. To unlock the explosive potential of the citrus oils, we must employ a professional bakery technique: rubbing the zest directly into the granulated sugar.
Sugar crystals are inherently abrasive. When you combine fresh orange zest with sugar and actively massage them together with your fingertips for two to three minutes, the sharp edges of the sugar crystals physically rupture the oil glands in the zest. The sugar absorbs these volatile oils, turning a beautiful pale orange color and taking on the texture of wet sand. By infusing the sugar first, you ensure that the orange flavor is dispersed homogeneously throughout every single microscopic crumb of the final baked muffin.
The Dual Role of Orange Juice
While the zest provides the aromatic perfume, the freshly squeezed juice of the orange provides two crucial elements:
Acidity: The juice introduces citric acid to the batter. This acid tenderizes the gluten strands in the flour, ensuring the muffin remains incredibly soft and velvety rather than tough and bready.
Moisture and Sweetness: The water content hydrates the starches, while the natural fructose enhances the overall sweetness profile, adding a subtle tang that sugar alone cannot provide.
Chapter 2: The Master Ingredient Breakdown
A muffin is a quick bread, meaning it relies on chemical leaveners rather than yeast to rise. Because the ingredient list is relatively short, the quality and temperature of every single component matter immensely. Let us examine the anatomy of our perfect batter.
1. The Flour: The Structural Framework
For the ideal muffin texture—sturdy enough to hold a high dome, yet tender enough to melt in the mouth—standard All-Purpose Flour is the optimal choice. It possesses a moderate protein content (around 10-11%), which provides the perfect balance of structural integrity and tenderness.
Sifting: Always spoon and level your flour, or better yet, weigh it with a digital kitchen scale. Sifting the flour aerates it, preventing dense, heavy, hockey-puck muffins.
2. The Fats: The Great Butter vs. Oil Debate
Fat is responsible for the richness, flavor, and perceived moisture of the baked good.
Unsalted Butter: Butter provides an irreplaceable, rich, complex dairy flavor that pairs gorgeously with citrus. The milk solids in butter also contribute to a beautiful golden-brown crust (the Maillard reaction).
Neutral Oil (Canola, Vegetable, or Grapeseed): Because oil remains liquid at room temperature (unlike butter, which solidifies), cakes and muffins baked with oil physically feel moister on the palate and stay softer for days longer.
The Master Solution: For this recipe, we will use a highly strategic combination of both. Creamed butter will provide the flavor and the structural aeration, while a splash of neutral oil will guarantee prolonged moisture retention.
3. The Sugar: Moisture and Caramelization
White granulated sugar does far more than just sweeten the batter. Sugar is hygroscopic, meaning it actively attracts and holds onto water molecules. A proper ratio of sugar ensures the muffin does not dry out in the harsh heat of the oven. Furthermore, as the sugar on the surface of the batter is exposed to the intense heat, it caramelizes, creating that iconic, slightly sticky, deeply flavorful muffin top.
4. The Eggs: The Emulsifying Binders
Eggs act as the structural glue of the recipe. The proteins coagulate during baking to hold the crumb together, while the lecithin found within the yolks acts as a powerful natural emulsifier, forcing the water-based ingredients (juice, milk) and fat-based ingredients (butter, oil) to blend into a smooth, homogenous batter without separating.
Crucial Rule: Your eggs must be at room temperature. If you add cold eggs to room-temperature creamed butter, the butter will instantly seize and harden, breaking the emulsion and leaving you with a curdled batter and a dense, greasy muffin.
5. The Dairy: Buttermilk or Sour Cream
While standard whole milk can be used, utilizing a cultured, acidic dairy product like Buttermilk or Full-Fat Sour Cream will elevate your muffins to bakery-level status. The thick, viscous nature of sour cream suspends the ingredients perfectly, while the lactic acid interacts with the baking soda to provide exceptional lift and an impossibly tender, velvety crumb.
6. The Leaveners: The Engine of the Rise
To achieve that glorious, bakery-style domed top, we employ a dual-leavening system:
Baking Powder: This contains both an acid and a base. It is double-acting, meaning it reacts once when it hits the wet ingredients, and again when it hits the heat of the oven, providing sustained, powerful lift.
Baking Soda: Because we are introducing acidic elements (orange juice and sour cream), we need a touch of baking soda. It reacts violently and immediately with the acids, producing carbon dioxide gas bubbles that puff the batter up beautifully.
Chapter 3: Essential Equipment for Muffin Perfection
You do not need an industrial kitchen to bake perfect muffins, but utilizing the correct tools, as demonstrated in professional baking workflows, will make the process seamless and the results consistent.
The Hand Mixer or Stand Mixer: A motorized mixer is highly recommended for the initial creaming phase. Beating the softened butter and the orange-infused sugar together on medium-high speed forces millions of microscopic air bubbles into the fat. These air bubbles are what the baking powder will eventually expand, giving your muffins their fluffy texture.
The Microplane Grater: This is an absolute necessity for zesting citrus. Traditional box graters tear the peel and often dig too deeply into the bitter white pith. A microplane shaves off only the delicate, oil-rich flavedo, creating a fluffy, snow-like zest that melts seamlessly into the batter.
The 12-Cup Muffin Tin: A heavy-duty, light-colored aluminum muffin pan conducts heat evenly, preventing the bottoms of the muffins from scorching before the centers are fully baked.
Paper Liners: Using high-quality paper or parchment liners prevents sticking and makes the muffins easy to transport and store.
A Spring-Loaded Ice Cream Scoop: This is the bakery secret for uniform muffins. Using a large cookie or ice cream scoop to portion the batter ensures that every single muffin is exactly the same size, which means they will all bake at the exact same rate.
Chapter 4: The Step-by-Step Scientific Method
Baking is applied chemistry. How you combine the ingredients is just as important as the ingredients themselves.
Phase 1: Mise en Place and The Aromatic Foundation
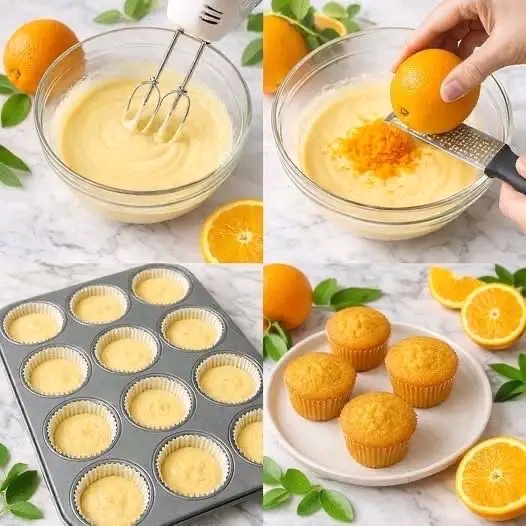
Before you begin, every cold ingredient must be brought to room temperature (roughly 70°F). Preheat your oven. Line your muffin tin. Begin by placing your granulated sugar into your primary mixing bowl. Zest two large, washed oranges directly over the bowl. Use your fingers to massage the zest into the sugar for three full minutes until it is incredibly fragrant and resembles wet sand.
Phase 2: The Creaming Process
Add your softened butter and neutral oil to the orange-sugar mixture. Using your hand mixer, beat them together on medium-high speed for no less than 4 to 5 minutes. Do not rush this step. The mixture should transform from a dense, yellow paste into a very pale, incredibly light, and fluffy cloud.
Phase 3: The Emulsion
Turn the mixer down to medium-low. Add your room-temperature eggs, one at a time. Wait until the first egg is completely invisible before adding the second. If you dump them all in at once, the batter will curdle. Once the eggs are integrated, beat in your vanilla extract and your freshly squeezed orange juice. The batter may look slightly separated at this stage due to the high volume of acidic liquid—do not panic, the dry ingredients will bring it back together.
Phase 4: The Alternating Addition (The Secret to Tenderness)
In a separate bowl, whisk together your flour, baking powder, baking soda, and salt. Have your room-temperature sour cream (or buttermilk) ready. Put away the electric mixer. From this point forward, you must mix by hand using a silicone spatula. Add the dry and wet ingredients in an alternating pattern: 1/3 of the dry, half of the wet, 1/3 of the dry, the remaining wet, and finish with the final 1/3 of the dry.
The Golden Rule of Muffin Mixing: You must stop mixing the moment the last streak of flour disappears. If you overmix the batter, you will develop the gluten network in the flour. This will result in tough, rubbery muffins with strange, peaked, and misshapen tops, often riddled with long air tunnels inside. The batter should look thick, lumpy, and slightly uneven. That is the hallmark of a perfect quick bread batter.
Phase 5: The “Rest” (Optional but Transformative)
If you have the patience, cover your bowl of batter with a towel and let it rest on the counter for 30 to 45 minutes before scooping it into the tin. This resting period allows the flour starches to fully hydrate and the baking powder to activate, creating an incredibly thick, mousse-like batter. This trick is the number one secret to achieving massive, towering bakery-style muffin domes.
Chapter 5: The Bake – Mastering Oven Dynamics
A perfect batter can be ruined by improper oven management. To achieve the beautiful, high-rising golden domes, we must manipulate the thermodynamics of the oven.
The Initial Heat Blast
Preheat your oven to a blazing hot 425°F (220°C). Fill your paper liners generously, almost all the way to the top. When you place the muffin tin into the incredibly hot oven, the intense heat hits the baking powder and the moisture in the batter immediately. This creates a rapid, explosive burst of steam and carbon dioxide, forcing the batter to shoot rapidly upwards before the crust has a chance to set, creating the iconic high dome.
The Temperature Drop
Bake the muffins at 425°F for exactly 5 to 6 minutes. Then, without opening the oven door, immediately lower the temperature down to 350°F (175°C). The initial blast created the height; the lowered temperature will now gently bake the center of the dense muffin all the way through without burning the delicate, sugary crust. Bake for an additional 13 to 15 minutes.
Testing for Doneness
Because all ovens run differently, rely on sensory cues rather than the clock. The muffins are done when:
The tops are a beautiful, deep golden-brown.
The domes spring back instantly when gently pressed with a fingertip.
A wooden skewer inserted into the dead center of the largest muffin comes out completely clean, or with one or two moist crumbs attached. (If it comes out wet with batter, they need more time).
The Cooling Protocol
When you remove the tin from the oven, place it on a wire cooling rack. Let the muffins sit in the hot metal tin for exactly 5 minutes. If you try to remove them immediately, their delicate, hot structure will cause them to tear or collapse. After 5 minutes, carefully transfer the individual muffins directly to the wire rack to cool completely. If you leave them in the tin to cool, the residual steam will condense on the bottom of the liners, resulting in soggy, wet muffin bottoms.
Chapter 6: Advanced Customizations and Glazes
While these Orange Muffins are a spectacular triumph on their own, the base recipe is a phenomenal canvas for immense culinary creativity. Here are several ways to elevate and customize your bake:
The Fresh Orange Glaze
For those who prefer their muffins to lean slightly closer to a dessert or a cupcake, a bright, tart glaze is mandatory. In a small bowl, whisk together 1 cup of sifted confectioners’ (powdered) sugar with 1 to 2 tablespoons of freshly squeezed orange juice. Whisk until it forms a thick, opaque, ribbon-like icing. Once the muffins are 100% completely cool (if they are warm, the icing will melt and disappear), aggressively drizzle the glaze back and forth over the tall domes. Top with a tiny pinch of extra orange zest for visual flair.
The Cranberry Orange Variation
This is the ultimate holiday or winter variation. The sharp, astringent pop of fresh cranberries pairs flawlessly with the sweet orange batter. Simply toss 1.5 cups of fresh or frozen (do not thaw) cranberries in one tablespoon of flour (to prevent them from sinking to the bottom of the tin) and gently fold them into the batter at the very last second before portioning.
The Orange Poppy Seed Twist
For a sophisticated, textural upgrade, fold 2 tablespoons of fresh poppy seeds into the dry ingredients. The seeds provide a stunning visual speckling throughout the pale yellow crumb and offer a delightful, earthy crunch that contrasts beautifully with the soft muffin.
The Dark Chocolate Citrus Experience
Orange and dark chocolate are a legendary flavor pairing. Fold 1 cup of high-quality dark chocolate chips (or better yet, a chopped 70% cacao dark chocolate baking bar) into the final batter. The melty, bitter pools of dark chocolate elevate the bright citrus notes to a luxurious, decadent level.
Chapter 7: Storage, Freezing, and Reheating Guide
Because this recipe utilizes an immense amount of fresh fruit juice and a combination of butter and oil, these muffins boast incredible keeping qualities. However, proper storage is crucial to prevent them from drying out or becoming soggy.
Room Temperature Storage (1-3 Days): Allow the muffins to cool completely to room temperature. Line an airtight plastic container with a layer of paper towels. Place the muffins in a single layer, then cover them with another layer of paper towels before snapping the lid shut. The paper towels act as a humidity regulator, absorbing the excess moisture that the muffins will naturally release, preventing the tops from becoming sticky and wet.
Refrigerator Storage: Do not store muffins in the refrigerator. The cold temperature alters the crystalline structure of the flour starches, causing the baked goods to stale and dry out at an incredibly rapid rate. Always store them on the counter or freeze them.
Freezing for Long-Term Storage (Up to 3 Months): Muffins freeze exceptionally well. Wrap each completely cooled muffin tightly in plastic wrap, then place the wrapped muffins into a heavy-duty, zip-top freezer bag. Squeeze out as much air as possible.
The Reheating Revival: To bring a frozen muffin back to life, unwrap it and let it thaw on the counter for a few hours. To recreate that “fresh out of the oven” experience, place the room-temperature muffin in a 300°F (150°C) oven for 5 minutes, or microwave it for exactly 10 to 12 seconds until just barely warm. The heat will melt the butterfat inside, instantly restoring the soft, velvety crumb.
Chapter 8: Comprehensive Frequently Asked Questions (FAQ)
To guarantee absolute perfection on your first attempt, we have compiled the most common troubleshooting questions and scenarios encountered by home bakers when making citrus muffins.
Q: Why did my muffins come out dense and heavy instead of fluffy? A: Dense muffins are almost always the victim of overmixing. When you combine the wet and dry ingredients, you must use a spatula and fold gently, stopping the very second the flour disappears. Lumps in the batter are a good thing! Another culprit could be expired baking powder. Always check the expiration date on your leaveners.
Q: Why did my muffins bake flat, without the beautiful high dome? A: Three possible reasons:
Your oven was not hot enough. The initial 425°F blast of heat is required to force the batter upwards before it sets.
You did not fill the muffin liners full enough. You must fill them generously, nearly to the brim.
Your batter was too warm or sat too long before baking (if you didn’t utilize the resting trick), causing the baking powder to expend all its energy before it even hit the oven.
Q: Can I use bottled orange juice instead of fresh? A: Culinarily speaking, no. Bottled orange juice has been pasteurized and heavily oxidized, resulting in a flat, one-dimensional, and often metallic flavor. Furthermore, the absolute essence of this recipe relies on the essential oils from the fresh zest, meaning you need to buy whole, fresh oranges anyway. Always squeeze your own juice for baking.
Q: My paper liners always stick to the muffins and tear them apart. How do I fix this? A: This usually happens when muffins are eaten while they are still too warm. The crumb needs time to cool and set up slightly, pulling away from the paper. Wait until they are completely cool. If you still have trouble, lightly spray the inside of your paper liners with non-stick cooking spray before filling them with batter.
Q: Why is there a weird, peaked tunnel or hole in the middle of my muffin? A: This is the textbook definition of overdeveloped gluten. You beat the final batter too aggressively or for too long. Treat the final folding stage with immense delicacy.
Q: Can I substitute the sour cream for milk? A: You can, but it changes the chemistry. Sour cream is highly acidic and very thick. If you replace it with standard, thin whole milk, you lose the tenderizing acid, and the batter becomes much runnier, which can result in a flatter, less rich muffin. If you don’t have sour cream, use full-fat, plain Greek yogurt or traditional buttermilk as a 1:1 substitute.
The Ultimate Master Recipe: Perfect Sunshine Orange Muffins
Here is the distilled, precise, professional-grade recipe. Read through the entire list and the instructions before you begin to ensure a seamless, stress-free baking experience.
Prep time: 20 minutes
Rest time (optional): 30 minutes
Bake time: 20 minutes
Total active time: 40 minutes
Yields: 12 to 14 standard-sized muffins
Cuisine: American Baking / Breakfast
The Master Ingredient List
The Dry Ingredients:
2 ½ cups (300g) All-Purpose Flour, spooned and leveled
1 Tablespoon (15g) Baking Powder
½ teaspoon (3g) Baking Soda
½ teaspoon (3g) Fine Sea Salt
The Wet & Aromatic Ingredients:
1 cup (200g) Granulated White Sugar
2 to 3 Tablespoons Fresh Orange Zest (strictly the orange flavedo, from about 2 large, well-washed oranges)
½ cup (113g / 1 stick) Unsalted Butter, softened to room temperature
¼ cup (60ml) Neutral Cooking Oil (Canola, Vegetable, or Grapeseed)
2 Large Eggs, strictly at room temperature
1 teaspoon Pure Vanilla Extract
½ cup (120ml) Freshly Squeezed Orange Juice (strained of pulp and seeds)
½ cup (120g) Full-Fat Sour Cream or Plain Greek Yogurt, at room temperature
The Step-by-Step Instructions
Oven and Pan Prep: Preheat your oven to a blazing 425°F (220°C). Line a standard 12-cup muffin tin with high-quality paper liners. If you have extra batter, prepare a second tin with 2-3 liners.
Infuse the Sugar: In the bowl of your stand mixer, or a large mixing bowl, combine the 1 cup of granulated sugar and the 2-3 tablespoons of fresh orange zest. Using your clean fingertips, vigorously rub the zest into the sugar for 2 to 3 minutes until the sugar becomes deeply fragrant, pale orange, and feels like damp sand.
Whisk the Dry: In a separate medium-sized bowl, use a wire whisk to thoroughly combine the flour, baking powder, baking soda, and salt. Set aside.
Cream the Fats: Add the softened, room-temperature butter and the neutral oil to the orange-sugar mixture. Using your hand mixer on medium-high speed, beat the mixture for a full 4 to 5 minutes, stopping to scrape down the sides of the bowl twice, until the mixture is incredibly pale, light, and fluffy.
The Emulsion: Turn the mixer down to low. Add the room-temperature eggs one at a time, beating well after each addition until fully incorporated. Add the vanilla extract and the fresh orange juice, and mix briefly just to combine. (The mixture may look slightly curdled here—this is fine).
Alternate Additions: Put the electric mixer away. Using a rubber spatula, add one-third of the dry flour mixture to the bowl. Fold gently until barely combined. Add half of the room-temperature sour cream, folding gently. Add the next third of the flour. Add the remaining sour cream. Finally, add the last third of the flour.
The Crucial Finish: Fold the mixture incredibly gently, pulling from the bottom of the bowl to the top, stopping the absolute second you no longer see dry streaks of white flour. The batter should be very thick, lumpy, and voluminous. Do not overmix.
The Rest (Recommended): If time permits, cover the bowl with a clean kitchen towel and let the batter rest at room temperature for 30 minutes to allow the starches to hydrate and the leaveners to activate.
Fill the Tins: Using a large spring-loaded ice cream scoop, portion the thick batter evenly into the prepared muffin liners, filling them generously, almost all the way to the very top.
The High-Heat Bake: Place the muffin tin into the preheated 425°F (220°C) oven. Bake for exactly 5 minutes.
The Gentle Finish: Without opening the oven door, immediately lower the oven temperature down to 350°F (175°C). Continue baking for an additional 13 to 16 minutes. Check them at the 13-minute mark. They are done when a toothpick inserted into the center comes out clean or with a few moist crumbs, and the tops are deeply golden and springy.
Cool and Serve: Remove the tin from the oven and place it on a wire cooling rack. Allow the muffins to cool in the hot tin for exactly 5 minutes. Carefully transfer the individual muffins out of the tin and directly onto the wire rack to cool completely. Serve warm or at room temperature, perhaps smeared with a touch of sweet cream butter.
Conclusion
Baking the ultimate, bakery-style Orange Muffin is not merely about combining ingredients; it is about honoring the vibrant, volatile nature of the citrus fruit. By respecting the science of the emulsion, extracting the maximum aromatic potential from the flavedo, and expertly managing the thermodynamics of your oven, you have transformed simple pantry staples into a masterpiece of morning pastry.
These golden, high-domed beauties are more than just a breakfast item; they are a sensory experience, filling your home with the undeniable, uplifting scent of sweet sunshine. Armed with this comprehensive knowledge and meticulous technique, you are now fully equipped to bake the most spectacular, tender, and deeply flavorful Orange Muffins imaginable. Enjoy every bright, zesty, magnificent bite!