Mastering the Flame: The Ultimate Guide to Perfect Grilled Pork Tenderloin and Charred Stone Fruit
Few culinary pairings capture the essence of warm-weather cooking quite like the marriage of smoky, savory meat and caramelized, sweet fruit. On a warm afternoon or crisp evening, the aroma of a perfectly seasoned pork tenderloin searing over live coals—accompanied by the gentle, honeyed fragrance of splitting stone fruits—is nothing short of intoxicating.
Yet, achieving perfection with this specific pairing requires navigating a few distinct culinary challenges. Pork tenderloin is an exceptionally lean, delicate muscle that can easily transition from succulent to cardboard-dry in a matter of minutes. On the other hand, stone fruits possess delicate, sugar-rich flesh that can quickly turn from beautifully caramelized to a mushy, burnt mess if left unmonitored over direct heat.
To bridge this gap, cooks must embrace a blend of kitchen science, proper prep, and refined heat management. This comprehensive guide covers everything you need to know about shopping, marinating, grilling, and slicing pork tenderloin, while perfectly charring summer stone fruits alongside it. Whether you are using a classic charcoal kettle, a high-end gas rig, or a rustic wood-fired grill, these techniques will elevate your outdoor cooking into a memorable, restaurant-quality feast.
Section 1: Understanding the Anatomy of Pork Tenderloin
Before firing up the grates, it is crucial to understand exactly what type of meat you are working with. A common mistake among casual backyard cooks is confusing pork tenderloin with pork loin. While their names sound almost identical, they are entirely different cuts of meat that require drastically different cooking methodologies.
Pork Tenderloin vs. Pork Loin: The Crucial Distinctions
| Feature | Pork Tenderloin | Pork Loin |
|---|---|---|
| Anatomy | A long, narrow, ribbon-like muscle running along the backbone. | A large, wide, cylindrical muscle running along the back. |
| Average Weight | Typically 1 to 1.5 pounds per tenderloin. | Often 2 to 5+ pounds; much thicker and wider. |
| Fat Content | Extremely lean, with virtually no intramuscular marbling. | Lean, but usually topped with a thick, protective fat cap. |
| Best Cooking Style | High-heat, fast grilling or roasting (Indirect to Direct). | Low-and-slow roasting, smoking, or slicing into thick chops. |
| Because the tenderloin comes from a muscle that does very little active work, its muscle fibers are incredibly fine, yielding a naturally tender texture. However, because it lacks the protective fat cap of a loin and has minimal marbled fat within the meat itself, it possesses almost no margin for error. Overcooking it by even a few degrees will cause the delicate muscle fibers to contract tightly, squeezing out its natural moisture and rendering it dry, chalky, and flavorless. |
Preparing the Meat: Removing the Silverskin
When you unpack a raw pork tenderloin, you will inevitably notice a shiny, iridescent, bluish-white membrane running along a portion of the surface. This is the silverskin, a tough band of connective tissue comprised entirely of elastin.
Unlike the collagen found in tough cuts like pork shoulder or beef chuck, elastin does not break down, melt, or tenderize when exposed to heat. If left on the meat during grilling, the silverskin will contract violently into a rubbery, unchewable strip, causing the entire tenderloin to twist, warp, and cook unevenly on the grates.
How to Clean a Tenderloin Safely and Efficiently
- Secure Your Canvas: Place the thawed pork tenderloin on a stable, heavy cutting board. Use paper towels to pat the meat completely dry. A slippery tenderloin makes precise knife work highly dangerous.
- Choose the Right Tool: Grab a sharp, flexible boning knife or a nimble utility knife. A dull blade will tear the meat, wasting valuable protein.
- The Anchor Cut: Slip the tip of your knife underneath the silverskin at one end, about an inch from where the membrane starts, creating a small “tab” of loose tissue.
- The Glide Technique: Angle your knife blade slightly upward toward the silverskin rather than down into the meat. Hold the loose tab of tissue taut with your non-dominant hand and smoothly slide the blade along the length of the meat. The knife should shave the silver membrane cleanly away, leaving the precious pink muscle completely intact beneath it. Repeat until all patches of silverskin are removed.
Section 2: The Power of the Marinade: Flavor and Moisture Insurance
Because pork tenderloin is inherently lean, it requires external help to maximize its juiciness and lock in depth of flavor. This is where a strategically designed marinade becomes your culinary insurance policy.
A truly effective marinade isn’t just a random splash of bottled dressing. It is a carefully calibrated chemical balance of four pillars: acid, fat, salt, and aromatics.
The Four Pillars of an Exceptional Marinade
1. Acid (The Tenderizer and Brightener)
Acids break down the tightly wound protein structures on the surface of the meat, allowing moisture to slip into the gaps and creating a more tender bite. Excellent choices include fresh citrus juices (orange, lime, or lemon), apple cider vinegar, or a splash of dry white wine.
Warning: Do not overdo the acid or leave the meat in it for too long. If a lean cut sits in a highly acidic liquid for more than 4 to 6 hours, the surface proteins will over-denature, turning mushy and unappealing.
2. Fat (The Moisture Shield and Conductor)
High-quality oils—such as extra-virgin olive oil, avocado oil, or toasted sesame oil—serve multiple critical functions. They coat the meat, slowing down the rate of evaporation during grilling. Furthermore, many flavorful compounds in spices and aromatics are fat-soluble, meaning they require oil to unlock and distribute their full flavor profile across the surface of the meat.
3. Salt / Umami (The Cellular Deep-Plunger)
Salt is the only ingredient in a marinade that actively penetrates deep into the interior of the muscle tissue via osmosis. Once inside, salt modifies the structure of the proteins, causing them to relax so they can trap and hold onto more moisture during the cooking process. For an added layer of complexity, substitute standard kosher salt with umami-bomb liquids like high-quality soy sauce, liquid aminos, or a dash of fish sauce.
4. Aromatics and Sweeteners (The Flavor Architecture)
This is where you build your dish’s identity. Fresh garlic, smashed ginger, woody herbs (rosemary, thyme, oregano), or cracked black pepper add immense aromatics. Introducing a touch of sugar—via honey, pure maple syrup, brown sugar, or molasses—encourages beautiful, rapid caramelization and crisp char marks when the meat hits the direct heat of the grill.
Three Master Marinade Formulations
For best results, place your trimmed pork tenderloins into a heavy-duty, zip-top bag, pour over one of these formulations, express all the air, and let them marinate in the refrigerator for 2 to 4 hours.
Profile A: The Herbaceous Citrus Garden (Bright and Classic)
- ½ cup extra-virgin olive oil
- ¼ cup fresh orange juice
- 2 tablespoons fresh lemon juice
- 4 cloves garlic, thoroughly smashed and minced
- 2 tablespoons fresh rosemary, finely chopped
- 1 tablespoon fresh thyme leaves
- 1 tablespoon kosher salt
- 1 teaspoon freshly cracked black pepper
Profile B: The Sweet Umami Glaze (Deep and Savory)
- ⅓ cup tamari or dark soy sauce
- ¼ cup avocado oil
- 2 tablespoons pure maple syrup or honey
- 1 tablespoon apple cider vinegar
- 1 tablespoon fresh ginger, finely grated
- 3 cloves garlic, microplaned
- 1 teaspoon toasted sesame oil
- ½ teaspoon red pepper flakes (optional, for a subtle kick)
Profile C: The Smoked Bourbon Orchard (Rich and Bold)
- ⅓ cup melted butter or neutral oil
- ¼ cup high-quality bourbon whiskey
- 3 tablespoons dark brown sugar, firmly packed
- 2 tablespoons apple cider vinegar
- 1 tablespoon Dijon mustard
- 1 teaspoon smoked paprika
- 1 tablespoon kosher salt
- 1 teaspoon onion powder
Section 3: Setting Up Your Grill for Dual-Zone Success
Grilling a pork tenderloin successfully requires an understanding of heat distribution. If you throw a raw tenderloin directly over a screaming-hot fire and leave it there, the exterior sugar from your marinade will burn to a bitter ash long before the cold, dense center of the meat reaches a safe internal temperature. Conversely, cooking it solely over low, gentle heat will yield a grey, unappealing surface lacking a savory crust.
The solution is the Dual-Zone Setup, which splits your grill into two distinct regions: a Direct Cooking Zone (high, radiant heat) and an Indirect Cooking Zone (gentle, convection heat).
   [ DIRECT ZONE ]          [ INDIRECT ZONE ]
  Screaming Hot Coals        No Coals Underneath
     or Burners ON             or Burners OFF
  -------------------      -------------------
  * Searing & Charring     * Gentle Convection Cook
  * High Radiant Heat      * Internal Temp Rise
Configuring a Charcoal Grill
- Ignite a full chimney starter of hardwood lump charcoal or briquettes until covered in light grey ash.
- Carefully dump the hot coals exclusively onto one half of the bottom charcoal grate. Leave the other half completely empty.
- Place the top cooking grate back on. The side directly above the glowing coals is your Direct Zone; the empty side is your Indirect Zone.
- Position the lid vents directly over the indirect side to draw the rising smoke and heat across your food like a convection oven.
Configuring a Gas Grill
- Turn all burners on high, close the lid, and let the grill preheat for 10 to 15 minutes to sterilize and heat the grates.
- Once hot, leave the primary burners on one side set to Medium-High, and completely turn off the burners on the opposite side.
- The space over the active burners serves as your Direct Zone, while the unlit side becomes your Indirect Zone.
Cleaning and Oiling the Grates
Food sticks to dirty, cold steel. Once your grill is preheated, use a high-quality wire brush, wooden scraper, or crumpled aluminum foil held with long tongs to aggressively clean off any carbonized residue from previous cooks.
Immediately afterward, fold a piece of paper towel into a tight pad, dip it into a small bowl of high-smoke-point oil (like canola or vegetable oil), and grip it with your tongs. Swiftly wipe the hot grates several times. This cleans away residual dust and creates a slick, seasoned surface that releases delicate foods effortlessly.
Section 4: The Reverse Sear Strategy vs. The Classic Sear
When grilling a pork tenderloin, you have two primary operational paths: The Classic Sear (Direct heat first, then Indirect to finish) or The Reverse Sear (Indirect heat first, finishing with a Direct flash sear). While both methods yield excellent results, understanding their nuances will help you choose the best approach for your timeline.
Method 1: The Classic Sear (Great for Speed and Crisp Edges)
This is the traditional method used by backyard grill masters for generations. It creates a robust, deeply charred exterior early on.
- The Initial Sear: Take the tenderloin out of the marinade, letting any excess liquid drip away. Place the meat directly over the scorching flames of your Direct Zone.
- Rotate Regularly: Sear the tenderloin for roughly 2 to 3 minutes, then rotate it 90 degrees. Continue this process until all four sides have developed beautiful grill marks and a rich, browned crust (about 8 to 10 minutes total).
- The Convection Glide: Once beautifully browned, move the tenderloin over to the Indirect Zone. Close the grill lid. Allow the ambient, circulating heat to gently cook the interior of the pork until it reaches its target internal temperature, which typically takes an additional 10 to 15 minutes depending on the thickness of the cut.
Method 2: The Reverse Sear (The Chef’s Choice for Uniform Doneness)
Popularized by modern food science, this approach warms the meat gradually first, resulting in an exceptionally uniform pink interior from edge to edge with minimal drying out.
- The Gentle Warm-Up: Place the cool, marinated tenderloin directly into the gentle environment of the Indirect Zone. Close the lid.
- Monitor the Core: Let the pork roast slowly at around 225°F to 250°F ambient grill temperature. Cook until a digital insert thermometer registers roughly 115°F to 120°F at its thickest point. The meat will look pale and undercooked at this stage, which is completely expected.
- The Fire Finish: Immediately transfer the warm tenderloin over to the blazing hot Direct Zone. Sear it aggressively, turning every 60 seconds, for roughly 4 to 5 minutes total. This rapidly develops a crisp, beautifully caramelized crust right as the interior reaches its final target temperature.
Section 5: The Temperature Truth: Debunking the Dry Pork Myth
For decades, home cooks routinely overcooked pork until it resembled shoe leather. This unfortunate habit stemmed from a fear of trichinosis, a parasitic foodborne illness that was historically associated with undercooked pork.
However, modern agricultural standards and strict feeding regulations have virtually eliminated this concern from commercial pork production.
The New Internal Guidelines
In a landmark update, the United States Department of Agriculture (USDA) officially lowered the recommended safe internal cooking temperature for whole cuts of domestic pork from 160°F down to 145°F (63°C), followed by a mandatory 3-minute rest period.
   [ 135°F - 140°F ] ➔ Pull from grill (accounting for carryover cooking)
   [ 145°F ]         ➔ Perfect medium doneness (blushing pink, ultra-juicy)
   [ 160°F+ ]        ➔ Well done (chalky, white, dry, tough)
At 145°F, the pork tenderloin retains its natural juices, boasting a distinct, beautiful, pale pink blush through its core. It is perfectly safe, remarkably tender, and completely transforms the eating experience.
The Essential Tool: The Instant-Read Digital Thermometer
You cannot accurately determine the doneness of a lean pork tenderloin by poking it with a finger, looking at its external color, or guessing based on time. Environmental variables like wind, outside air temperature, and fuel density alter grill times significantly every time you cook.
Investing in a high-quality, digital instant-read thermometer is paramount.
- Insert the long, slender probe into the exact center of the thickest part of the tenderloin, avoiding running it through lengthwise where it can read inaccurate ambient air or surface temperatures.
- The Pull Strategy: Pull the pork off the grill grates when the thermometer displays 138°F to 140°F. Do not wait until it hits 145°F on the fire.
The Non-Negotiable Law of Resting
Once your tenderloin is off the flames, transfer it to a clean platter or a warm cutting board. Tent it loosely with a sheet of aluminum foil. Let the meat rest undisturbed for 8 to 10 minutes.
During cooking, the intense heat causes the protein fibers to contract tightly, driving all the internal juices inward toward the center of the muscle. If you slice into the tenderloin immediately after pulling it from the grill, those tightly compressed juices will rush out onto your cutting board, leaving the meat dry.
During the rest period, the muscle fibers relax, allowing the savory juices to redistribute evenly throughout the entire cut. Furthermore, carryover cooking will occur, meaning the residual heat trapped on the surface will continue to travel inward, raising the core temperature by an additional 5°F to 7°F, bringing your pork to a safe, perfectly juicy 145°F right as you prepare to slice.
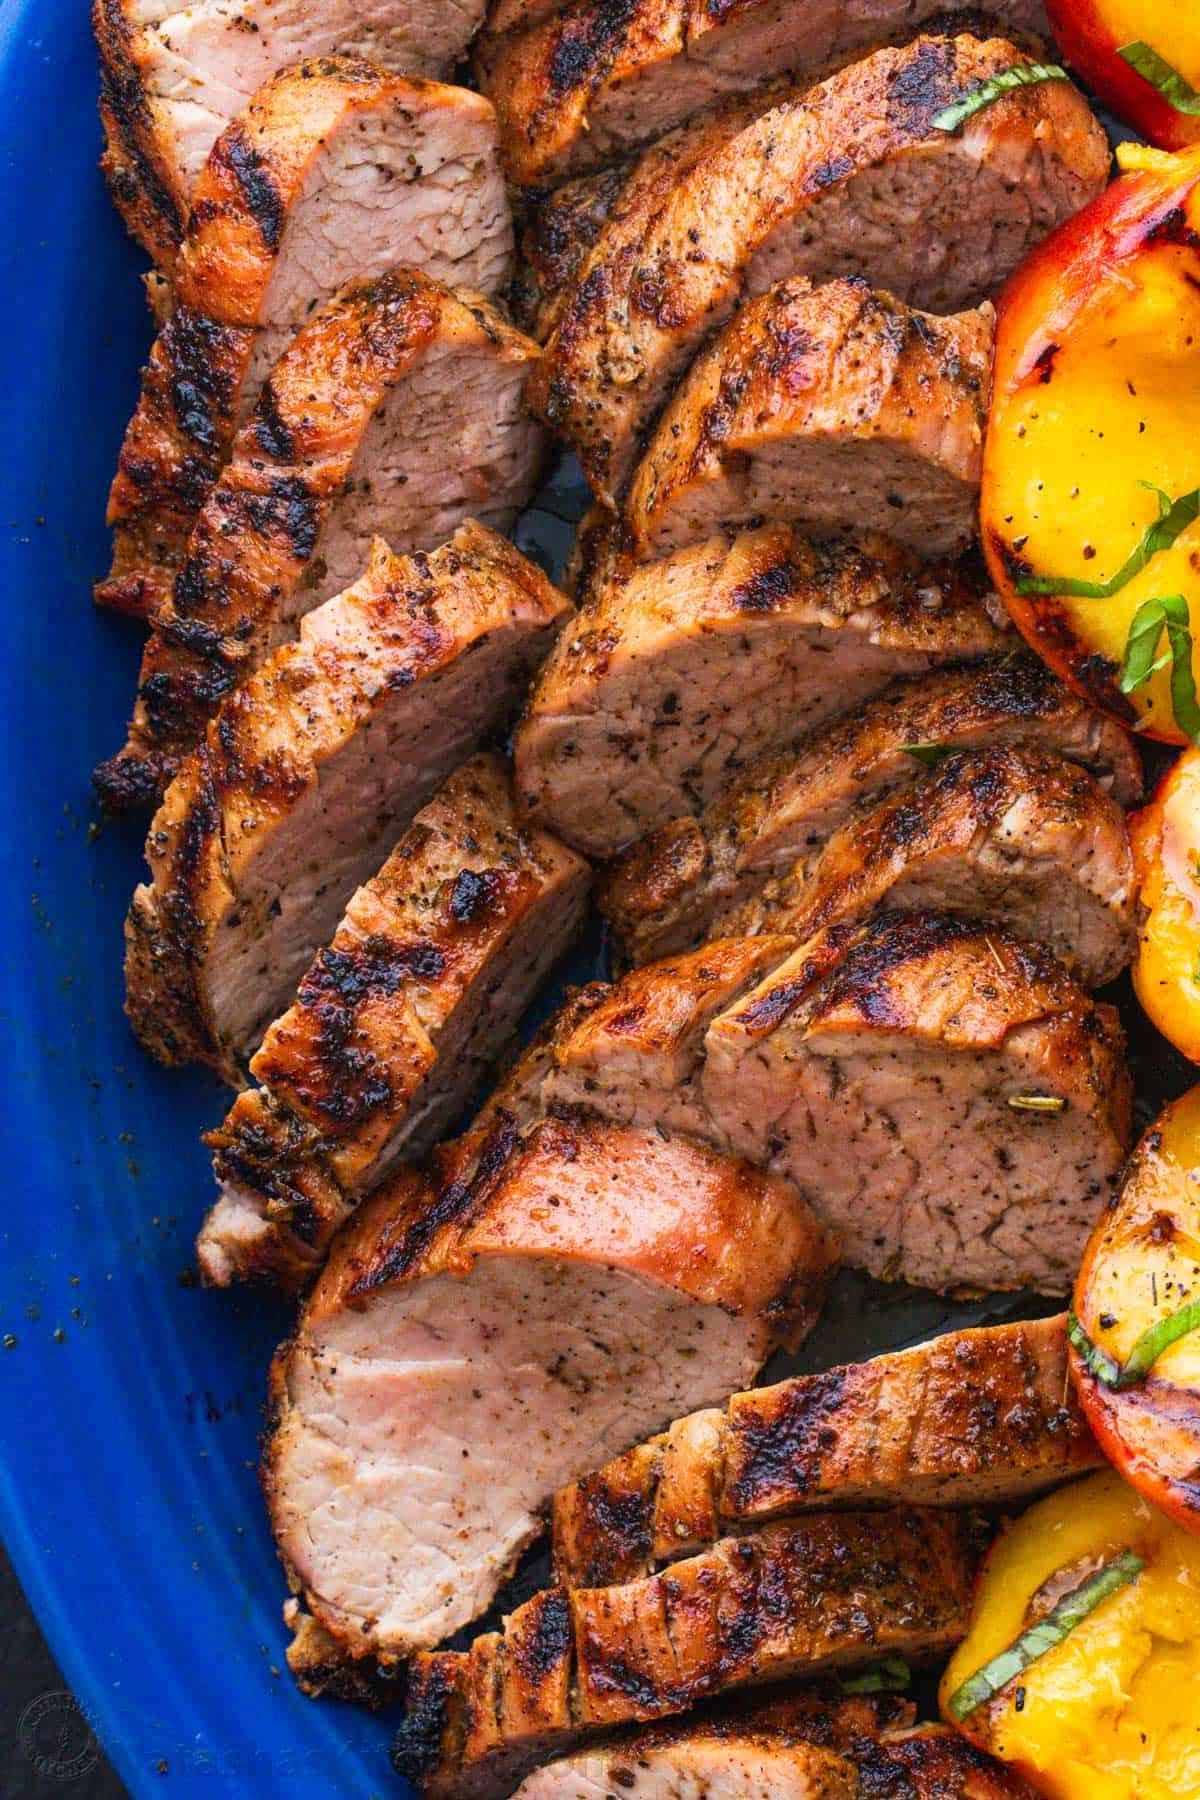
Section 6: Slicing with Precision for Maximum Tenderness
When the resting period is complete, the final step in the kitchen is slicing the meat. How you orient your knife can profoundly impact the perceived tenderness of the pork when bitten.
Cutting Against the Grain
Look closely at the surface of your rested pork tenderloin. You will see the natural muscle fibers running longitudinally from the pointed tip up to the thick head of the cut.
Always slice the meat perpendicularly (at a 90-degree angle) across those fibers. By cutting across the grain, your knife does the heavy mechanical work of shortening the long muscle strands. This means your teeth don’t have to break down elongated fibers, resulting in a melt-in-your-mouth texture.
The Bias Angle Technique
For an elegant, professional culinary presentation, angle your slicing knife at a 45-degree bias slant rather than cutting straight up and down. Slicing on a bias creates wider, beautiful medallions that showcase the delicate, uniform pink interior of the pork while offering more surface area to catch any accumulating resting juices or accompanying glazes on the platter. Aim for uniform slices roughly ½-inch thick to ensure substantial, satisfying portions that retain heat well.
Section 7: The Sweet Complement: Mastering Grilled Stone Fruit
While your pork tenderloin is resting beautifully under its foil tent, you have the perfect window of opportunity to execute the sweet half of this culinary pairing: grilled stone fruits.
The natural acidity and high sugar content of stone fruits make them an ideal foil for the savory, smoky notes of grilled pork. When exposed to high heat, their natural sugars caramelize rapidly, intensifying their sweetness while creating a lovely tender-crisp texture.
Selecting the Ideal Fruits
The umbrella of stone fruits offers incredible variety, each bringing a unique nuance to the plate:
- Peaches and Nectarines: The quintessential choices. They offer a perfect balance of lush sweetness and bright acidity.
- Plums and Pluots: Provide a sharper, tart flavor profile with gorgeous deep red, purple, or golden hues.
- Apricots: Denser and less watery, they hold their structural shape beautifully on the grill and offer a subtle, floral sweetness.
The Ripeness Rule
When selecting fruit for the grill, avoid overripe, soft, or bruised specimens. If a peach is soft enough that your thumb leaves a dent when pressed, its cell walls are already breaking down; it will collapse into mush and stick aggressively to the grates.
Instead, look for fruit that is firm but slightly yielding—just a day or two away from being perfectly ripe for raw eating. They need structural integrity to withstand the intense heat of the grates.
Preparing and Stabilizing the Fruit
- The Halving Technique: Run a sharp chef’s knife along the natural seam of the fruit until you hit the hard central pit. Guide the blade all the way around the fruit. Hold both halves and gently twist them in opposite directions to separate them.
- Pit Removal: Use a spoon, a melon baller, or your fingers to pop the hard pit out of the center.
- The Flat Plane: If your fruit halves are rocking unsteadily, shave a tiny, paper-thin slice off the rounded back of the skin side to create a small, flat base. This keeps them steady on the grates.
Grilling the Fruit Step-by-Step
- Lightly Lubricate: Lightly brush the cut flesh side of the fruit with a neutral, high-smoke-point oil (like avocado or canola oil). Avoid extra-virgin olive oil here, as its distinct flavor can clash with the fruit, and it burns at a lower threshold.
- The Direct Blast: Place the fruit halves cut-side down directly over the high-heat Direct Cooking Zone. 3. Do Not Disturb: Leave them entirely undisturbed for 3 to 4 minutes. You want to give the intense heat time to caramelize the fruit sugars and form distinct, dark grill marks before attempting to move them.
- Flip and Warm: Use a thin, flexible metal spatula to gently lift the fruit. If it resists or sticks, let it cook for another 30 seconds until it releases naturally. Flip the fruit over onto its skin side and move it to the Indirect Zone for an additional 2 minutes just to warm the core through without over-softening the flesh.
Section 8: Harmonizing the Plate: Glazes, Herbs, and Assembly
To transform your perfectly sliced pork medallions and smoky charred stone fruits into a cohesive masterpiece, you need a few final binding elements to tie the sweet and savory profiles together.
1. The Finishing Drizzle
While the natural juices from the meat and fruit are wonderful, a concentrated glaze elevates the entire dish. You can reduce a portion of your unused marinade in a small saucepan on the stovetop until thick and syrupy, or create a quick finishing glaze by whisking together:
- ¼ cup raw honey or hot honey
- 2 tablespoons aged balsamic vinegar
- 1 tablespoon melted butter
- A tiny pinch of flaky sea salt
Drizzle this glaze elegantly across the arranged pork and fruit right before serving.
2. The Fresh Herb Counterpoint
Caramelized sugars and savory meats can feel heavy without a pop of fresh, raw green herb.
- Fresh Basil: Stack several large basil leaves, roll them tightly into a cylinder like a cigar, and slice across thinly to create delicate ribbons (chiffonade). The peppery, anise-forward notes of basil pair beautifully with peaches and pork.
- Fresh Mint: Adds an incredibly refreshing, cooling contrast that cuts through the rich fats.
- Tarragon: Offers a subtle, sophisticated French flair with a soft licorice undertone that elevates plums and pork.
3. Assembling the Platter
For a gorgeous visual display, select a wide, vibrant serving platter.
- Arrange the bias-cut pork tenderloin medallions overlapping down the center of the dish, showing off their perfect pink cores.
- Nestled the charred, golden-orange stone fruit halves along the sides of the pork.
- Drizzle the accumulated resting juices from the cutting board back over the meat.
- Finish with your balsamic-honey drizzle and a generous scattering of fresh green herb chiffonade.
Section 9: Troubleshooting and Pro-Tips for Perfect Results Every Time
Even with the best instructions, outdoor cooking introduces erratic variables. Here is how to navigate unexpected challenges on the fly.
What to Do If Your Grill Flares Up
If the sugar or oil from your marinated pork drips onto charcoal or gas diffusers, it can trigger sudden grease fires.
- Don’t Panic and Don’t Use Water: Spraying water inside a gas grill can ruin components, and on a charcoal grill, it kicks up ash onto your food.
- The Indirect Escape: Use long tongs to immediately transfer the pork tenderloin away from the flames over to the safe haven of your Indirect Zone. Close the grill lid to starve the fire of oxygen until the flare-up subsides naturally.
How to Salvage Under-Grilled Fruit
If your fruit finishes grilling but feels hard or lacks sweetness due to being slightly underripe, don’t worry. Place the grilled halves into a bowl, toss them with a tablespoon of brown sugar or maple syrup while they are still warm, and cover the bowl with plastic wrap for five minutes. The trapped residual steam will rapidly soften the fruit, while the added sugar creates a quick glaze that mimics natural caramelization.
Managing Leftovers with Care
If you have leftover grilled pork tenderloin, store it in an airtight glass container in the refrigerator for up to three days.
- Avoid the Microwave: Reheating lean pork medallions in a microwave will aggressively overcook them into a rubbery texture.
- The Gentle Reheat: Instead, slice the leftover pork thinly and use it cold in gourmet sandwiches paired with leftover fruit, or gently warm the slices in a skillet over low heat with a splash of broth or butter just until taken off the chill.
Conclusion: The Reward of Patience and Precision
Grilling is far more than just applying raw heat to cold ingredients; it is a thoughtful dance of temperature control, timing, and flavor balancing. By understanding the lean anatomy of the pork tenderloin, utilizing a well-balanced marinade, managing your grill with a dual-zone configuration, and respecting the magic threshold of 145°F, you unlock the true potential of this versatile cut.
When paired alongside the caramelized, smoky sweetness of fresh, charred stone fruits and accented with bright herbs, this dish transforms simple ingredients into a stunning celebration of outdoor cooking. Fire up your grill, trust your thermometer, and enjoy every bite of this perfect sweet-and-savory masterpiece.