The Ultimate Guide to Slow-Cooker Comfort Food: Mastering the Art of Melted Cheese and Tender Meats
There is a unique culinary magic that happens when patience meets a heavy ceramic pot. In the fast-paced landscape of modern cooking, where high-heat searing and rapid air-frying often dominate the conversation, the slow cooker remains an understated champion of depth, texture, and flavor.
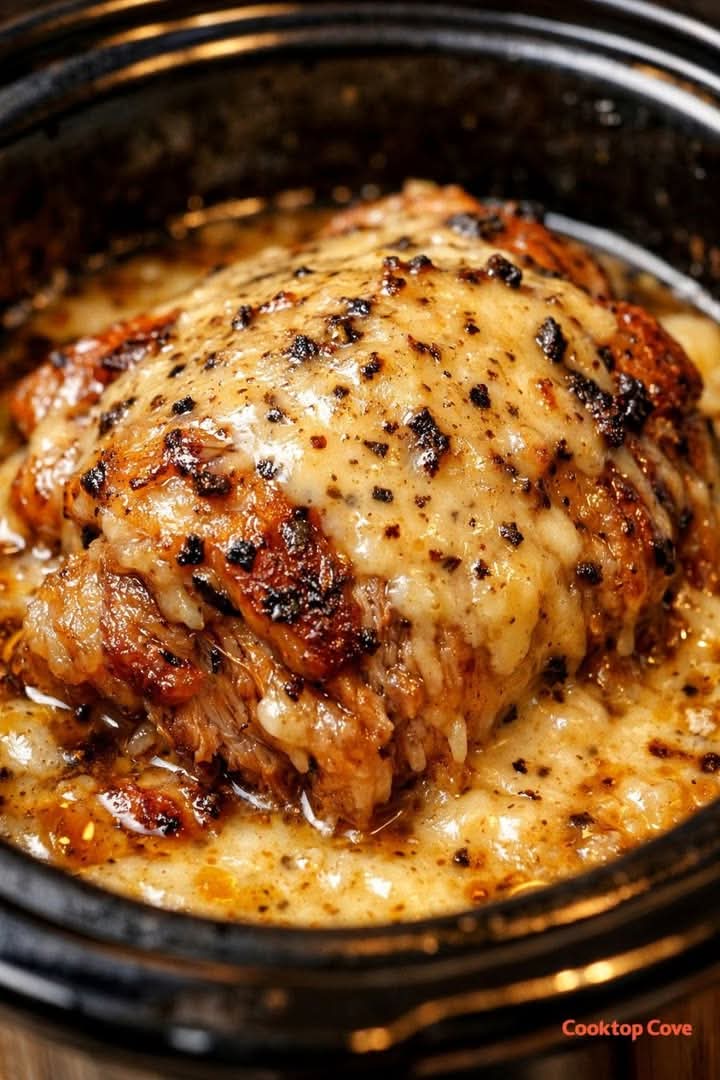
When you peer into a slow cooker and see a perfectly tender cut of meat, bathed in its own rich juices and blanketed by a bubbling, golden layer of melted cheese, you are looking at the culmination of specific chemical transformations. This isn’t just convenience cooking; it is the deliberate application of low-and-slow heat to break down tough connective tissues, rendering meat so succulent it falls apart at the touch of a fork, all while infusing it with whatever aromatics share its space.
To truly master this style of cooking, one must look beyond the basic “dump-and-go” mentality. Crafting a truly spectacular slow-cooked masterpiece requires an understanding of meat selection, moisture control, timing, and the precise art of dairy integration. This comprehensive guide explores every facet of creating deeply satisfying, slow-cooked dishes that deliver restaurant-quality results right from your kitchen counter.
Section 1: The Science of Slow Cooking
To understand why slow cooking yields such remarkably tender results, it helps to understand what happens to meat at a microscopic level when subjected to prolonged, gentle heat.
The Transformation of Collagen
Tougher cuts of meat—such as beef chuck, pork shoulder, and chicken thighs—are packed with a dense structural protein called collagen. When cooked quickly over high heat, collagen contracts tightly, squeezing out moisture and turning the meat rubbery and dry.
However, when kept at a low simmer (around 180°F to 200°F) over several hours, a beautiful transformation occurs:
- The tightly wound collagen fibers begin to uncoil and dissolve.
- It converts into gelatin, a rich, silky substance that can hold up to ten times its weight in water.
- This gelatin coats the individual meat fibers, giving the dish a luxurious, lip-smacking mouthfeel and keeping the meat incredibly moist, even if it has technically lost its original cellular water content.
Retaining Moisture and Flavor Density
Because a slow cooker operates with a tightly sealed lid, very little evaporation occurs. The moisture released from the meat and vegetables trapped inside vaporizes, hits the cooler lid, and condenses back down into the pot. This continuous self-basting cycle ensures that the cooking liquid becomes highly concentrated with the natural fats, proteins, and sugars of the ingredients, creating a deeply savory base sauce that cannot be replicated in a rapid boil.
Section 2: Selecting the Perfect Ingredients
Not all ingredients are created equal when it comes to the slow cooker environment. Selecting the wrong cut of meat or using delicate vegetables too early can turn a promising meal into a mushy, unappealing mess.
Choosing the Right Meats
| The golden rule of slow cooking is simple: lean meats fail, fatty and fibrous meats thrive. | Meat Type | Best Cuts for Slow Cooking | Why They Work | Cuts to Avoid |
|---|---|---|---|---|
| Beef | Chuck roast, short ribs, brisket, oxtail | High collagen and intramuscular fat melt into rich gelatin over time. | Boneless ribeye, sirloin, tenderloin (they turn dry and chalky). | |
| Pork | Pork shoulder (Boston butt), pork cheeks, spare ribs | Plentiful fat marbling prevents drying during 8+ hour cooking cycles. | Pork tenderloin, center-cut lean chops (they become incredibly tough). | |
| Poultry | Bone-in, skin-on chicken thighs, drumsticks | Dark meat contains more connective tissue and fat, retaining juiciness. | Boneless, skinless chicken breasts (easily overcook into dry shreds). |
The Role of Aromatics and Vegetables
Vegetables behave differently under prolonged low heat. Hard, dense root vegetables break down beautifully, while delicate greens or cruciferous vegetables require careful timing.
- Root Vegetables (Carrots, Potatoes, Parsnips): Cut these into large, uniform chunks. Because they take longer to soften than meat, place them at the very bottom of the slow cooker insert, where they are closest to the heating element.
- The Allium Base (Onions, Garlic, Leeks): These form the foundational flavor profile. Sautéing them briefly before adding them to the pot coaxes out their natural sugars, preventing a raw, sulfurous aftertaste.
- Delicate Vegetables (Peas, Bell Peppers, Spinach): Stir these into the pot during the final 20 to 30 minutes of cooking. This preserves their vibrant color, structural integrity, and fresh flavor.
Section 3: Pre-Sear vs. Dump-and-Go: The Ultimate Debate
The convenience of a slow cooker lies in its ability to take raw ingredients, walk away, and return to a completed meal. However, if your goal is depth of flavor, skipping the skillet is a major compromise.
The Magic of the Maillard Reaction
The Maillard reaction is a complex chemical reaction between amino acids and reducing sugars that occurs when food is browned at high temperatures. It is what gives a seared steak, roasted coffee, and baked bread their incredibly complex, savory flavors.
A slow cooker simply cannot reach the temperatures required to trigger the Maillard reaction. If you place raw meat directly into a slow cooker, it will cook through perfectly well, but it will lack the caramelized, umami-rich crust that elevates a dish from simple sustenance to culinary art.
How to Execute the Perfect Pre-Sear
- Dry the Meat Thoroughly: Pat the surface of your meat completely dry with paper towels. Moisture is the enemy of a good sear; if the meat is wet, it will steam in the pan rather than brown.
- Season Generously: Apply a liberal coating of coarse salt and cracked black pepper to all sides of the meat.
- Get the Pan Smoking Hot: Heat a heavy cast-iron skillet or stainless steel pan over high heat with a tablespoon of high-smoke-point oil (like avocado, canola, or grapeseed oil).
- Sear, Don’t Cook: Place the meat in the pan and leave it undisturbed for 2–3 minutes per side until a deep, mahogany-brown crust forms. Deglaze the pan with a splash of wine, broth, or water, scraping up all the stuck, caramelized bits (fond), and pour that liquid straight into your slow cooker.
Section 4: The Art of the Cheesy Finish
A perfectly slow-cooked dish topped with a thick, beautifully melted blanket of cheese is the epitome of comfort food. However, dairy is notoriously finicky when exposed to prolonged heat. If added too early, cheese will break down into an oily, grainy, curdled mess.
Understanding Cheese Chemistry
Cheese is an emulsion of milk fat, water, and protein matrix (casein). When heated, the protein matrix relaxes, allowing the fat to flow more freely, creating that classic stretch and melt.
However, if cheese is subjected to sustained heat for hours:
- The proteins tighten up and clump together.
- The water evaporates or separates.
- The fat separates completely, leaving a greasy puddle on top of your food and a grainy texture underneath.
The Best Cheeses for Melting
For a flawless slow-cooker finish, look for high-moisture, semi-hard cheeses with good melting properties:
- Low-Moisture Mozzarella: The king of stretch and coverage. It melts uniformly without releasing excessive oil.
- Provolone: Offers excellent meltability with a slightly sharp, smoky undertone that complements beef and pork perfectly.
- Fontina or Gruyère: Exceptionally smooth, rich, and nutty—ideal for sophisticated, velvety finishes.
- Sharp Cheddar / Monterey Jack: Great for classic flavor profiles, though cheddar should be freshly grated from a block to avoid the anti-caking agents found in pre-shredded bags, which hinder smooth melting.
Step-by-Step Guide to the Perfect Melted Cheese Crust
To achieve that picture-perfect, gooey, golden cheese topping without compromising the integrity of the dish, follow this precise method:
- Cook the Base Fully: Allow your meat and vegetable base to cook completely according to your recipe timeline until the meat is ultra-tender.
- Skim the Excess Surface Fat: Slow-cooked meats release a substantial amount of rendered fat. Before adding cheese, use a wide spoon to skim the pooling oil off the surface of the sauce. If left behind, this oil will mix with the melting cheese and turn it greasy.
- Layer the Cheese Evenly: Turn off the slow cooker or switch it to the “Warm” setting. Shred or slice your chosen cheese and distribute it in a generous, even layer over the entire surface of the meat.
- The Trap-and-Melt Method: Place the lid back onto the slow cooker tightly. Let it sit undisturbed for 10 to 15 minutes. The residual heat trapped inside the ceramic insert will gently and perfectly melt the cheese into a uniform, glossy blanket.
- Optional: The Oven Broiler Finish: If your specific slow cooker model features a removable ceramic insert that is explicitly labeled oven-safe, you can carefully transfer the uncovered insert to your kitchen oven. Broil on high for 2–4 minutes, watching it closely, until the cheese forms a bubbly, deeply browned crust.
Section 5: Layering Liquid and Managing Consistency
A common pitfall in slow cooking is ending up with a watery, washed-out sauce. Because the lid traps all internal moisture, liquids do not reduce or thicken naturally during the cooking process. Managing your ratios from the start is paramount.
Liquid Ratios: Less is More
When adapting a conventional stovetop or oven recipe for a slow cooker, a reliable rule of thumb is to reduce the total liquid volume by roughly 30% to 50%.
The meat and vegetables will release a surprising amount of water as their cellular walls break down. The liquid level should ideally cover no more than half to two-thirds of the ingredients at the start of the cooking cycle. The ingredients do not need to be completely submerged; the trapped steam will handle the rest.
How to Thickening the Sauce at the End
If your dish finishes cooking and the sauce is thinner than desired, do not despair. You can easily adjust the body of your sauce using these proven techniques:
- The Cornstarch Slurry: In a small bowl, whisk together 2 tablespoons of cornstarch with 2 tablespoons of cold water until smooth. Stir this mixture directly into the bubbling slow cooker liquid during the last 20 minutes of cooking on the “High” setting. The starch molecules will hydrate and swell, rapidly thickening the sauce into a glossy glaze.
- The Beurre Manié: Knead together equal parts softened butter and all-purpose flour into a smooth paste. Whisk small, pea-sized bits of this paste into your hot slow cooker sauce. The butter melts, distributing the flour evenly without creating lumps, yielding a rich, velvety texture.
- Reduction via Stovetop: Carefully ladle the excess cooking liquid out of the slow cooker and into a saucepan. Bring it to a rapid boil on your stove, allowing it to reduce naturally by half until it coats the back of a spoon, then pour it back over your dish.
Section 6: Comprehensive Recipe Concept: French Onion Slow-Cooked Beef Thighs with Melted Gruyère
To bring all these principles together, let us examine a masterclass application: a slow-cooked, rich beef dish heavily inspired by the deep, savory flavors of a classic French onion soup, finished with an decadent layer of toasted cheese.
The Foundation Layer
- 3 pounds beef chuck or thick beef thigh portions, cut into large, uniform pieces.
- 4 large yellow onions, thinly sliced from root to stem.
- 4 cloves garlic, smashed and minced.
- 1 cup high-quality beef bone broth.
- ½ cup dry white or red wine (such as Sauvignon Blanc or Cabernet Sauvignon) to deglaze.
- 2 tablespoons Worcestershire sauce.
- Fresh herbs: 3 sprigs of fresh thyme, 1 fresh rosemary sprig, and 2 bay leaves.
The Preparation Flow
- Caramelize the Aromatics: In a large skillet over medium heat, melt two tablespoons of butter. Add the sliced onions with a pinch of salt. Cook them slowly for roughly 15–20 minutes, stirring occasionally, until they turn soft, sweet, and a deep golden-brown color. Stir in the garlic for the final minute, then transfer the entire mixture into the bottom of your slow cooker insert.
- Sear the Beef: Turn the skillet heat up to high. Pat your beef pieces completely dry with paper towels and season them thoroughly with salt and pepper. Sear the beef in batches, ensuring a deep brown crust develops on all sides. Place the seared meat directly on top of the caramelized onions in the slow cooker.
- Deglaze the Skillet: Pour the wine into the hot skillet, using a wooden spoon to scrape up every bit of caramelized flavor left on the bottom of the pan. Let the alcohol bubble down for about two minutes, then stir in the beef bone broth and Worcestershire sauce. Pour this rich liquid over the beef in the slow cooker. Top with the fresh thyme, rosemary, and bay leaves.
- The Slow Cook Journey: Cover with the lid and set the cooker to Low for 7 to 8 hours (or High for 4 to 5 hours). Resist the urge to open the lid during cooking; every time you open it, you release trapped heat and extend the required cooking time by roughly 15 minutes.
- The Finale: Once the cooking duration is complete and the beef is incredibly tender, fish out the herb sprigs and bay leaves. Skim away any excess fat pooling on the surface. Turn the slow cooker off.
- The Cheese Blanket: Completely cover the top of the beef and onions with a generous layer of freshly grated Gruyère, Fontina, or low-moisture Mozzarella cheese. Pop the lid back on for 10 minutes until the cheese transforms into a smooth, gooey, beautifully melted shield. Serve directly from the pot.
Section 7: Critical Slow Cooker Safety and Maintenance
Operating a appliance over many hours requires a quick review of fundamental kitchen safety principles to ensure your meals are both delicious and entirely safe to consume.
Temperature Danger Zone Management
The USDA defines the food safety “danger zone” as the temperature range between 40°F and 140°F, where harmful bacteria can multiply rapidly.
- Never put frozen meat directly into a slow cooker. It takes far too long to thaw and heat through, meaning the meat will spend hours sitting directly inside the danger zone. Always completely thaw your proteins in the refrigerator beforehand.
- Keep the lid on. Constant lifting of the lid drops the internal temperature significantly, potentially prolonging the time food spends in unsafe zones.
- Cool down correctly. Do not place a boiling-hot ceramic slow cooker insert straight into your refrigerator. The extreme temperature shock can crack the heavy stoneware, and the massive heat source will raise the internal temperature of your fridge, putting your other stored groceries at risk. Transfer leftovers into shallow, airtight storage containers first.
Cleaning and Stoneware Longevity
To preserve the non-stick properties and structural integrity of your slow cooker’s ceramic insert, avoid thermal shock. Always let the insert cool down completely to room temperature before washing it with cool or warm water. Avoid abrasive metal scouring pads, which can create microscopic scratches in the glaze, causing food to stick permanently in future cooking sessions. For tough, baked-on rings of cheese or sauce, fill the insert with warm, soapy water and let it soak on your counter overnight; it will wipe clean effortlessly the following morning.
Conclusion: Embracing the Slow Movement
The kitchen is often filled with rush, noise, and immediacy. Embracing the slow cooker is an exercise in culinary mindfulness. By choosing the right cuts of meat, taking the extra few minutes to properly sear your ingredients, understanding the delicate nature of dairy, and letting time do the heavy lifting, you elevate simple comfort ingredients into a profoundly satisfying dining experience. The reward is a meal rich in depth, texture, and soul—perfectly melted, exceptionally tender, and entirely worth the wait.