The Ultimate Guide to Crispy Stuffed Potato Cakes: A Culinary Masterclass
Potato cakes, pancakes, or croquettes—call them what you will, but there is something universally comforting about a golden-brown, crispy exterior yielding to a fluffy, savory center. When you add a molten core of gooey cheese into the mix, you aren’t just making a side dish; you are creating a masterpiece of texture and flavor.
This comprehensive guide will walk you through every nuance of creating the perfect stuffed potato cake. We will explore the science of the starch, the art of the sear, and the creative possibilities of fillings. Whether you are a seasoned home cook or a beginner looking to impress, this 3,000-word deep dive is your definitive roadmap to potato perfection.
Table of Contents
- The Philosophy of the Potato Cake
- Ingredient Deep-Dive: Choosing Your Components
- The Essential Equipment
- The Science of Texture: Starch and Moisture
- The Core Recipe: Step-by-Step Instructions
- Mastering the Fillings: From Cheese to Braised Meats
- The Art of the Sear: Frying Techniques
- Troubleshooting Common Mistakes
- Global Variations: Inspiration from Around the World
- Pairing and Presentation
- Storage, Reheating, and Make-Ahead Tips
- Conclusion: The Joy of the Perfect Bite
1. The Philosophy of the Potato Cake
At its heart, the potato cake is a dish born of thrift and ingenuity. Historically, it was a way to repurpose leftover mashed potatoes from the night before. However, the modern iteration has evolved into a deliberate, gourmet endeavor.
The goal is a “Contrast of Constants.” You want a crust that is shattered by the fork, followed by a middle that is almost cloud-like, culminating in a center that flows like lava. This dish satisfies our primal craving for carbohydrates and fats while providing a blank canvas for high-level seasoning.
2. Ingredient Deep-Dive
To get a result like the one in your mind’s eye, you cannot simply grab any bag of potatoes. Every ingredient serves a structural or flavor-based purpose.
The Potato
- Russet (Idaho): High in starch, low in moisture. This is the gold standard. They provide the fluffiest interior and the crispest exterior.
- Yukon Gold: A medium-starch option. They offer a buttery flavor and a creamier texture but can be slightly harder to handle if the moisture isn’t managed.
- Avoid Waxier Potatoes: Red-skinned or new potatoes have too much moisture and not enough starch to hold their shape during the stuffing and frying process.
The Binder
While the starch in the potato does most of the heavy lifting, a binder ensures the cake doesn’t disintegrate in the oil.
- All-Purpose Flour: Adds stability.
- Cornstarch: Provides a lighter “crunch” than flour.
- Egg Yolk: Adds richness and acts as a biological “glue.”
The Fat
- For the Mash: High-quality unsalted butter and a touch of heavy cream.
- For Frying: A neutral oil with a high smoke point (Canola, Grapeseed, or Avocado oil). You can add a tablespoon of butter to the oil at the very end for a nutty aroma.
The Filling
- Mozzarella: For the ultimate “cheese pull.”
- Sharp Cheddar: For flavor, though it is less “stretchy.”
- Gruyère or Fontina: For a sophisticated, nutty profile.
3. The Essential Equipment
You don’t need a professional kitchen, but a few specific tools will make your life significantly easier:
- A Potato Ricer or Food Mill: This is non-negotiable for smooth, lump-free cakes. Mashing by hand with a fork can overwork the starch, leading to a gluey texture.
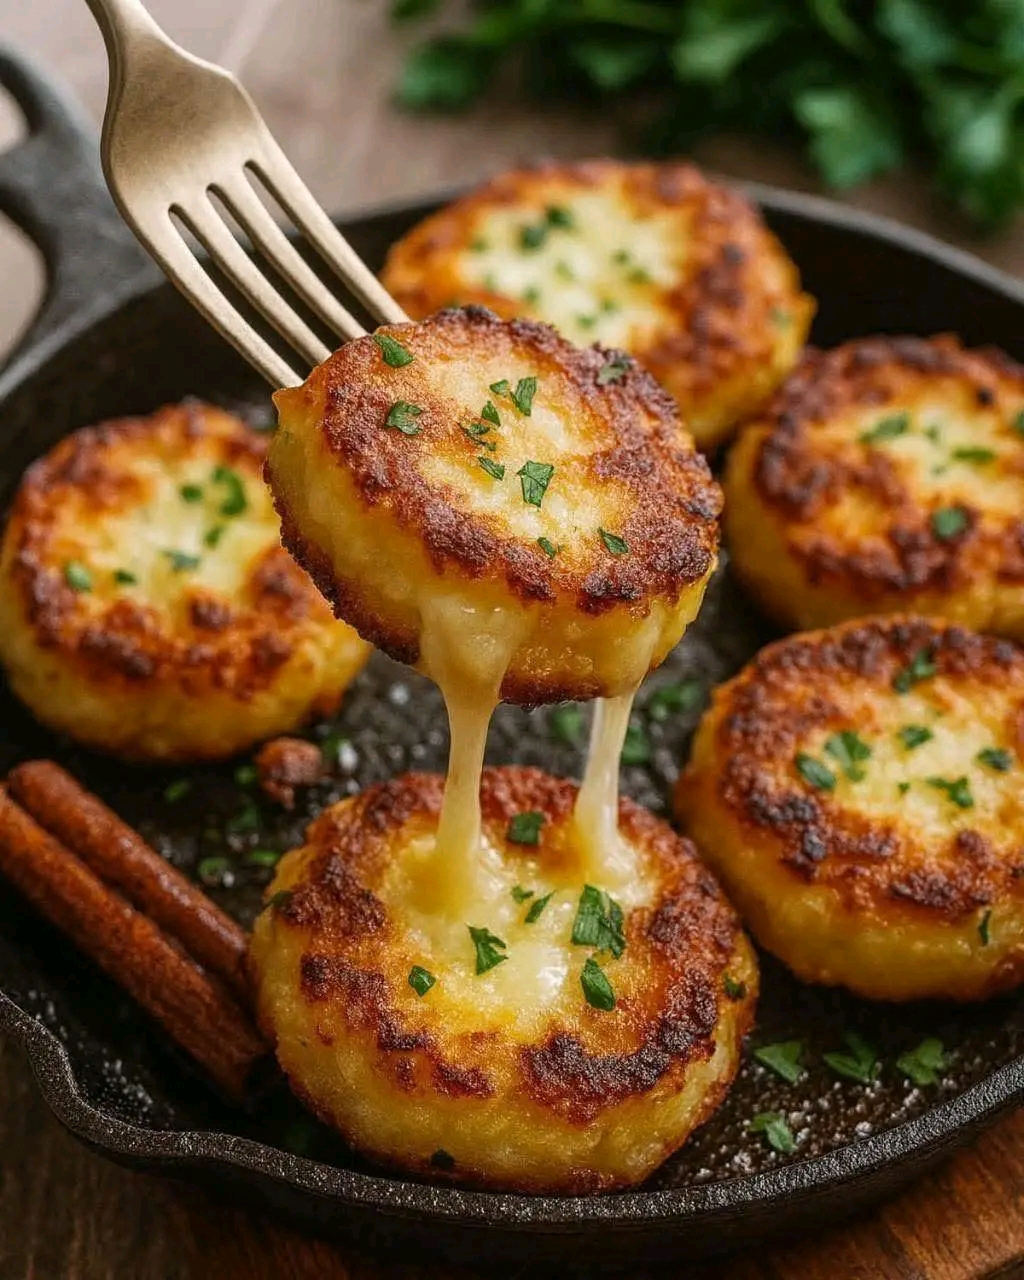
- Cast Iron Skillet: As seen in the inspiration image, cast iron provides the most even heat distribution for that perfect mahogany crust.
- Offset Spatula: For delicate flipping.
- Digital Thermometer: To ensure your oil stays between 350°F and 375°F.
4. The Science of Texture: Starch and Moisture
The biggest enemy of a potato cake is water. If your mashed potato base is too wet, the cakes will slump and absorb grease like a sponge.
The Pro Secret: Steam-dry your potatoes. After boiling the potatoes (ideally in their skins to prevent water absorption), peel them while hot and return them to the warm pot for two minutes. This allows excess steam to evaporate, leaving you with “dry” potato solids that are ready to soak up butter instead of water.
5. The Core Recipe: Step-by-Step Instructions
Prep Time: 30 mins | Cook Time: 20 mins | Yields: 8-10 cakes
Ingredients:
- 2 lbs Russet potatoes, peeled and cubed
- 2 tbsp Unsalted butter
- 1 Large egg yolk
- 1/4 cup All-purpose flour (plus extra for dusting)
- 1 tsp Garlic powder
- 1/2 tsp Onion powder
- 1/4 cup Freshly chopped parsley or chives
- Salt and black pepper to taste
- 6 oz Low-moisture mozzarella, cut into 1-inch cubes
- Neutral oil for shallow frying
Step 1: Boiling the Potatoes
Place the potato cubes in a large pot of cold salted water. Bring to a boil and cook until fork-tender (about 15 minutes). Drain thoroughly.
Step 2: The “Dry” Phase
Return the potatoes to the hot pot for 2 minutes over very low heat, shaking the pan until the potatoes look “floury” and the moisture is gone.
Step 3: Mixing the Base
Pass the hot potatoes through a ricer into a large bowl. While still warm, fold in the butter, garlic powder, onion powder, salt, and pepper. Let the mixture cool for 10 minutes (this prevents the egg from scrambling). Fold in the egg yolk, flour, and herbs.
Step 4: The Stuffing Process
Take a handful of the potato mixture (about the size of a lemon) and flatten it in your palm. Place a cube of mozzarella in the center. Carefully fold the edges over the cheese, pinching to seal. Ensure there are no cracks, or the cheese will escape during frying. Shape into a disk about 1-inch thick.
Step 5: The Chilling (Crucial Step)
Place the formed cakes on a parchment-lined tray and refrigerate for at least 30 minutes. This firms up the starch and prevents the cakes from falling apart.
Step 6: The Sear
Heat 1/4 inch of oil in a cast-iron skillet over medium-high heat. Lightly dust each cake with a tiny bit of flour just before it hits the pan. Fry for 3-4 minutes per side until deeply golden and crispy.
6. Mastering the Fillings
Once you’ve mastered the basic cheese center, the world is your oyster.
- The Carnivore: Tiny bits of crispy bacon or pancetta mixed with shredded cheddar.
- The Mushroom Forest: Sautéed finely minced mushrooms with thyme and a dab of goat cheese.
- The Breakfast Club: A small amount of cooked chorizo and a tiny piece of jalapeño.
- The Smoked Salmon: Cream cheese and dill filling (best served with a dollop of sour cream on top).
7. The Art of the Sear: Frying Techniques
Frying is a balance of temperature. If the oil is too cold, the potato absorbs the oil and becomes heavy. If it’s too hot, the outside burns before the cheese in the center has a chance to melt.
- The Shimmer Test: If you don’t have a thermometer, dip the end of a wooden spoon into the oil. If steady bubbles form around the wood, it’s ready.
- Don’t Overcrowd: Fry in batches. Adding too many cakes at once drops the oil temperature significantly.
- The Butter Finish: In the last minute of frying, drop a knob of butter and a sprig of rosemary into the pan. Baste the cakes with the foaming butter for an incredible aroma.
8. Troubleshooting Common Mistakes
“My cakes are falling apart in the pan!”
- Cause: Too much moisture or not enough binder.
- Fix: Add another tablespoon of flour to the remaining mixture and ensure the cakes are chilled before frying.
“The cheese isn’t melting!” - Cause: The cakes were too thick or the heat was too high.
- Fix: Use room-temperature cheese instead of cold cheese. You can also finish the cakes in a 350°F oven for 5 minutes to ensure a molten center.
“The crust is soggy.” - Cause: Not enough oil or moving the cakes too early.
- Fix: Let the cake sit undisturbed for at least 3 minutes to build a “crust.” Use a wire rack for cooling rather than a paper towel to prevent the bottom from steaming.
9. Global Variations
Every culture has a version of this dish:
- Ireland (Boxty): Uses a mix of mashed and grated raw potatoes for a unique texture.
- Korea (Gamja-jeon): Often utilizes potato starch for a chewier, more translucent finish.
- Japan (Korokke): Usually breaded in Panko breadcrumbs for an aggressive, airy crunch.
- Latin America (Papas Rellenas): Often stuffed with seasoned ground beef and deep-fried.
10. Pairing and Presentation
A dish this rich needs a bit of acidity to balance it out.
- Sauces: A lemon-garlic aioli, a spicy Sriracha mayo, or a traditional dollop of sour cream with chives.
- Side Salads: A bitter arugula salad with a balsamic vinaigrette cuts through the fat beautifully.
- The “Insta-Garnish”: As seen in professional photography, a sprinkle of fresh Maldon sea salt and finely chopped parsley provides the color contrast that makes the dish “pop.”
11. Storage and Make-Ahead Tips
These cakes are a fantastic option for meal prep or hosting.
- Fridge: Formed, uncooked cakes can stay in the fridge for up to 48 hours.
- Freezer: You can freeze the uncooked cakes. Place them on a tray until frozen solid, then transfer to a freezer bag. Fry directly from frozen, adding 2-3 minutes per side to the cook time.
- Reheating: Never use a microwave—it will make them rubbery. Use an air fryer (375°F for 5 minutes) or a toaster oven to bring back the crunch.
12. Conclusion: The Joy of the Perfect Bite
The stuffed potato cake is more than just food; it is a labor of love. It requires patience—waiting for the potatoes to dry, waiting for the cakes to chill, and waiting for that perfect golden sear. But when you lift that first cake with a fork and see the cheese stretch between the layers of seasoned potato, you’ll realize that the effort was worth every second.
Whether you’re serving these as a decadent appetizer at a dinner party or as a cozy weekend brunch, they represent the pinnacle of comfort food. Experiment with flavors, trust the process, and most importantly, enjoy the crunch!