The Ultimate Guide to the Velvety Cream Mousse: A Masterclass in Texture
There are desserts that require hours of meticulous baking, precise oven temperatures, and complex structural engineering. Then, there are desserts that rely on the sheer, harmonious alchemy of ingredients. The Velvety Cream Mousse—often referred to as a “Brazilian Mousse” or a simplified chilled pudding—belongs firmly to the latter category. It is a triumph of modern culinary simplicity, delivering a texture that is impossibly smooth, cloud-like, and profoundly satisfying.
Whether you are a seasoned pastry chef looking for a foolproof dessert or a home cook seeking to impress guests with minimal effort, this recipe is a cornerstone. It is a study in texture—that perfect intersection where airiness meets density. When garnished with chocolate sprinkles (granulado), it offers a nostalgic, comforting profile that transcends age, culture, and occasion.
This comprehensive guide will walk you through the history, the science, the technique, and the endless variations of this classic chilled dessert.
The History of the Mousse: From French Foam to Global Favorite
The term “mousse” is derived from the French word for “foam,” which accurately describes the light, airy structure of the original 18th-century dish. Traditionally, a French mousse was an exercise in patience. It required the beating of egg whites to stiff peaks, the melting of high-quality chocolate, and the careful folding of whipped cream. It was a dessert of the aristocracy, prized for its delicacy.
However, as the 20th century progressed, the global culinary landscape shifted toward accessibility. In regions across Latin America, and eventually spreading worldwide, home cooks sought to replicate that luxurious, airy texture without the risk of raw eggs or the instability of traditional techniques. The result was the modern “condensed milk mousse.”
This evolution turned the mousse from a technical challenge into a pantry-stable miracle. By utilizing the fat content of heavy cream and the stabilizing sugar of condensed milk, home cooks created a dessert that was consistent, shelf-stable until chilled, and universally beloved. Today, the “creamy mousse” has become a staple of global home cooking, a testament to how traditional French techniques can be democratized through modern ingredients.
Why You Should Master This Recipe: The Benefits
Beyond its exquisite taste, this dessert offers several distinct advantages for the home cook:
- Reliability: Unlike traditional custards that can curdle or soufflés that can collapse, this mousse has a high tolerance for error. It sets firmly due to the high fat and protein content, making it a “fail-safe” dessert.
- Time Efficiency: The active preparation time is less than 10 minutes. The rest is simply a matter of letting the refrigerator do the work.
- The “Canvas” Effect: This recipe acts as a blank canvas. While the base is rich and creamy, it is perfectly neutral enough to take on any flavor profile—citrus, berry, coffee, or pure vanilla.
- Texture-First Experience: In the world of dessert, texture is often as important as flavor. The mouthfeel of this mousse—cool, velvety, and dense—is deeply satisfying, providing a “comfort food” sensation that lighter, spongier cakes cannot replicate.
The Core Ingredients: The Science of Stability
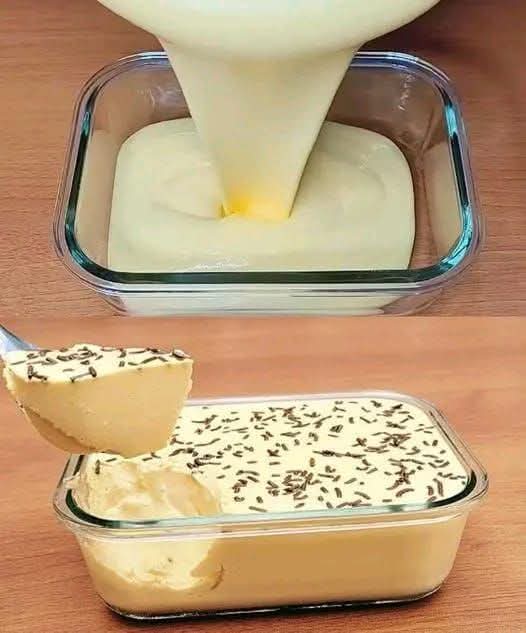
To achieve the results seen in the photograph—a dessert that holds its shape when spooned but dissolves on the tongue—you must understand the role of your ingredients.
- Condensed Milk: This is your structural agent. Its high sugar concentration and thick viscosity provide the backbone of the dessert. It provides the necessary sweetness and, crucially, acts as the primary stabilizer.
- Heavy Cream (Double Cream): To get the “mousse” effect, you need the fat. Heavy cream with a minimum of 35% milkfat is essential. This provides the mouthfeel and the air bubbles that make the dessert feel light rather than heavy.
- The Flavoring/Acid Agent: If you are making a fruit-based mousse (like passion fruit or lemon), the acidity reacts with the proteins in the dairy, naturally thickening the mixture. If making a vanilla or chocolate version, you rely on the chilled fats to set the structure.
- Chocolate Sprinkles (Granulado): These are not just for aesthetics. They provide a vital textural contrast—a subtle “snap” against the otherwise uniform, creamy texture.
The Master Method: Step-by-Step Execution
This method relies on high-speed blending to incorporate air, followed by controlled cooling to set the structure.
Phase 1: The Emulsification
- Chilling: Ensure your ingredients—especially the heavy cream—are cold. Cold fats whip better and hold structure longer.
- The Blend: Combine the condensed milk and heavy cream in a high-powered blender. If you are adding fruit juices (like passion fruit concentrate) or extracts (vanilla bean paste), add them now.
- The Aeration: Blend on high speed for at least 3 to 5 minutes. This step is critical. You are not just mixing; you are whipping air into the emulsion. You will see the volume increase and the texture change from liquid to a thick, pourable cream.
Phase 2: The Setting
- The Vessel: Pour the mixture into a glass dish. Glass is ideal because it conducts temperature efficiently, ensuring the center sets as fast as the edges.
- The Cooling: Cover with plastic wrap, pressing it directly onto the surface of the mousse to prevent a skin from forming. Place in the coldest part of your refrigerator (usually the back).
- The Patience Factor: While it may feel set after two hours, the true “velvet” texture develops over 6 to 8 hours. Allow it to rest overnight for the best results.
Phase 3: The Garnish
- The Final Touch: Just before serving, sprinkle your chocolate granules. If you add them too early, the moisture from the mousse will soften the chocolate too much, losing the crunch.
Troubleshooting: Why It Didn’t Set
If your mousse remains too liquid, do not panic. It is almost always a result of one of three factors:
- Low Fat Content: If your cream had a fat content lower than 30%, it will not aerate or set properly. Always check the label.
- Insufficient Blending: You may have stopped the blender too early. The mixture needs time to emulsify. If it looks “thin,” blend it for another 2 minutes.
- Temperature: If your kitchen is extremely hot, or if the bowl was warm when you started, the fats won’t firm up. If the mixture is too soft, place it in the freezer for 45 minutes to jumpstart the setting process.
Endless Variations: Customizing Your Mousse
The base recipe above is just the beginning. Once you master the method, you can adapt it to any flavor profile:
- The “Dark Temptation”: Replace 1/4 cup of the condensed milk with high-quality melted dark chocolate. Blend until fully incorporated.
- The Citrus Twist: Add the zest of two limes or lemons to the blender. The oils in the zest will infuse the entire mousse with a bright, aromatic scent that cuts through the richness.
- The Coffee Infusion: Dissolve 2 tablespoons of high-quality instant espresso powder in a teaspoon of hot water, let it cool, and add it to the blender. This creates a sophisticated, tiramisu-like flavor profile.
- The Nutty Layer: Toast crushed hazelnuts or pistachios and fold them into the mixture right before pouring it into the dish for an added textural dimension.
Lovers: Pairings and Accompaniments
Because this mousse is rich, smooth, and sweet, it is a “lover” of accompaniments that provide contrast—either through temperature, texture, or flavor profile.
The Contrast Pairings
- Fresh Berries: The tartness of raspberries or blackberries is the classic foil to the sweetness of condensed milk. A handful of fresh, slightly sour berries eaten alongside a spoonful of mousse balances the palate.
- Shortbread or Butter Cookies: Serve with a side of crisp, buttery cookies. The crunch of the biscuit against the velvet mousse is a classic sensory combination.
- Hot Coffee: The bitterness of a fresh espresso or a dark roast drip coffee cleanses the palate between bites, preventing the sweetness from becoming overwhelming.
The Texture Pairings
- Whipped Cream: A dollop of unsweetened whipped cream on top can make the experience feel lighter and more ethereal.
- Sea Salt: A tiny pinch of flaky sea salt (like Maldon) sprinkled over the top elevates the dessert from “home-cooked” to “gourmet.” It highlights the chocolate notes and balances the sugar.
Nutritional Breakdown
While this dessert is an indulgence, understanding the components helps in managing portions.
| Nutrient | Amount (Per Serving) |
|---|---|
| Calories | ~320 kcal |
| Total Fat | 16g |
| Saturated Fat | 10g |
| Sugars | 35g |
| Protein | 4g |
| Note: The primary calories come from the fat in the cream and the concentrated sugars in the condensed milk. Enjoy as a treat, and consider serving in smaller ramekins to manage portion size. |
Conclusion: The Art of the Simple Dessert
In a culinary world that often over-complicates, there is profound power in simplicity. This velvety cream mousse does not demand a pastry degree or a cabinet full of specialized equipment. It demands quality ingredients, a bit of patience, and an appreciation for the subtle art of texture.
When you spoon out a portion, watch how it holds its shape momentarily before yielding to the heat of the tongue. That interaction—that brief transition from solid to creamy—is the reason this dish has survived for generations. It is a dessert that connects the cook to the eater, providing a moment of calm, sweet, and velvety indulgence in an otherwise busy day.
Whether you choose to flavor it with the tang of passion fruit, the depth of coffee, or the classic charm of simple vanilla, the technique remains your best tool. Master the emulsification, respect the chilling time, and you will have a dessert in your repertoire that is ready for any occasion, from a casual family dinner to an elegant evening gathering.
Happy creating, and enjoy the blissful simplicity of the perfect mousse.