Turn it upside down. Watch what happens.
The glitter swirls. The sand lifts in slow, drifting clouds. The tiny seahorse tips sideways, the shells rock gently, and for a moment the whole miniature world inside the jar looks like it’s breathing — like a real ocean, scaled down to something you can hold in the palm of your hand.
Colorful Ocean Jars are one of those crafts that produces something genuinely, repeatedly magical. Part DIY snow globe, part sensory bottle, part miniature aquarium — they are beautiful to look at, soothing to watch, endlessly fascinating to shake, and completely achievable with a trip to the craft store and an afternoon at the kitchen table.
Kids love making them. Kids love shaking them. Kids love lining them up on windowsills and watching the light move through the blue-tinted water, the glitter catching and scattering into tiny underwater sparks. And the adults in the room, who came over to help, tend to find themselves swirling the jars just as often as the children.
Here’s everything you need to make the most beautiful, most mesmerizing ocean jars you’ve ever seen — including the science behind why they work so perfectly, tips for the most stunning results, and creative ideas to make each jar truly its own world.
What Are Colorful Ocean Jars?
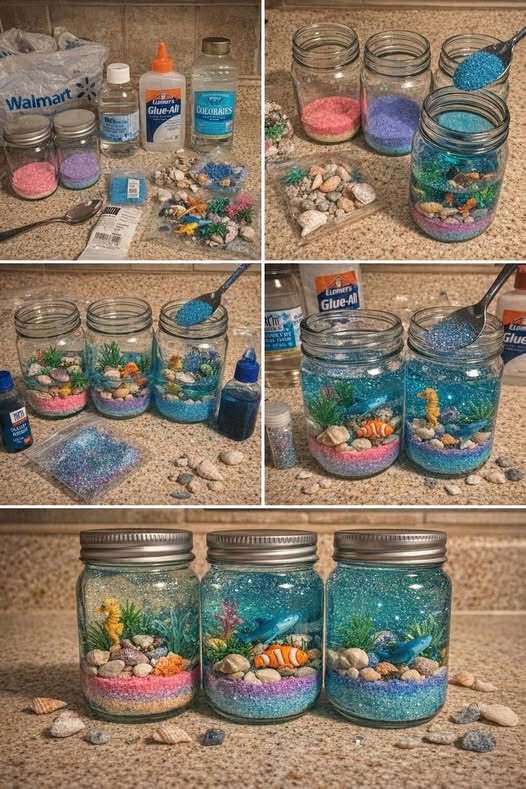
Colorful Ocean Jars are sealed glass jars filled with a carefully layered underwater scene — colored sand at the base, shells and pebbles arranged across the floor, miniature sea creatures and plants positioned throughout, blue-tinted water carrying drifting glitter above — and sealed permanently so the whole scene can be swirled, turned, and shaken to watch the contents move like a real ocean.
They’re a sophisticated evolution of the classic DIY snow globe, customized for the ocean world with layers, color, and living-scene detail that standard snow globes don’t offer. The addition of glycerin or clear glue to the water creates a slightly thickened liquid that slows the movement of everything inside, giving each swirl a languid, underwater quality that is genuinely hypnotic to watch.
Every jar tells its own story. One might be a shallow tropical reef — bright pink sand, vivid coral colors, a clownfish hiding in a small plastic anemone. Another might be a deep ocean scene — dark blue sand, dark green plants, a submarine and a whale in deep indigo water. Children who make these tend to give their jars names, characters, and narratives, treating them as tiny worlds rather than just crafts.
They make beautiful bedroom decorations, stunning windowsill displays, memorable handmade gifts, and some of the best sensory tools for calm-down corners and quiet moments that you’ll ever put together at home.
What You’ll Need
For the jar:
Clear glass jars with lids — The clearer, the better. Mason jars, jam jars, or wide-mouth glass containers all work beautifully. A tight-fitting, securely sealing lid is essential — you’ll be turning these upside down. Consider applying a thin line of waterproof sealant inside the lid before closing for permanent, leak-proof results.
For the base layer:
Colored sand — The most visually stunning base option. Pink, blue, purple, and teal colored sand is available at craft stores and creates an immediately beautiful first impression when layered in the jar.
Baking soda — A brilliant budget alternative to colored sand. White on its own, or easily tinted with food coloring, baking soda has a fine, powdery texture that lifts beautifully in the water when the jar is swirled, creating a cloud-like, underwater sand storm effect.
For the scene:
Small shells and pebbles — Natural or craft store. Vary the sizes for the most realistic look.
Mini plastic sea animals — Seahorses, fish, starfish, crabs, sharks, turtles, octopuses — the more variety, the richer the scene.
Small plastic plants or coral pieces — Green seaweed, pink coral, kelp shapes — whatever suggests an underwater garden.
For the water:
Water — Plain tap water is perfect.
Blue food coloring — For the characteristic ocean tint. Start with just a few drops and build up — it’s very easy to over-color and produce an opaque blue rather than a clear, luminous one.
Clear glue or glycerin — The secret ingredient. Added to the water, either of these creates a slightly viscous liquid that slows the movement of the glitter and sand particles inside, producing that dreamy, slow-motion underwater swirling effect.
Fine glitter — Iridescent or holographic glitter in silver, gold, or pale blue catches the light most beautifully. Chunky glitter settles too quickly; ultra-fine glitter stays suspended longest.
Tools:
A spoon for gentle stirring and arranging elements
Step-by-Step Instructions
Step 1: Create the Sand Base
Pour a generous layer of colored sand or tinted baking soda into the bottom of your jar — enough to cover the base fully and create a foundation about half an inch to an inch deep. This is the ocean floor, and how you treat it sets the entire visual tone of the jar.
For the most beautiful, layered effect, try using two colors of sand: a deeper tone at the very base, then a lighter or contrasting color on top, blended slightly where they meet. Pink and purple together create a fantastical, otherworldly sea floor. Blue and white suggests a Caribbean shallows. Grey and dark teal evokes a deep ocean trench.
If you’re using baking soda, add a few drops of food coloring before placing it in the jar and mix thoroughly until the color is evenly distributed. The fine texture of baking soda creates a particularly beautiful slow cloud when the jar is swirled.
Step 2: Build the Underwater Scene
This is the most creative and personal stage of the whole project, and it deserves real attention and care. Arrange your shells, pebbles, plastic plants, and sea creatures directly on top of the sand base, positioning each element thoughtfully to create a scene with depth, variety, and visual interest.
Think about it as staging a miniature set. Place larger elements — a big shell, a piece of coral, a whale — toward the back. Position medium elements in the middle. Tuck smaller details — a tiny crab, a small pebble, a miniature starfish — in the foreground. Vary the heights by propping some elements against others.
Leave some open space across the sand floor — a real ocean isn’t carpeted edge to edge in objects. That open floor space is what you’ll see the sand drift across when the jar is swirled, and it’s one of the most beautiful moments in the whole effect.
Take your time. This step is pure imaginative pleasure.
Step 3: Add the Colored Water Base
Fill the jar approximately halfway with water. Add two or three drops of blue food coloring and stir very gently with a spoon to distribute the color evenly through the water. Assess the color — you’re looking for a clear, luminous blue, like sunlit ocean water, rather than an opaque or murky blue.
Add color conservatively and build up slowly. Two or three drops in a standard mason jar produces a beautiful, transparent ocean blue. More than five or six drops tends to produce water dark enough that the scene inside becomes difficult to see — which defeats the whole purpose.
If you want to create a tropical effect, a single drop of green alongside the blue produces a stunning turquoise. For a deeper ocean atmosphere, one drop of purple with the blue creates a beautiful indigo-violet shade.
Step 4: Add Glycerin or Clear Glue
This is the step that transforms a shaken jar from just “things moving around in water” to “slow, graceful, genuinely oceanic movement.” Add two to three tablespoons of glycerin or clear PVA glue to the water and stir very gently to incorporate.
Glycerin produces a slightly more even viscosity and a cleaner look in the finished jar. Clear glue works just as well and is usually more readily available. Both achieve the same essential function: thickening the water just enough to slow down the glitter, sand particles, and tiny debris that float up when the jar is shaken, making everything settle back down in the same slow, drifting way that sediment settles in real water.
The more glycerin or glue you add, the slower the movement will be. Two tablespoons produces a gentle, medium-slow drift. Four tablespoons or more produces an extremely slow, almost gel-like movement that takes many minutes to fully settle. Experiment to find what you love.
Step 5: Add the Glitter
Sprinkle fine glitter over the surface of the water. A generous pinch — or two or three generous pinches — is usually about right, but the exact amount is entirely a matter of personal preference. More glitter produces a denser, more dramatic shimmer effect when swirled. Less glitter produces a sparser, more subtle sparkle.
Iridescent or holographic fine glitter is the most beautiful choice — it catches light from multiple angles and creates tiny rainbow flashes as it moves through the water. Silver and pale blue glitters complement ocean themes perfectly. Gold adds warmth and an unexpectedly beautiful sunset-ocean quality.
Avoid chunky or coarse glitter, which sinks and settles too quickly and doesn’t create the suspended cloud effect that makes these jars so mesmerizing.
Step 6: Fill and Seal
Fill the remaining space in the jar with water, leaving just a small gap at the top — about a centimeter of air. Stir the contents one final time, very gently, to ensure everything is evenly distributed.
For a permanent seal, run a thin bead of waterproof craft glue or silicone sealant around the inside rim of the lid before closing. Tighten the lid as firmly as possible. Allow the sealant to cure for at least 24 hours before turning the jar upside down.
A well-sealed lid transforms an ocean jar from a temporary craft into a lasting piece — something that can be swirled and turned and shaken hundreds of times without any risk of leaking.
Step 7: Swirl, Turn, and Watch the Magic
Once sealed and dried, the jar is ready. Turn it gently upside down and then right-side up again. Swirl it in slow circles. Tip it side to side.
Watch what happens.
The glitter rises in lazy, spiraling clouds. The sand lifts from the floor and drifts in slow horizontal sheets. The tiny fish tips and sways. The shells rock. Everything moves in that particular slow, purposeful way that real underwater things move — and for a moment the whole small world inside the jar feels genuinely alive.
Hold it up to a window. The light passes through the tinted water and the glitter catches it from within, turning each jar into something that glows.
The Science Behind the Magic
The ocean jar’s beautiful slow movement is the direct result of some elegant physics.
Why Glycerin Slows Everything Down
In a jar of plain water, glitter and sand particles sink quickly because water offers relatively little resistance to falling objects. The rate at which objects fall through liquid is governed by that liquid’s viscosity — its resistance to flow.
Glycerin has a viscosity approximately 1,400 times higher than water. When added to the jar water in even small amounts, it significantly increases the viscosity of the mixture, creating a liquid that resists the movement of objects through it. Glitter that would settle in two or three seconds in plain water takes thirty seconds or more to settle in glycerined water — and that difference is the entire difference between “shaken jar” and “magical swirling ocean.”
Clear glue works on the same principle — the polymer chains in the glue increase the water’s viscosity in the same way as glycerin.
How Blue Food Coloring Creates the Ocean Effect
The blue tint isn’t just aesthetic. Real ocean water appears blue for exactly the same reason the sky appears blue — a phenomenon called Rayleigh scattering. Water molecules preferentially absorb and scatter the longer red wavelengths of light, leaving shorter blue wavelengths to be reflected back to our eyes.
By tinting the jar water with blue food coloring, we’re mimicking this natural optical effect and creating an immediate perceptual association with open water. The brain responds to the color and light together as “ocean” — which is why even knowing exactly what’s in the jar, it’s hard to look at a swirling blue ocean jar without feeling something calm and vast.
Why Glitter Mimics Bioluminescence
Real ocean water sparkles. Sunlight catches the surface in constantly shifting patterns. In deep water, countless tiny bioluminescent organisms produce their own light — blue-green flashes visible in disturbed water at night. Fine glitter in a swirling blue jar mimics this effect at a remarkably convincing level. Each glitter particle catches and reflects light from a different angle as it turns and drifts, creating a field of moving light that the visual system processes as “ocean sparkle.”
Why Ocean Jars Are Perfect for Kids
They’re Calming and Sensory-Regulating
The slow, rhythmic movement inside a swirled ocean jar is one of the most effective natural calming tools for children. Watching floating particles settle slowly is categorized by researchers as a mindfulness anchor — a visual focus that draws attention gently outward from anxious thoughts and into the present moment.
Many teachers and therapists use commercial sensory bottles for exactly this purpose. Homemade ocean jars are a more beautiful, more personal, and more enriching version of the same tool.
They Spark Imaginative Play and Storytelling
Every ocean jar is a world with characters, geography, and — in the imagination of a child — an unfolding story. Who lives in the big shell? What does the shark eat? Where is the sea turtle swimming to? These questions are the beginning of narrative thinking, language development, and creative cognition. The jar is a prompt as much as it is a craft.
They Build Fine Motor Skills and Patience
Arranging tiny shells and mini sea creatures in a jar requires careful, precise hand movements. Pouring slowly, adding color drop by drop, layering materials without disturbing the layers below — all of these tasks develop the fine motor control and patience that underpin later skills from handwriting to musical instrument playing.
Tips for the Most Beautiful Ocean Jars
Use less blue food coloring than you think you need. The most common mistake is adding too much color. A jar so dark that you can barely see the scene inside defeats the whole purpose. Two to three drops for a mason jar is usually exactly right.
Choose fine glitter and add it generously. Fine, iridescent glitter creates the best suspended cloud effect and the most beautiful sparkle. Add more than feels like enough — it always looks less dramatic once diluted in the water.
Vary the scene elements in height and size. A flat, uniform arrangement of same-sized objects looks less interesting than a varied, layered scene with tall plants at the back, medium shells in the middle, and tiny details tucked in the foreground.
Seal the lid properly. Waterproof sealant inside the lid is the difference between an ocean jar that can be freely shaken and one that has to be handled nervously. The few minutes this takes is worth it many times over.
Make multiple jars with different color palettes. A collection of ocean jars — one tropical pink, one deep ocean blue, one teal and turquoise, one sunset purple — displayed together in a row is absolutely stunning. Each one catches and reflects the light differently and creates a conversation piece that visitors always notice and ask about.
Creative Variations and Themes
Tropical Reef: Pink or white sand, bright coral and anemone pieces, a clownfish and striped reef fish, teal-tinted water with gold glitter.
Deep Ocean: Dark grey or black sand, dark green plants, a whale and deep-sea creatures, deep indigo water with silver glitter.
Arctic Ocean: White sand and small white pebbles, polar bear and penguin figurines, pale icy blue water with silver and white glitter.
Mermaid World: Lavender and pink layered sand, pearl shells, mermaid figurines, purple-tinted water with holographic glitter.
Sunken Treasure: Golden sand with a small treasure chest (easily found in craft or pet stores), gold coins and jewels, warm blue-green water with gold glitter.
Seasonal Ocean: A winter ocean jar with blue and white tones and snowflake glitter. A summer jar with warm tropical colors and starfish. A Halloween jar with dark water, black sand, and tiny skeleton sea creatures.
Display and Care
Ocean jars need no maintenance once sealed. Place them on a windowsill for the most beautiful light effect — backlit by natural light, the glitter sparkles and the blue water glows in a way that is genuinely breath-taking.
Group multiple jars together on a tray or shelf for maximum visual impact. Vary the heights using small stands or books beneath some jars for an arranged display that looks intentional and beautiful.
Handle gently if the lid seal isn’t fully permanent. Give to children freely if the lid has been properly sealant-sealed. A well-made ocean jar can last for years — the water stays clear, the glitter keeps its sparkle, and the tiny world inside remains exactly as you arranged it, waiting to come alive whenever someone reaches out to give it a swirl.
Final Thoughts
There is something deeply satisfying about holding an ocean in your hands. About watching an entire world — scaled to the size of a mason jar, filled with all the beautiful details of the sea — swirl and drift and slowly settle back into stillness each time you turn it.
Colorful Ocean Jars are a reminder that the most magical things are often the simplest ones. Sand from a craft store. A handful of glitter. A miniature seahorse. A few drops of blue. And yet, in the right combination, in a sealed jar turned upside down in afternoon light, they become something that stops people mid-sentence, makes children go quiet with attention, and fills a room with the feeling of standing at the edge of something deep and beautiful and alive.
Make one for your windowsill. Make a set as a gift. Make a whole ocean, jar by jar, color by color, world by world.
Then swirl them, one by one, and watch the magic unfold.