The Art and Science of the Strawberry Swirl Loaf: A Masterclass in Baking
There is an undeniable magic to the loaf cake. It is the unassuming workhorse of the baking world—a sturdy, reliable, comforting structure that doesn’t demand the pomp and circumstance of a tiered birthday cake or the delicate assembly of a macaron. Yet, when you cut into a perfectly baked loaf cake, you are greeted with a slice that is dense, moist, and tender. When you introduce a vibrant, ruby-red strawberry swirl to that golden canvas, you elevate the humble loaf into a piece of art.
Whether you are baking for a neighborhood potluck, preparing a batch of gifts, or simply ensuring your kitchen is stocked with a reliable, crowd-pleasing snack, the Strawberry Swirl Loaf is a testament to the beauty of simplicity.
In this guide, we will move beyond the basic recipe to understand the science, the technique, and the nuances that turn a “good” loaf into a “bakery-level” masterpiece.
The Philosophy of the Swirl: Why It Works
A swirl in a cake isn’t just about aesthetics, though the visual appeal of marbled red and gold is undeniably striking. It is about the interplay of textures and flavors.
A classic pound cake or butter cake batter is rich with fats, sugars, and proteins. It provides a creamy, sweet base. When you introduce a concentrated fruit reduction—a strawberry swirl—you are introducing acidity and brightness. This contrast is vital. A cake that is purely sweet can be monotonous; a cake that is interrupted by a concentrated pocket of slightly tart fruit awakens the palate with every bite.
The marbling technique creates a “heterogeneous” crumb. Instead of every bite tasting the same, you get a variation. One mouthful might be rich and buttery, while the next offers a burst of intense strawberry. This keeps the eater engaged, making the loaf feel far more sophisticated than a standard vanilla cake.
Mastering Your Ingredients: The Foundation of Quality
To bake a superior loaf, you must treat your ingredients with respect. In a recipe with so few components, the quality of each one matters immensely.
1. The Flour: Structure vs. Tenderness
For a loaf cake, you want a crumb that is soft but sturdy enough to hold a slice together without crumbling into a pile of dust the moment it touches the plate.
- All-Purpose Flour: This is your standard. It has a moderate protein content, making it reliable for most loaves.
- Cake Flour: If you want a finer, more delicate crumb, swapping out 20% of your all-purpose flour for cake flour (or using a 50/50 mix) will result in a lighter, more “melt-in-your-mouth” texture.
2. The Fats: The Secret to Moisture
- Butter: Salted or unsalted? Always start with unsalted so you can control the sodium levels. Ensure your butter is at “cool room temperature”—if it’s too soft or melted, your cake will be greasy and dense.
- The Creaming Method: This is the most critical step. Beating the sugar and butter together creates thousands of tiny air bubbles. This aeration is what gives your cake its lift. Don’t rush this stage; take the full 3–5 minutes until the mixture is pale and fluffy.
3. The Strawberry Element: Compote vs. Jam
This is the most common point of failure for home bakers. If you use raw, sliced strawberries, they will release too much water during baking, creating soggy holes in your cake.
- The Homemade Compote: Cook your strawberries down with a little sugar and a squeeze of lemon juice until they form a thick, jam-like consistency.
- The Texture: A good swirl needs “body.” If your strawberry mixture is too runny, it will bleed into the batter, turning the whole cake a muddy pink rather than creating a beautiful marbled effect. You want a thick, concentrated reduction that maintains its shape.
4. The “Binder”: Eggs and Dairy
- Eggs: Always use large, room-temperature eggs. They incorporate into the fat better, creating a stable emulsion.
- Dairy (Yogurt/Sour Cream/Buttermilk): Including an acidic dairy component is vital. The acid reacts with the baking powder to create lift, and the fat content adds a luxurious, velvety mouthfeel that butter alone cannot achieve.
The Technique: From Batter to Marble
The process of building your loaf is a rhythmic, almost meditative practice. Here is how to ensure your swirl is perfect every time.
The Prep Phase
Before you begin, ensure all ingredients are at room temperature. Cold eggs hitting creamed butter will cause the emulsion to break, leading to a curdled look and a dense finished product.
The Mixing Method
- Creaming: As mentioned, aerate your butter and sugar. This is the “bones” of your cake.
- Add Eggs: Add them one at a time, beating well after each addition. This ensures the batter can hold the liquid.
- Dry and Wet Alternation: Add your flour mixture and your liquid (dairy) in three parts, starting and ending with the dry ingredients. This keeps the batter stable and prevents over-mixing, which leads to tough, gluten-heavy cake.
The Art of the Marble
When filling your loaf pans, do not just dump the batter in.
- The Base: Spoon about one-third of the batter into the prepared pans.
- The Swirl: Drizzle or drop a portion of your strawberry reduction over the batter.
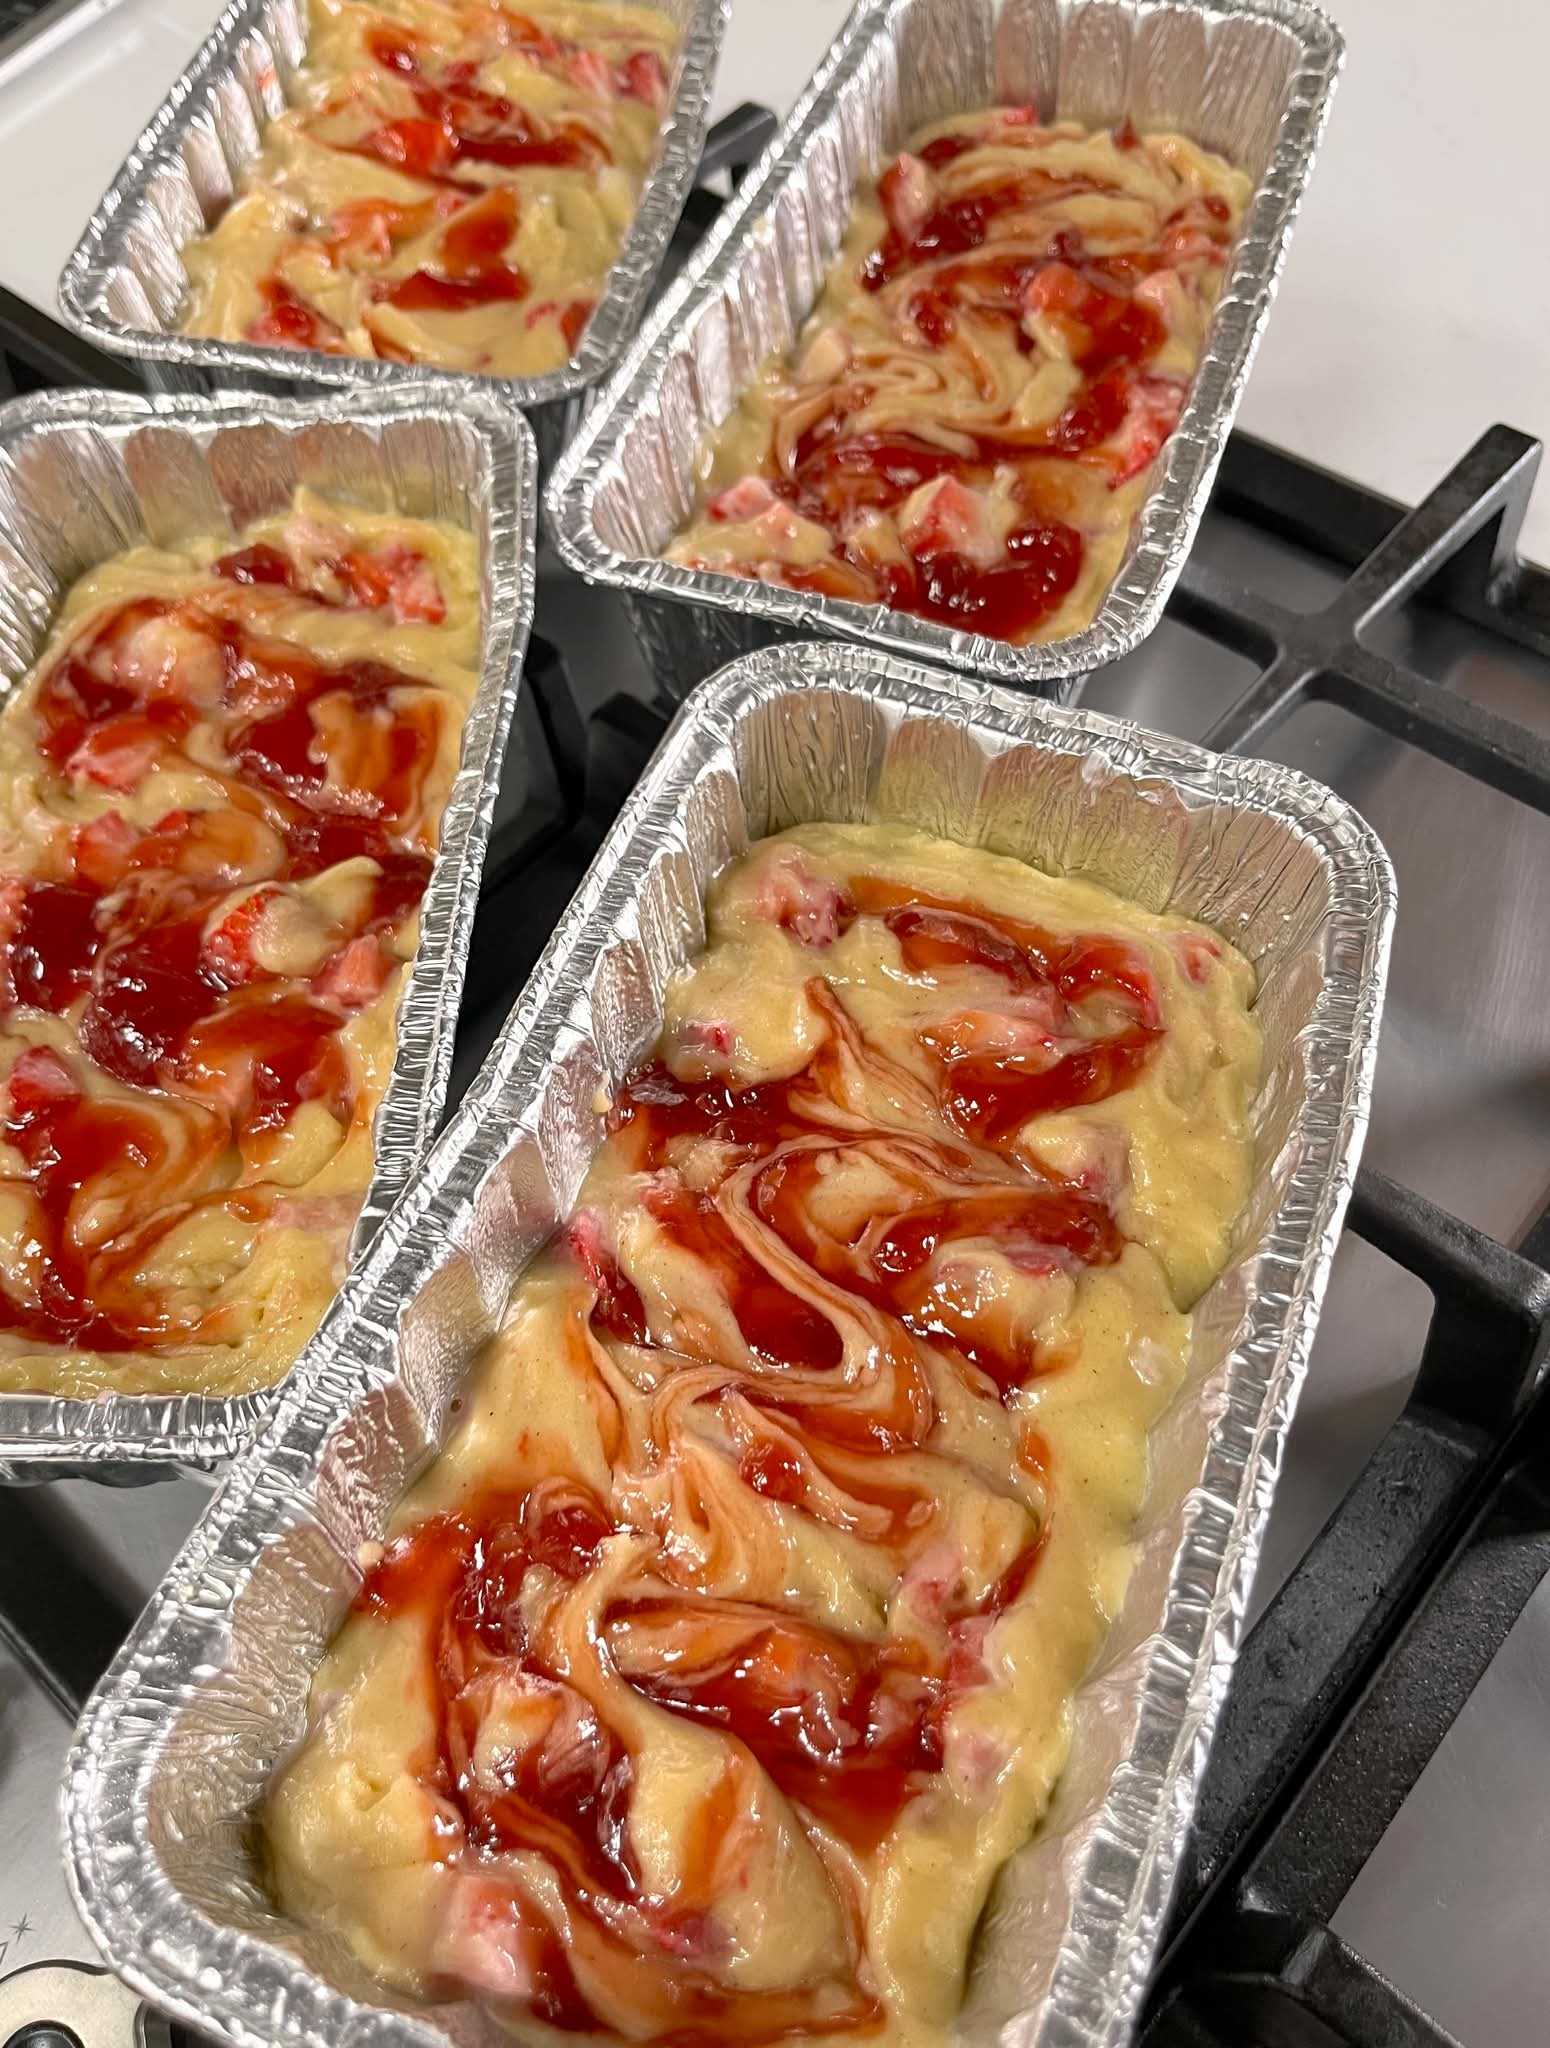
- The Pattern: Use a butter knife or a skewer. Run it through the batter in a zig-zag or “S” motion. Do not over-mix! If you swirl too much, you will blend the colors together, losing the definition of the marble. You want distinct streaks, not a homogenous color.
- Repeat: Add the remaining batter and the rest of the strawberry reduction, and finish with one final, gentle swirl on the top layer.
Equipment: The Loaf Pan Conundrum
The image of individual foil loaf pans highlights a common, practical way to bake. However, the vessel you choose changes the outcome.
- Aluminum/Foil Pans: These are excellent for gift-giving and bake very quickly. Because aluminum is thin, the sides bake fast, often resulting in a darker crust. If you are using these, keep an eye on the oven after the 30-minute mark.
- Light-Colored Metal: This is the gold standard for home bakers. It heats evenly and allows the cake to rise without creating a burnt, thick exterior.
- Glass/Ceramic: Glass heats slowly but retains heat for a long time. If using glass, you may need to lower your oven temperature by 25°F (about 15°C) and increase the baking time to ensure the center finishes before the edges burn.
Pro-Tip: Always grease your pans thoroughly, even if they are “non-stick.” For a professional finish, line the bottom with parchment paper. It ensures the cake releases perfectly every time.
Troubleshooting: Why Didn’t It Work?
Baking is chemistry. If your loaf doesn’t look like the one in your mind, here is how to diagnose the issue:
1. The “Sunken Middle”
This usually happens because the oven was opened too early, the oven temperature was too low, or you over-mixed the batter (which deflated the air bubbles you worked so hard to create). Let the cake set firmly before you even think about opening the oven door.
2. The “Bleeding” Swirl
If your beautiful red swirl has disappeared into the batter, your strawberry reduction was likely too watery, or you over-swirled the batter. Ensure your fruit is cooked down until it is thick, and handle the marbling stage with extreme gentleness.
3. The Dense, Gummy Crumb
This is often the result of using cold ingredients or over-mixing the flour. Once the flour hits the wet ingredients, stop mixing as soon as you no longer see streaks of white. Gluten loves to develop, and you want to keep that development to a minimum for a tender cake.
Flavor Variations: Beyond Strawberry
Once you have mastered the Strawberry Swirl, you possess the formula for hundreds of other loaf cakes. The base is your canvas.
- The Lemon-Blueberry Swirl: Use a lemon-zest infused batter and a thick blueberry compote. The citrus adds a brightness that makes the blueberry pop.
- The Chocolate-Raspberry Swirl: Swap out some of the flour for cocoa powder in the base batter and use a tart raspberry reduction. This is a classic flavor pairing that feels incredibly decadent.
- The Cream Cheese Swirl: Skip the fruit and marble in a mixture of cream cheese, sugar, and an egg yolk. This creates a “cheesecake” marbled effect that is rich and creamy.
- The Spiced-Apple Swirl: Add cinnamon, nutmeg, and cardamom to your batter and use a thick apple butter or apple compote for the swirl. Perfect for autumn.
Serving and Storing: The Final Acts
A loaf cake is one of the few baked goods that actually improves with time. Because it is a dense, fat-heavy cake, the flavors have a chance to meld and the moisture to redistribute after it has cooled.
Slicing
Wait! It is tempting to cut into a warm loaf, but patience is required. If you cut it while it is hot, the structure hasn’t set, and you will end up with a squashed, gummy mess. Let it cool in the pan for 10 minutes, then turn it out onto a wire rack to cool completely.
Storing
- Countertop: Wrapped tightly in plastic wrap, a loaf cake will stay fresh for 3–4 days.
- Freezing: This is the best way to handle a large batch. Wrap individual slices or the entire loaf in two layers of plastic wrap, then a layer of foil. It will stay fresh in the freezer for up to three months. When you want a slice, just thaw it on the counter for an hour.
Presentation
If you are gifting these, a simple glaze—powdered sugar mixed with a tiny bit of milk or lemon juice—drizzled over the top makes it look like it came straight from a patisserie. If you want to get fancy, top the glaze with a few dried strawberry bits or a sprig of fresh mint.
The Cultural Significance of the Loaf
Why do we love the loaf cake? It is not just about the sugar or the butter. It is about the manageability of the format. A loaf cake is unpretentious. It doesn’t require a knife and fork—it is meant to be held.
In many cultures, the “quick bread” or loaf cake is the ultimate symbol of home. It requires simple tools, humble ingredients, and a bit of patience. There is something deeply grounding about the process of measuring flour, creaming butter, and watching a liquid batter transform into a solid, golden-brown structure in the oven.
When you bake a Strawberry Swirl Loaf, you are participating in a tradition of home cooking that values quality, presence, and sharing. It is a slow-food experience in a fast-food world.
A Final Thought on the “Perfect” Loaf
Perfection in baking is rarely about achieving a magazine-cover aesthetic. It is about the joy of the process and the satisfaction of the result. If your marble isn’t a perfect spiral, or if your loaf rises a little unevenly, don’t worry. The beauty of the loaf is that it is delicious regardless of its shape.
As you look at those pans—whether they are sitting on your counter waiting for the oven, or cooling on a rack—remember that you have created something from scratch. You’ve taken separate elements and combined them into a cohesive, comforting whole. That is the true heart of baking.
Take a moment, pour yourself a cup of coffee or tea, slice a piece of that warm, strawberry-kissed cake, and enjoy the fruits of your labor. You’ve earned it.
Summary Checklist for Success
To summarize your journey to the perfect Strawberry Swirl Loaf, keep this checklist in mind for your next baking session:
- Temperature Matters: Ensure butter, eggs, and dairy are all at room temperature before you start.
- Thicken Your Swirl: Cook your strawberry filling until it is a thick reduction to prevent the cake from becoming soggy.
- Aerate Well: Spend the time to properly cream your butter and sugar.
- Don’t Over-mix: Use a light hand when folding in the final ingredients and when marbling.
- Test for Doneness: Use a wooden skewer. It should come out with just a few moist crumbs attached. If it’s wet, keep baking.
- Cool Completely: Patience is the final ingredient. Let the cake set before slicing.
Armed with these principles, you are ready to experiment, adapt, and refine your process. Whether you follow the recipe exactly or branch out into your own flavor combinations, the structure of the loaf cake remains the most reliable foundation for your culinary creativity. Happy baking!
m