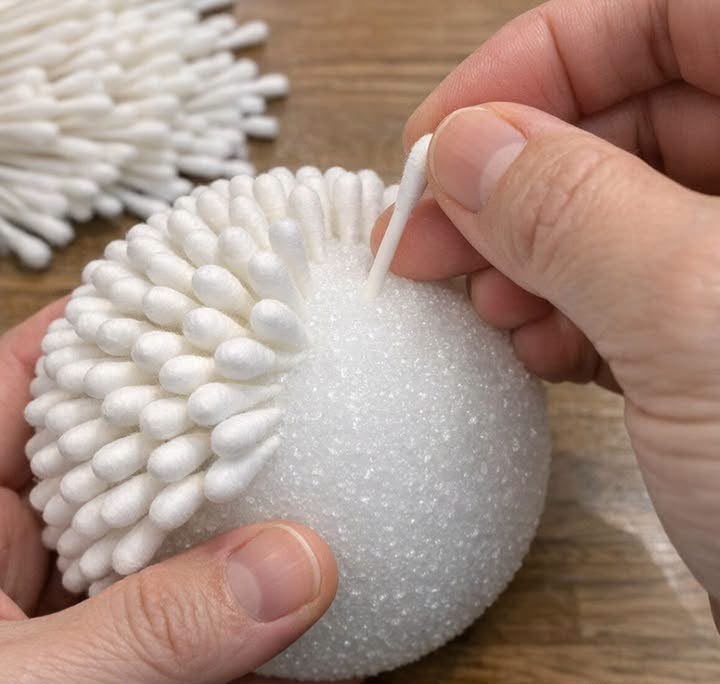
There’s something deeply satisfying about a project that uses the simplest supplies and turns them into something that feels special once it’s done. These oversized snowball ornaments start with plain foam balls and a big pile of dollar store cotton swabs, and the magic is really in the repetition—snipping, pressing, and watching that smooth foam slowly disappear under a soft snowy texture.
I love this kind of wintry decorating project for a quiet afternoon at the kitchen table. It’s best for anyone who enjoys easy but hands-on crafting more than speed, because this is not a five-minute project. It takes about an hour per ball and roughly 300 halved swabs for the larger size, but the process is pleasantly repetitive, and the finished pieces look lovely in a bowl on a coffee table, hanging from a branch, or lined up along a mantel.
Materials
1 white foam craft ball, 5 to 6 inches in diameter
300 white cotton swabs, cut in half to make about 600 pieces with one cotton tip each
1 to 2 tablespoons iridescent fine glitter
1 light coat spray adhesive
18 inches white ribbon, 1/4 inch wide
1 wooden toothpick
1 teaspoon strong craft glue or hot glue
1 sheet scrap paper or a shallow box lid for catching glitter
Instructions
1. Cut all the cotton swabs in half so each piece has one soft cotton tip and one clean cut end. Set them in a bowl so they’re easy to grab as you work.
2. Start at one point on the foam ball and push the cut end of each swab piece straight into the foam, leaving the cotton tip facing outward. Space the first row evenly so the swabs stand close together without crushing each other.
3. Keep adding swabs in even rows, turning the ball as you go and filling every gap until no foam shows. Aim for full coverage and a rounded shape, not perfectly rigid spacing.
4. Check the surface from all sides and tuck extra swabs into any thin spots where the foam peeks through. This little fill-in step is what gives the finished ball that fluffy snow texture instead of a patchy look.
5. Make the hanging loop by folding the ribbon in half and gluing the ends around the middle of a toothpick. Let the glue grab for a minute so the ribbon stays wrapped securely.
6. Push the glued toothpick into the foam ball between the swabs until only the ribbon loop shows at the top. Add a dab of glue at the entry point if you want the hanger extra secure for ornaments.
7. Set the ball over scrap paper or a box lid, then mist it lightly with spray adhesive from all sides. Use just enough to make the surface tacky without soaking the cotton.
8. Dust the ball with iridescent glitter, turning it as you sprinkle so the sparkle lands evenly over the cotton tips. Tap off the excess and let it dry completely before displaying.
Variations & Tips
Make a set: I think these look sweetest in groups. Try one large ball for a bowl centerpiece, a few medium ones for the mantel, and smaller versions as hanging ornaments.
For table display: If you’re setting them in a bowl or tray, you can skip the ribbon loop entirely. Just leave the top fully covered with swabs so the ball looks seamless from every angle.
For picky perfectionists: If uneven spacing bothers you, work in bands around the ball instead of random patches. I find it easier to keep the rows tidy that way, especially once you get past the halfway point.
Glitter control: These do shed a little, especially at first, so I like to glitter them over a box lid and let them dry overnight before bringing them into the living room. A very light hand with the glitter gives a prettier fresh-snow look than a thick coat.
Adhesive alternative: If you don’t want to use spray adhesive indoors, take the project outside or into a garage with the door open. You can also brush on a very thin coat of clear-drying craft glue, though it takes longer and can flatten the fluffy texture a bit.
Time expectations: This is pleasantly repetitive, not quick. Put on a movie, pour yourself something warm, and settle in—one large ball takes about 300 halved swabs and around an hour of steady work.
Storage tip: Store these in a roomy box with tissue paper around them so the cotton tips don’t get crushed. I wouldn’t stack anything heavy on top, or you’ll lose that soft snowball shape.