The Ultimate Guide to Magic Crazy Dough: One Dough, Endless Recipes
Introduction: The Culinary Miracle of Magic Dough
In the vast, wondrous, and sometimes intimidating world of baking, yeast dough is often viewed with a mixture of reverence and fear. For many home cooks, the idea of mixing yeast, flour, and water feels like a delicate scientific experiment where one wrong move—water that is too hot, a draft in the kitchen, or over-kneading—will result in a dense, inedible brick. But what if there was a recipe that defied these rigid rules? What if there was a culinary Swiss Army knife—a single, foolproof, incredibly forgiving recipe that could transform your kitchen and your meal planning forever?
Enter the “Magic Crazy Dough.”
This is not just another bread recipe; it is a lifestyle change. The Magic Crazy Dough is a revolutionary approach to baking that yields an incredibly soft, pliable, and versatile canvas. As the name so aptly suggests, the magic lies in its boundless versatility. From one simple batch of dough, you can create pillowy soft dinner rolls, a crispy and chewy pizza crust, decadent gooey cinnamon rolls, sturdy hamburger buns, and savory garlic knots.
Imagine waking up on a Saturday morning and using a portion of this dough for sweet breakfast pastries, using another portion for lunchtime sandwich buns, and stretching the remainder into a spectacular evening pizza. It eliminates the need to memorize a dozen different recipes, streamlines your grocery shopping, and guarantees bakery-quality results with minimal effort. In this comprehensive, masterclass-level guide, we will dive deep into the history, science, methods, and endless applications of the Magic Crazy Dough. Prepare to unlock your inner master baker.
The Fascinating History of Universal Doughs
To truly appreciate the brilliance of the Magic Crazy Dough, we must look back at the history of bread-making. Bread is one of the oldest prepared foods in human history, dating back thousands of years. For centuries, baking bread was a daily, laborious chore.
Historically, doughs were divided into two main categories: “lean doughs” and “enriched doughs.” Lean doughs contain only flour, water, yeast, and salt—yielding crusty, chewy breads like French baguettes or Italian ciabatta. Enriched doughs, on the other hand, contain added fats, sugars, and dairy (like butter, eggs, and milk), yielding soft, tender, and rich breads like French brioche or Jewish challah.
The concept of a “universal” or “crazy” dough finds its roots in Eastern European and Mediterranean peasant baking traditions. In regions like the Balkans, home cooks developed a recipe known as Ludo Testo (which literally translates to “crazy dough”). Historically, these resourceful bakers needed a dough that could be made in large batches, stored in the cold larder or refrigerator for several days, and used throughout the week for various meals to save time and firewood.
To ensure the dough remained soft and didn’t spoil or over-ferment over several days, they added acidic dairy—like yogurt, sour cream, or kefir—alongside the yeast. The acidity tenderized the gluten, while the fats kept the crumb moist. Over time, this brilliant, resilient, “crazy” method made its way across the internet and into modern kitchens worldwide, celebrated for its forgiving nature and miraculous multi-purpose capabilities.
The Lovers of Magic Dough: Who is This For?
The Magic Crazy Dough has amassed a dedicated global following. The “lovers” of this recipe span across all demographics, culinary skill levels, and lifestyles. But who exactly benefits the most from this miraculous recipe?
1. The Busy Parent and Meal Prepper: For families, time is the ultimate luxury. Parents love this dough because a single batch made on a Sunday evening can provide school lunch sandwich buns on Monday, a quick sheet-pan pizza on Tuesday, and sweet rolls for a Wednesday morning treat. It is the ultimate meal-prep hack.
2. The Baking Beginner (The Intimidated Cook): Those who have failed at making bread in the past fall in love with Magic Dough because it is incredibly forgiving. The addition of fats and sugar makes the dough supple and easy to handle. It is not sticky or temperamental. It builds confidence, allowing novices to experience the joy of shaping and baking their own bread without the fear of failure.
3. The Budget-Conscious Pragmatist: Have you looked at the price of artisanal bread, gourmet cinnamon rolls, or high-quality pizza delivery lately? The lovers of this dough appreciate the profound economic benefits. For the cost of a bag of flour, some yeast, and pantry staples, you can generate meals and treats that would cost ten times as much at a bakery or restaurant.
4. The Creative Culinary Artist: For the seasoned home chef, this dough acts as a blank canvas. It is robust enough to hold heavy fillings for stuffed breads (like calzones or babkas) and delicate enough to be twisted into intricate, braided shapes. It invites experimentation with herbs, spices, and exotic fillings.
The Science and Formation: Why It Works
Baking is applied chemistry. To understand why this dough is “magic,” we must break down the formation of the dough and the chemical reactions occurring within your mixing bowl and oven.
The Role of Gluten (The Structure)
When the proteins in the all-purpose flour (glutenin and gliadin) come into contact with liquids and are physically agitated (kneaded), they form a strong, elastic network called gluten. In lean breads, you want extremely tight gluten for a chewy texture. In our Magic Dough, we want some gluten for structure (so our bread doesn’t crumble like cake), but we want it to be tender.
The Enablers of Tenderness (Sugar and Fat)
This is where the magic happens. The recipe calls for 2 tablespoons of sugar. While sugar feeds the yeast (making it rise faster), it also acts as a tenderizer. Sugar is hygroscopic, meaning it holds onto water, keeping the baked bread moist for days. Furthermore, the standard liquid additions to a crazy dough (milk, oil, or yogurt) coat the flour proteins in fat. This fat literally lubricates the gluten strands, preventing them from becoming too tight or tough. This results in the “pillowy” texture seen in the dinner rolls.
The Miracle of Yeast (Aeration and Flavor)
The 1 packet of yeast is a living organism. When activated by warm liquid, the yeast consumes the sugars in the dough and expels carbon dioxide gas and alcohol. The elastic gluten network traps this gas like thousands of tiny balloons, causing the dough to rise (proof). The alcohol produced provides that distinct, irresistible, bakery-fresh aroma.
The Maillard Reaction
When the shaped dough enters the hot oven, the sugars and amino acids on the surface of the dough undergo the Maillard reaction. This complex chemical process creates the beautiful, golden-brown crust and develops hundreds of new flavor compounds, transforming pale dough into a savory, mouth-watering masterpiece.
Nutritional Profile and Benefits
While homemade bread is often viewed as a purely indulgent comfort food, creating your own Magic Crazy Dough offers several distinct nutritional and psychological benefits compared to relying on commercial, store-bought alternatives.
The Nutritional Breakdown
A standard, un-filled dinner roll made from this dough (assuming the batch makes roughly 16 to 20 rolls) contains approximately:
Calories: 120 – 150 kcal
Carbohydrates: 22g – 25g (Providing essential energy)
Protein: 3g – 4g (Derived from the flour and any added milk/egg)
Fat: 2g – 4g (Depending on the oil or butter used)
Sodium: 120mg – 150mg
Note: The nutritional profile will shift dramatically based on how you use the dough. A roll filled with butter, cinnamon, and cream cheese frosting will naturally have higher sugar, fat, and caloric content than a simple garlic knot.
The Health Benefits of Homemade
The most profound physical health benefit of making your own Magic Dough is absolute control over the ingredients. Commercial breads and rolls are packed with chemical dough conditioners, preservatives (like calcium propionate), and artificial stabilizers designed to keep the bread soft on a supermarket shelf for three weeks. By making it at home, you are consuming pure, recognizable, whole-food ingredients. You are feeding your family bread, not a science experiment.
The Psychological Benefits
We cannot discuss the benefits of bread-making without highlighting mental health. The physical act of mixing ingredients, the tactile sensation of kneading soft, warm dough, and the required patience of waiting for the dough to rise promote a profound sense of mindfulness. Baking is incredibly grounding. It forces you to disconnect from digital screens and be present in the moment. Furthermore, the olfactory benefits—the smell of baking bread—are scientifically proven to trigger positive memories, reduce stress, and elevate mood.
The Master Ingredient List
To create the Magic Crazy Dough, you need the foundational dry ingredients highlighted in your guide, paired with the essential wet ingredients that activate the chemistry and provide the signature tender texture.
The Dry Ingredients:
4 cups All-Purpose Flour: Do not use bread flour. Bread flour has too much protein and will make cinnamon rolls or dinner rolls too chewy. All-purpose flour provides the perfect balance of softness and structure. (Note: always have an extra 1/2 cup of flour on hand for dusting your workspace).
1 packet Instant or Active Dry Yeast (approx. 2 ¼ teaspoons): The engine of our dough.
2 tablespoons Granulated Sugar: To feed the yeast, tenderize the crumb, and promote a golden crust.
1 teaspoon Fine Salt: Absolutely essential for flavor. Without salt, bread tastes like flat cardboard. Salt also regulates the yeast, preventing it from growing too quickly and exhausting itself.
The Wet Ingredients (The Magic Activators):
1 cup Warm Milk (Whole milk is best): The liquid must be warm to the touch (around 110°F or 45°C)—like warm bath water. If it is too hot, it will kill the yeast; if it is too cold, the yeast won’t wake up.
½ cup Neutral Oil (Canola, Vegetable, or melted Unsalted Butter): This fat provides the richness and keeps the bread soft for days.
1 Large Egg (Room temperature): Adds richness, color, and helps bind the dough.
½ cup Plain Yogurt or Sour Cream (Room temperature): This is the secret weapon of historic “Crazy Doughs.” The acidity of the yogurt tenderizes the gluten to an unbelievable degree, resulting in melt-in-your-mouth pastries.
The Master Method: Step-by-Step Instructions
Now that we understand the science and the ingredients, let us walk through the foundational method of creating the mother dough. This process remains the same regardless of what final product you intend to bake.
Phase 1: Activation and Wet Mixing
Bloom the Yeast (Optional but recommended): In a large mixing bowl (or the bowl of a stand mixer), combine the 1 cup of warm milk, 1 packet of yeast, and 1 tablespoon of the sugar. Give it a gentle stir and let it sit undisturbed for 5 to 10 minutes. If the yeast is alive and active, the mixture will become frothy and smell deeply of fresh bread. (If using Instant yeast, you can technically skip this and add everything together, but blooming is a great way to ensure your yeast isn’t dead).
Add the Enablers: Into the frothy yeast mixture, whisk in the remaining 1 tablespoon of sugar, the ½ cup of oil (or melted, cooled butter), the room-temperature egg, and the ½ cup of plain yogurt. Whisk until the wet ingredients are completely smooth and homogenous.
Phase 2: Amalgamation
Introduce the Dry: Add the 1 teaspoon of salt to your 4 cups of all-purpose flour.
Combine: Gradually add the flour mixture into the wet bowl, about one cup at a time. Use a sturdy wooden spoon or a silicone spatula to stir. The mixture will transition from a thick batter into a shaggy, rough, sticky dough.
Phase 3: The Knead (Developing the Structure)
By Hand: Turn the shaggy dough out onto a clean, lightly floured kitchen counter. Begin kneading the dough. Push the dough away from you with the heel of your hand, fold it back over itself, give it a quarter turn, and repeat. Do this for 8 to 10 minutes.
By Machine: If using a stand mixer fitted with a dough hook, knead on medium-low speed for 5 to 7 minutes.
The Windowpane Test: You will know the dough is perfectly kneaded when it transforms from sticky and rough to incredibly smooth, elastic, and supple. If you poke it with your finger, the indentation should slowly spring back. It should feel like a soft baby’s cheek.
Phase 4: Bulk Fermentation (The First Rise)
The Rest: Lightly oil a large, clean bowl. Form your kneaded dough into a tight, smooth ball and place it in the bowl, turning it once so the top of the dough is lightly coated in oil (this prevents a dry crust from forming).
The Proof: Cover the bowl tightly with plastic wrap or a damp kitchen towel. Place the bowl in a warm, draft-free spot in your kitchen.
The Waiting Game: Allow the dough to rise until it has completely doubled in size. Depending on the temperature of your kitchen, this will take anywhere from 1 hour to 1.5 hours.
Punching Down: Once doubled, remove the cover and gently press your fist into the center of the dough to deflate the excess gas. Turn the dough out onto your counter.
Congratulations. You have successfully created the Magic Crazy Dough. You are now holding a blank culinary canvas. Let’s explore the endless methods to use it.
Endless Methods & Variations: How to Use the Magic Dough
The true beauty of this recipe is what happens next. Here are five exhaustive, master-level applications for your newly risen Magic Dough.
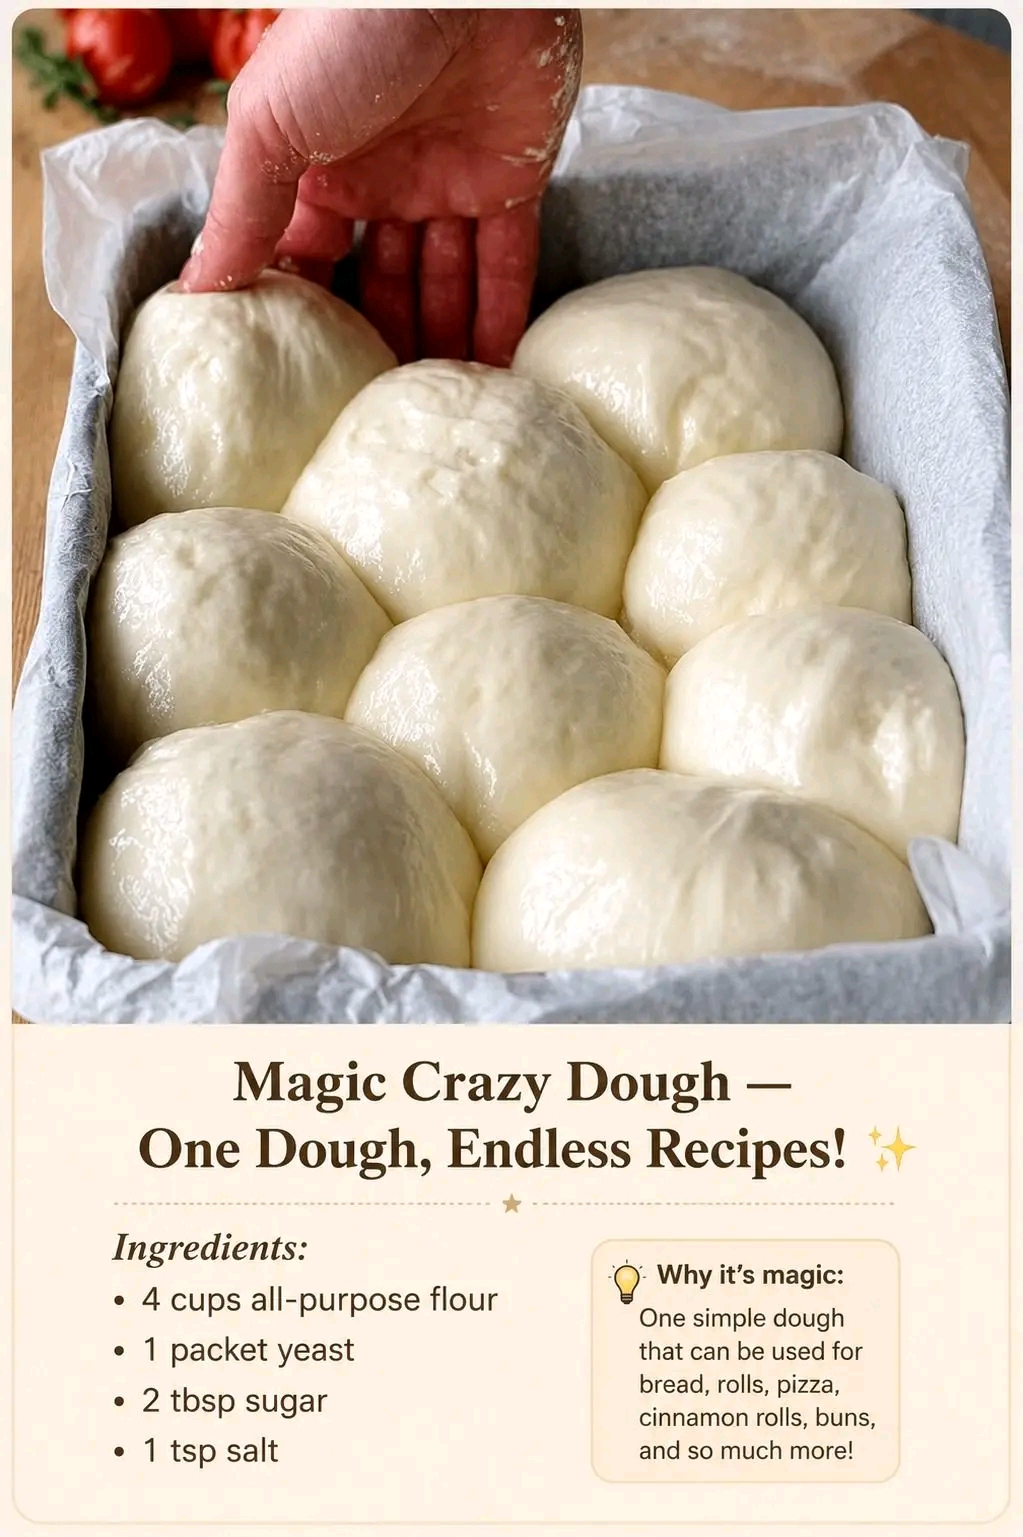
Method 1: The Ultimate Fluffy Dinner Rolls (As Pictured)
The image provided displays nine perfectly smooth, uniform dough balls resting in a parchment-lined square baking pan. Here is how to achieve that exact, mouth-watering result.
Portioning: After punching down the master dough, use a bench scraper or a sharp knife to divide the dough into equal pieces. For a 9×9 inch square baking pan (as pictured), divide the dough into 9 equal pieces. (For smaller rolls, divide into 12 to 15 pieces). Using a digital kitchen scale ensures they are perfectly uniform.
Shaping the Boules: Take one piece of dough and pull the edges down and tuck them underneath, creating a smooth surface on top. Place the dough ball on the counter, cup your hand loosely over it, and move your hand in a rapid circular motion. The friction of the counter will seal the bottom and create a perfectly tight, smooth, round ball.
The Pan: Line a 9×9 inch square baking pan with parchment paper. Place the 9 dough balls into the pan in a 3×3 grid. They should have a little space between them.
The Second Rise: Cover the pan with a towel and let the rolls rise for 30 to 45 minutes, or until they have puffed up significantly and are touching each other, filling the pan completely.
The Egg Wash (Optional but recommended): Gently brush the tops of the puffed rolls with a mixture of one beaten egg and a splash of milk. This will give them a gorgeous, glossy, deep mahogany finish in the oven.
The Bake: Bake in a preheated 375°F (190°C) oven for 18 to 22 minutes, until the tops are deeply golden brown and the internal temperature reaches 190°F.
The Finish: The moment they come out of the oven, brush the hot rolls generously with melted butter and sprinkle with flaky sea salt. Pulling them apart reveals the incredibly soft, feathery crumb.
Method 2: The Perfect Friday Night Pizza Crust
You do not need to buy pre-made pizza bases ever again. This dough makes a phenomenal, chewy, and crispy crust.
Divide and Rest: Divide the master batch of dough in half (this recipe makes two large 12-14 inch pizzas). Form them into balls, cover them, and let them rest for 15 minutes. This relaxes the gluten, making them easier to stretch.
Stretching: Place a dough ball on a piece of parchment paper lightly dusted with cornmeal or flour. Using your hands, gently press the air out of the center toward the edges, creating a crust. Gently stretch the dough outward until it forms a large circle. (Do not use a rolling pin; it pushes all the beautiful air bubbles out of the dough).
Topping: Brush the dough lightly with olive oil (to prevent a soggy crust), then add your favorite tomato sauce, a generous layer of mozzarella cheese, and your desired toppings.
The High-Heat Bake: Pizza requires extreme heat. Bake in a preheated 475°F (245°C) oven (ideally on a pre-heated pizza stone or steel) for 10 to 14 minutes, until the cheese is bubbling and blistering and the crust is charred and crispy on the edges.
Method 3: Decadent Weekend Cinnamon Rolls
Because this dough is enriched with sugar, fat, and yogurt, it makes the ultimate sweet breakfast pastry.
Rolling Out: Take the entire master batch of dough and roll it out onto a lightly floured surface into a large rectangle, roughly 12×18 inches and about ¼ inch thick.
The Filling: Spread ½ cup of very soft (room temperature) butter evenly over the entire surface of the rectangle, leaving a small ½ inch border at the edges. Generously sprinkle a mixture of 1 cup of packed brown sugar and 2 ½ tablespoons of ground cinnamon over the butter. Gently pat the sugar into the butter.
The Roll: Starting from the long edge, tightly roll the dough up into a long log. Pinch the final seam to seal it.
Cutting: Using a serrated knife (or unflavored dental floss for the cleanest cut), slice the log into 12 equal rolls.
Second Rise: Place the rolls into a greased 9×13 inch baking dish. Cover and let them rise for 45 minutes until puffy.
Bake: Bake at 350°F (175°C) for 25 to 30 minutes until golden brown.
The Glaze: While warm, smother them in a classic cream cheese frosting (cream cheese, butter, powdered sugar, and vanilla). The tender dough absorbs the icing perfectly.
Method 4: Savory Garlic Knots and Breadsticks
Perfect alongside a bowl of pasta or a hearty salad.
Shaping: Roll the master dough out into a rectangle. Use a pizza cutter to slice the dough into long strips, about 1 inch wide.
The Knot: Take one strip, roll it gently into a rope, and tie it into a simple overhand knot. Place on a parchment-lined baking sheet.
Second Rise & Bake: Let them puff for 20 minutes. Bake at 400°F (200°C) for 12-15 minutes until golden.
The Garlic Butter Bath: While they are baking, melt ½ cup of butter in a saucepan with 4 minced garlic cloves, fresh chopped parsley, and a pinch of salt. The moment the knots come out of the oven, toss them in a large bowl with the garlic butter until heavily coated.
Method 5: Sturdy Hamburger and Hot Dog Buns
Summer barbecues will never be the same. This dough holds up to juicy burgers without falling apart.
Shaping: Divide the dough into 8 to 10 equal pieces. Form them into tight balls (just like the dinner rolls).
Flattening: Place the balls on a baking sheet lined with parchment, spacing them well apart. Using the palm of your hand, gently flatten each ball until it is about 3.5 inches across. (For hot dog buns, shape them into 5-inch long logs and flatten slightly).
Second Rise: Cover and let rise for 40 minutes. They will puff up into classic bun shapes.
Topping & Baking: Brush with an egg wash and generously sprinkle with sesame seeds or “everything bagel” seasoning. Bake at 375°F (190°C) for 15-18 minutes. Allow them to cool completely before slicing horizontally.
Pro Tips for Storing and Freezing
One of the reasons the Magic Crazy Dough is so beloved by its followers is its exceptional storage capabilities. You do not have to bake the entire batch at once.
Storing in the Refrigerator (The Cold Ferment): If you do not want to bake the dough on the same day you make it, you can utilize the refrigerator. After the dough has finished its first rise (bulk fermentation) and you have punched it down, place it in an airtight container or a large, heavily oiled zip-top bag (leaving room for it to expand). You can store it in the fridge for up to 3 days. Benefit: This cold environment slows down the yeast. The dough undergoes a “slow fermentation,” which dramatically improves the flavor, developing a slightly tangy, artisanal, sourdough-like complexity. When ready to use, simply pull off what you need, shape it, let it come to room temperature and rise (which will take a bit longer since it’s cold, about 1 to 1.5 hours), and bake.
Freezing the Dough: This dough freezes beautifully. After the first rise and punching it down, divide the dough into your desired portions (e.g., individual pizza balls or un-baked dinner rolls). Wrap each portion tightly in plastic wrap, then place them in a freezer bag. They can be frozen for up to 2 months. To use: Transfer the frozen dough to the refrigerator overnight to thaw. The next day, shape, let rise at room temperature, and bake as directed.
Storing Baked Goods: Because of the enriching fats and the hygroscopic nature of the sugar, baked goods made from this dough stay fresh longer than lean breads. Store leftover dinner rolls, buns, or cinnamon rolls in an airtight container at room temperature for up to 4 days. Do not put baked bread in the refrigerator, as the cold air alters the starch structure and causes it to go stale faster. To revive a day-old roll, simply microwave it for 8 seconds or warm it in a 300°F oven for 5 minutes.
Conclusion: A Lifelong Baking Companion
The culinary world is filled with complex recipes that demand precise temperatures, exotic ingredients, and years of practiced technique. The Magic Crazy Dough stands as a beautiful, defiant contrast to that complexity. It is a testament to the fact that extraordinary food does not have to be difficult.
By taking just four cups of all-purpose flour, a packet of yeast, a little sugar, salt, and enriched liquids, you hold the power to completely transform your kitchen. The image of those nine smooth, pristine dough balls resting in a pan is not just a picture of upcoming dinner rolls; it is a picture of endless potential.
Whether you are a busy parent looking to streamline school lunches with homemade sandwich buns, an amateur baker wanting to conquer your fear of yeast, or an adventurous foodie designing the ultimate stuffed pizza, this single recipe is all you will ever need. It is economical, it is deeply satisfying to make, and the aromas it will fill your home with are simply priceless.
So, tie on an apron, clear off your kitchen counter, and let your hands sink into the warm, supple Magic Crazy Dough. Once you experience the unparalleled joy, the incredible taste, and the sheer versatility of this recipe, you will proudly join the ranks of its global lovers. You will never need to hunt for another bread recipe again. Happy baking!