The Ultimate Millionaire’s Cheesecake: A Masterclass in No-Bake Decadence
Table of Contents
- Introduction: The Evolution of the “Millionaire”
- Why This Recipe Works
- The Anatomy of the Perfect Crust
- The Science of Stable No-Bake Filling
- Mastering Homemade Salted Caramel
- Ganache vs. Chocolate Shell: Choosing Your Topping
- Essential Kitchen Tools
- Ingredients Deep Dive
- Step-by-Step Instructions
- Troubleshooting Common Mistakes
- Flavor Variations and Customization
- Storage, Freezing, and Serving Etiquette
- Final Thoughts
1. Introduction: The Evolution of the “Millionaire”
The term “Millionaire” in the dessert world typically refers to a Shortbread—a Scottish classic consisting of a shortbread base, a thick caramel center, and a milk chocolate top. It is called “Millionaire” because it is incredibly rich, decadent, and supposedly “rich enough for a millionaire.”
In this recipe, we are elevating that concept. We are taking the foundational flavors of a Millionaire’s Shortbread and merging them with the silky, tangy profile of a New York-style cheesecake, but without the stress of a water bath or the risk of cracks. This is a dessert designed to impress, offering a multi-sensory experience: the crunch of the biscuit, the flow of the caramel, the cloud-like cream cheese, and the snap of the chocolate.
2. Why This Recipe Works
Balance is the secret to a high-end dessert. Many no-bake cheesecakes are either too sweet or too flimsy. This recipe works because:
- Contrast in Textures: The buttery, gritty crust provides a base for the gooey caramel and the airy cheesecake.
- The Salt Factor: We use high-quality sea salt in the caramel to cut through the heavy fats of the cream and chocolate.
- Structural Integrity: Using a specific ratio of heavy cream to cream cheese ensures the tart holds its shape at room temperature for serving.
3. The Anatomy of the Perfect Crust
While a traditional Millionaire bar uses baked shortbread, a no-bake cheesecake thrives on a crushed biscuit base.
- The Biscuit Choice: Graham crackers are the standard in the US, but for a true “Millionaire” feel, use Digestive biscuits or Walker’s Shortbread. The higher fat content in shortbread creates a melt-in-your-mouth experience.
- The Binding Agent: We use melted unsalted butter. The trick is to ensure every crumb is coated. If it feels like wet sand, it’s perfect.
- The Press: Do not just dump and level. Use the bottom of a flat measuring cup to press the crumbs firmly into the edges. This creates the “wall” that holds the caramel.
4. The Science of Stable No-Bake Filling
The biggest fear with no-bake desserts is a “puddle” effect. To avoid this, we focus on Fat Content and Temperature.
- Cream Cheese: Must be full-fat and at room temperature. Low-fat versions contain too much water, which prevents the filling from setting.
- Heavy Cream: Must be cold. When you whip heavy cream, you are creating a matrix of air bubbles supported by fat globules. Folding this into the cream cheese provides the “lift.”
- Sugar: We use powdered (confectioners) sugar because it contains a small amount of cornstarch, which acts as a secondary stabilizer.
5. Mastering Homemade Salted Caramel
The caramel layer is the “gold” in the Millionaire. While store-bought is an option, homemade caramel provides a depth of flavor that can’t be matched.
- Dry vs. Wet Method: We recommend the Wet Method (dissolving sugar in water first) for beginners as it is less likely to burn instantly.
- The Amber Stage: You want to cook the sugar until it reaches a deep amber color. Too light, and it’s just sweet; too dark, and it’s bitter.
- Deglazing: When you add the cream to the hot sugar, it will steam violently. This is normal. Keep whisking!
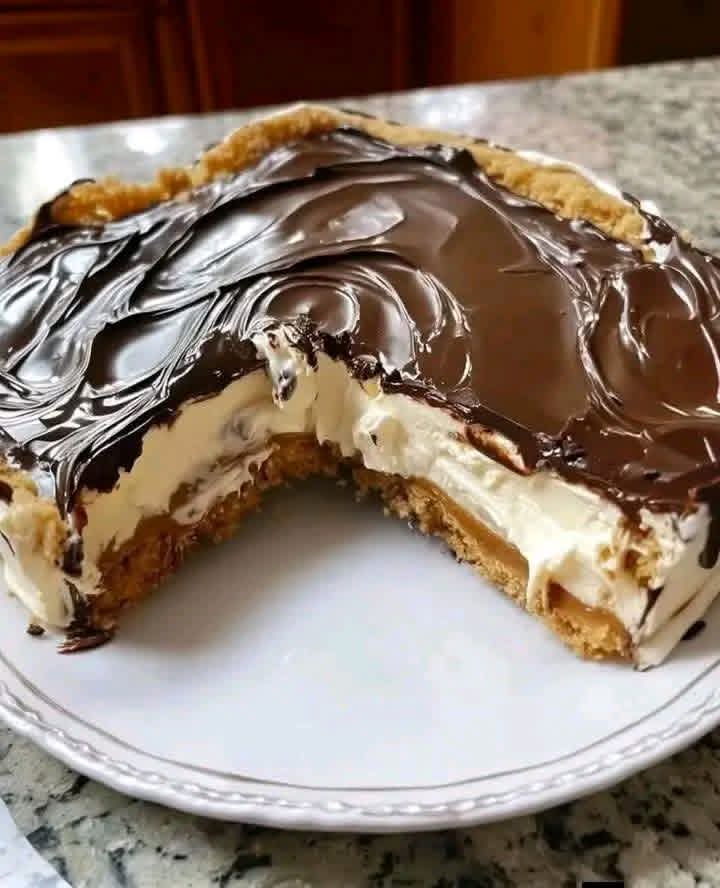
6. Ganache vs. Chocolate Shell: Choosing Your Topping
The photo shows a glossy, spreadable chocolate layer.
- The Shell: If you melt chocolate with a little coconut oil, it will set hard. This gives a satisfying “crack” but can be messy to cut.
- The Ganache: By mixing chocolate with warm heavy cream, you create a ganache. This stays soft and fudgy, allowing the fork to glide through all layers simultaneously. For this recipe, we choose a 2:1 ratio of chocolate to cream.
7. Essential Kitchen Tools
Before you begin, ensure you have:
- 9-inch Springform Pan: Essential for removing the tart without destroying the sides.
- Offset Spatula: For that professional, swirled finish on the chocolate.
- Stand Mixer or Hand Mixer: To achieve the necessary volume in the cream.
- Food Processor: For the finest, most even biscuit crumbs.
8. Ingredients Deep Dive
- Biscuits (300g): Shortbread or Digestives.
- Butter (150g): Unsalted, melted.
- Cream Cheese (500g): Full-fat brick style (e.g., Philadelphia).
- Powdered Sugar (120g): Sifted to avoid lumps.
- Vanilla Extract (2 tsp): Use pure extract, not imitation “essence.”
- Heavy Whipping Cream (300ml): Minimum 36% fat content.
- Caramel Layer: 200g sugar, 90g butter, 120ml cream, 1 tsp sea salt.
- Chocolate Topping: 200g Dark or Milk chocolate, 100ml heavy cream.
9. Step-by-Step Instructions
Phase 1: The Foundation
- Pulse your biscuits in a food processor until they resemble fine breadcrumbs.
- Pour in the melted butter and pulse until the mixture clumps together.
- Press the mixture into your springform pan, going up the sides about 1 inch to create a “crust bucket.”
- Pro Tip: Chill this in the freezer for 20 minutes while you make the next layer. A cold base prevents the caramel from soaking in and making the crust soggy.
Phase 2: The Caramel Core
- In a heavy-bottomed saucepan, combine sugar and 60ml of water. Heat over medium without stirring. Swirl the pan occasionally.
- Once it reaches a deep copper color, remove from heat and immediately whisk in the butter.
- Slowly pour in the heavy cream while whisking constantly. Add the salt.
- Let the caramel cool to room temperature. If you pour hot caramel onto the crust, it will melt the butter; if you pour it onto the cheese, it will deflate the filling.
- Pour a thick layer over the chilled base and return to the fridge for 30 minutes.
Phase 3: The Cheesecake Cloud
- In a large bowl, beat the room-temperature cream cheese and powdered sugar until completely smooth. Add vanilla.
- In a separate cold bowl, whip the heavy cream until stiff peaks form. (When you lift the whisk, the cream should stand straight up).
- Gently fold the whipped cream into the cream cheese mixture using a spatula. Do not stir vigorously, or you will lose the air.
- Spread this mixture over the set caramel layer. Level the top with your offset spatula.
Phase 4: The Chocolate Crown
- Finely chop your chocolate and place it in a heat-proof bowl.
- Heat heavy cream until it just begins to simmer (do not boil).
- Pour the hot cream over the chocolate and let it sit for 5 minutes.
- Gently stir from the center outward until a glossy, dark ganache forms.
- Pour over the cheesecake layer. Use the back of a spoon to create the decorative “swirls” seen in the photo.
10. Troubleshooting Common Mistakes
- Lumpy Cheesecake: This happens when the cream cheese is too cold. If this occurs, you can try to microwave the bowl for 10 seconds and re-beat, but it’s best to start with room-temp cheese.
- Runny Caramel: If your caramel is too thin, you didn’t boil it long enough after adding the cream. It needs to reach about 225°F (107°C) to set properly.
- The Base Crumbles: This usually means there wasn’t enough butter or it wasn’t pressed firmly enough. Don’t be afraid to use some muscle when setting the base!
11. Flavor Variations
- The “Snickers” Twist: Add a layer of roasted peanuts on top of the caramel before adding the cheesecake.
- The Boozy Millionaire: Add 2 tablespoons of Irish Cream or Bourbon to the cheesecake filling.
- Coffee Infusion: Dissolve 1 tablespoon of espresso powder into the chocolate ganache for a mocha finish.
12. Storage, Freezing, and Serving
- The Set Time: This cake must chill for at least 6 hours, preferably overnight. This allows the fats to solidify and the flavors to marry.
- How to Cut: To get the clean slice seen in the image, dip a sharp knife in hot water, wipe it dry, and make one clean cut. Repeat the cleaning/heating process for every single slice.
- Freezing: This tart freezes beautifully. Wrap it tightly in plastic wrap and foil. Thaw in the fridge for 4 hours before serving.
13. Final Thoughts
The Millionaire’s No-Bake Cheesecake is more than just a dessert; it’s an exercise in patience and quality. By taking the time to make your own caramel and carefully folding your cream, you create a professional-grade pastry shop item in your own kitchen. Whether it’s for a birthday, a holiday, or just a Tuesday that needs a little more “wealth,” this recipe is your ticket to a gold-standard treat.
Enjoy your baking!