No-Bake Cherry Delight Recipe: The Ultimate Creamy, Dreamy Dessert
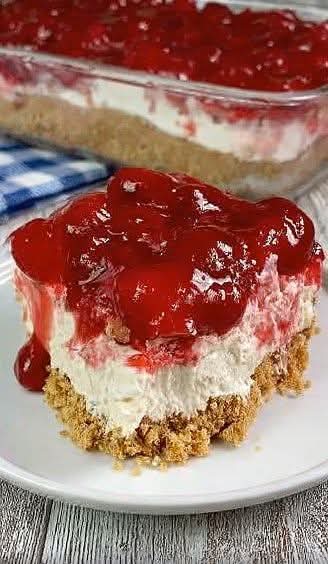
Are you craving a dessert that’s effortlessly elegant, bursting with sweet-tart flavor, and requires absolutely no oven time? Look no further than this classic No-Bake Cherry Delight. This timeless layered dessert features a buttery graham cracker crust, a rich and fluffy cream cheese filling, and a glossy crown of cherry pie filling. It’s the kind of treat that disappears quickly at potlucks, family gatherings, holiday parties, or simple weeknight dinners.
With its perfect balance of textures—crisp crust, velvety cream, and juicy fruit topping—Cherry Delight has been a staple in American kitchens for decades. It’s incredibly forgiving for beginners, yet impressive enough to serve to guests. Best of all, the entire dessert comes together in under 30 minutes of active prep time, then chills in the refrigerator to set.
This comprehensive guide will walk you through every detail: ingredient selection and substitutions (including international alternatives), precise step-by-step instructions, professional tips, common pitfalls to avoid, storage guidelines, nutritional breakdown, variations, frequently asked questions, and even a homemade cherry topping recipe for those who prefer from-scratch elements. By the end, you’ll have everything you need to make the perfect Cherry Delight every single time.
Serves: 12–15 generous squares
Prep Time: 25 minutes
Chill Time: Minimum 4 hours (overnight preferred)
Total Time: 4 hours 25 minutes
Why This No-Bake Cherry Delight Is Irresistible
The beauty of Cherry Delight lies in its simplicity and versatility. Unlike baked cheesecakes that can crack or require water baths, this version is virtually foolproof. The no-bake method keeps the filling light and airy while letting the flavors meld beautifully in the fridge.
The contrast of flavors is what makes it addictive: the subtle honeyed sweetness of graham crackers against the tangy cream cheese, lifted by vanilla, and finished with bright, juicy cherries. It’s sweet without being cloying, creamy without being heavy, and always leaves people asking for seconds.
This dessert is also budget-friendly, make-ahead friendly, and easily scalable. Double it for a crowd or halve it for a smaller pan. It travels well (keep it chilled) and looks stunning when cut into neat squares.
Ingredients You’ll Need
This recipe uses pantry staples and a few refrigerated items. I’ve included detailed notes on each ingredient, including substitutions for readers outside the United States where some items (like graham crackers or Cool Whip) may be harder to find.
For the Graham Cracker Crust
- 2 cups (about 240g) graham cracker crumbs (approximately 14–16 full cracker sheets)
- ½ cup (115g) unsalted butter, melted
- ¼ cup (50g) granulated sugar (optional – omit for a less-sweet crust)
Notes & Substitutions:
Graham crackers are lightly sweet, honey-flavored wheat crackers. If unavailable (common in many countries), substitute with digestive biscuits, Marie biscuits, or any plain sweet biscuit/cookie. Crush them finely for the best texture.
The sugar is optional; many traditional recipes skip it because the filling and topping are already sweet.
Use salted butter if that’s what you have—just reduce added salt elsewhere (there is none here).
For the Cream Cheese Filling
- 8 ounces (226g) full-fat cream cheese, softened to room temperature
- 1 cup (120g) powdered sugar (also called icing sugar)
- 1 teaspoon pure vanilla extract
- 8 ounces (226g) frozen whipped topping (Cool Whip), completely thawed
OR homemade stabilized whipped cream (see substitution below)
Notes & Substitutions:
Full-fat cream cheese gives the richest, creamiest texture. Reduced-fat works but may be slightly less firm.
Powdered sugar dissolves instantly and prevents graininess—do not substitute granulated sugar.
Cool Whip is a stabilized whipped topping that holds up beautifully. If unavailable or you prefer homemade, whip 1½–2 cups cold heavy whipping cream with ¼ cup powdered sugar and ½ teaspoon vanilla until stiff peaks form. For extra stability, add 1–2 tablespoons instant vanilla pudding mix or a teaspoon of cornstarch while whipping.
For the Cherry Topping
- 1 (21-ounce / 595g) can cherry pie filling (good-quality brand recommended)
Notes & Substitutions:
Look for “premium” or “more fruit” varieties for chunkier cherries and better flavor.
See the full homemade cherry topping recipe further down if you want to make your own (highly recommended when fresh or frozen cherries are in season).
Optional Add-Ins
- ½ cup finely chopped pecans or walnuts mixed into the crust for nutty crunch
- Lemon zest (1 teaspoon) added to the cream cheese filling for brightness
Step-by-Step Instructions
Step 1: Prepare the Pan
Lightly grease a 9×13-inch (23×33 cm) baking dish with butter or non-stick spray. This helps the crust release cleanly when serving. You can also line with parchment paper for even easier removal, leaving overhang on the sides as “handles.”
Step 2: Make the Graham Cracker Crust
Place graham crackers (or substitute biscuits) in a large zip-top bag and crush with a rolling pin until you have fine, even crumbs. Alternatively, pulse in a food processor.
In a medium bowl, combine the crumbs, melted butter, and sugar (if using). Stir until the mixture resembles wet sand and holds together when squeezed.
Pour the crumb mixture into the prepared pan. Use the bottom of a measuring cup or flat glass to press it firmly and evenly across the bottom. Pay special attention to the corners and edges. A firmly packed crust prevents crumbling when cut.
Place the crust in the refrigerator for 10–15 minutes while you prepare the filling. Chilling helps it set slightly and makes spreading the filling easier.
Step 3: Prepare the Cream Cheese Filling
In a large mixing bowl, beat the softened cream cheese with an electric mixer on medium speed until completely smooth and no lumps remain (about 1–2 minutes). Scrape down the sides of the bowl as needed.
Add the powdered sugar and vanilla extract. Beat on low speed until incorporated, then increase to medium and beat until light and fluffy (about 2 minutes).
Gently fold in the thawed Cool Whip (or homemade whipped cream) using a rubber spatula. Use slow, sweeping motions to avoid deflating the mixture. Fold just until no white streaks remain—the filling should be thick but spreadable.
Step 4: Assemble the Layers
Remove the pan with the chilled crust from the refrigerator.
Spread the cream cheese filling evenly over the crust. Use an offset spatula or the back of a spoon to create a smooth, level surface. Work gently to avoid disturbing the crust.
Step 5: Add the Cherry Topping
Spoon the cherry pie filling over the cream cheese layer. Spread it gently and evenly, leaving a small border of cream visible around the edges if desired for a prettier presentation.
Step 6: Chill and Set
Cover the pan tightly with plastic wrap or aluminum foil. Refrigerate for at least 4 hours, but overnight (8–12 hours) is best. This allows the layers to firm up, flavors to meld, and the dessert to slice cleanly.
Step 7: Serve
When ready to serve, use a sharp knife to cut into squares (3×4 or 3×5 grid works well). Wipe the knife clean between cuts for neat edges. Serve chilled.
Pro Tips for Perfect Cherry Delight Every Time
- Room-temperature cream cheese is non-negotiable. Cold cream cheese leads to lumpy filling no matter how long you beat it.
- Don’t overmix after adding whipped topping. Overworking deflates the air, resulting in a denser filling.
- Press the crust firmly. A loose crust will crumble when sliced.
- Chill thoroughly. Cutting too early leads to messy slices.
- For cleaner cuts, dip the knife in hot water and wipe dry between each slice.
- Make it ahead: This dessert actually tastes better the next day as flavors deepen.
- Avoid soggy crust: Don’t let the filling sit too long before topping with cherries, and always chill promptly.
Common Mistakes and How to Avoid Them
- Grainy filling: Caused by undissolved powdered sugar or cold cream cheese. Sift the sugar if it’s clumpy.
- Runny filling: Usually from under-whipped homemade cream or using low-fat ingredients. Stick to full-fat and whip to stiff peaks.
- Soggy crust: Too much butter or not pressing firmly. Measure butter accurately.
- Dull flavor: Using low-quality pie filling. Taste your filling and choose brands with real fruit.
Variations and Creative Twists
- Different Fruit Toppings: Swap cherry for blueberry, strawberry, peach, or lemon pie filling.
- Pineapple Delight: Use crushed pineapple (well-drained) instead of cherries and add shredded coconut to the crust.
- Chocolate Version: Mix ¼ cup cocoa powder into the cream cheese filling and top with chocolate pudding or ganache.
- Mini Desserts: Assemble in individual glasses or muffin tins for parfait-style servings.
- Nutty Crust: Add ½ cup finely chopped pecans or almonds to the crumb mixture.
- Lemon Cherry Delight: Add 2 tablespoons lemon juice and zest to the cream cheese layer.
- Gluten-Free: Use gluten-free graham-style crackers.
- Lower-Sugar: Reduce powdered sugar to ¾ cup and use sugar-free pie filling.
Homemade Cherry Topping (From Scratch)
If you prefer to avoid canned filling, here’s an easy homemade version:
Ingredients:
- 4 cups (about 600g) fresh or frozen pitted cherries
- ¾ cup (150g) granulated sugar
- ¼ cup (60ml) water
- 2 tablespoons cornstarch
- 1 tablespoon lemon juice
- ½ teaspoon almond extract (optional, enhances cherry flavor)
Instructions:
- In a medium saucepan, combine cherries, sugar, and water. Bring to a simmer over medium heat.
- In a small bowl, whisk cornstarch with 2 tablespoons cold water to make a slurry.
- Stir slurry into simmering cherries. Cook 3–5 minutes until thickened and glossy.
- Remove from heat; stir in lemon juice and almond extract.
- Cool completely before spreading over the cream cheese layer.
Yield: Enough for one 9×13 dessert. Stores in fridge up to 1 week.
How to Store Cherry Delight
- Refrigerator: Cover tightly and store up to 5 days. Flavors peak on days 2–3.
- Freezer: Cut into squares, flash-freeze on a tray, then wrap individually in plastic wrap and store in a freezer bag up to 2 months. Thaw overnight in the fridge.
- Do not leave at room temperature longer than 2 hours for food safety (cream cheese and whipped topping).
Nutritional Information (Per Serving, Approximate)
Based on 15 servings, using full-fat ingredients and canned cherry filling:
- Calories: 320
- Total Fat: 19g
- Saturated Fat: 12g
- Carbohydrates: 35g
- Sugars: 25g
- Protein: 3g
Cherries provide antioxidants, vitamin C, and fiber. This dessert, while indulgent, offers a small nutritional boost from real fruit.
Frequently Asked Questions
Can I bake the crust for extra crunch?
Yes! Bake at 350°F (175°C) for 8–10 minutes, then cool completely before adding filling.
Can I use fresh cherries without cooking them?
No—the filling would be too watery and wouldn’t set properly. Always cook fresh cherries into a thickened topping.
Is this dessert gluten-free?
Only if you use certified gluten-free crackers/biscuits.
Can I make it dairy-free?
Yes—use vegan cream cheese, coconut whipped topping, and plant-based butter.
How far in advance can I make it?
Up to 2 days ahead. Assemble, cover, and refrigerate.
My filling is too soft—what went wrong?
Likely under-chilled or homemade whipped cream not whipped to stiff peaks. Chill longer or add a stabilizer next time.
Can I double the cream cheese layer?
Absolutely! Use 16 oz cream cheese, 1½–2 cups powdered sugar, and 16 oz whipped topping for an extra-thick middle layer.
Final Thoughts
No-Bake Cherry Delight is more than just a dessert—it’s nostalgia on a plate. Whether you’re making it for a summer barbecue, holiday buffet, or simply because you deserve something sweet, this recipe delivers every time. With its effortless preparation and crowd-pleasing flavor, it’s bound to become a regular in your rotation.
Give it a try, experiment with variations, and enjoy the compliments that are sure to follow. Happy chilling!