Ultimate Traditional Russian Medovik Honey Cake Recipe: Exquisite Layered Honey Cake with Sour Cream Frosting
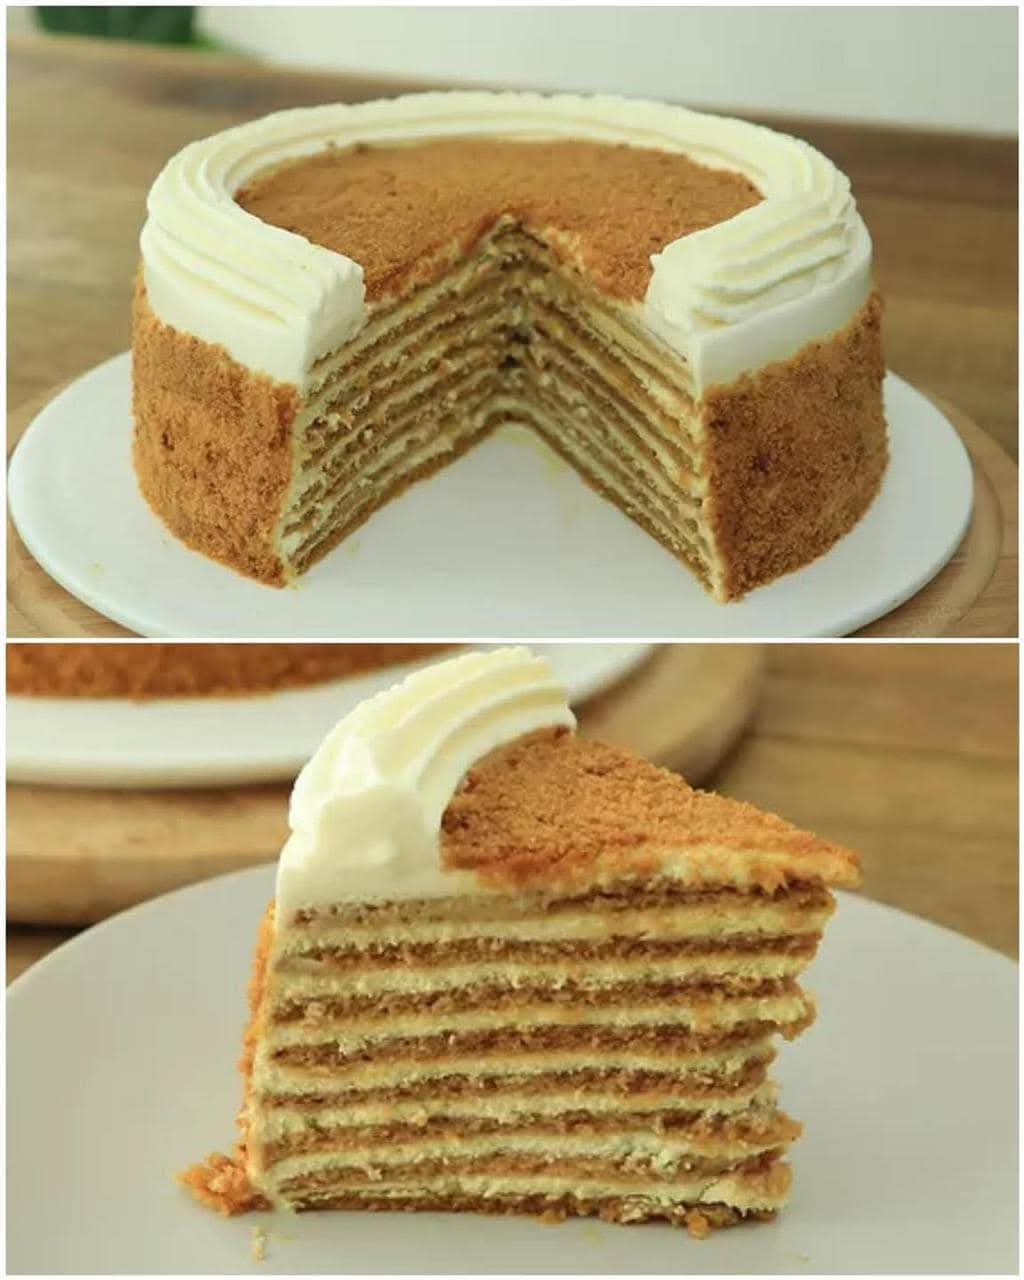
If you’ve never tasted Medovik—the iconic Russian honey layer cake—you’re in for a revelation. This legendary dessert features ultra-thin, tender honey-infused cake layers sandwiched with a silky, tangy sour cream frosting. The entire cake is traditionally coated in cake crumbs for texture and visual appeal, creating a stunning contrast between the golden layers and snowy white cream.
Medovik (sometimes called Medovnik or Honey Cake) is a celebration cake across Eastern Europe and Russia. Its delicate honey flavor is subtle yet pervasive, balanced perfectly by the lightness of the cream. Despite its impressive appearance—with 8 to 12 paper-thin layers—this cake is remarkably achievable at home. The dough is forgiving, the cream comes together in minutes, and the long chilling time does most of the work, softening the layers into a melt-in-your-mouth texture.
This comprehensive recipe yields a tall, elegant 8-inch (20 cm) cake with 10–12 layers, serving 12–16 people generously. It’s perfect for birthdays, holidays, New Year’s celebrations, or any occasion that calls for something extraordinary. The process spans two days (for best results), but active prep is minimal.
Once you master this version, you’ll understand why Medovik has endured for over two centuries: every bite delivers honeyed warmth, cool creaminess, and satisfying crunch from the crumb coating.
Prep Time: 1 hour 30 minutes (active)
Cook Time: 40–60 minutes (baking layers in batches)
Chill Time: Minimum 8 hours, ideally 24–48 hours
Total Time: 2–3 days (including chilling)
Servings: 12–16
Yield: One 8-inch layered cake
Why This Medovik Recipe Stands Above the Rest
Hundreds of Medovik recipes exist online, but many produce dry layers, overly sweet cream, or cumbersome techniques. This version has been refined through extensive testing to deliver:
- Perfectly tender, flexible layers that roll easily without cracking.
- Balanced honey flavor—pronounced but not cloying.
- Stable yet light sour cream frosting that holds up during assembly and slicing.
- Authentic crumb coating for traditional appearance and texture.
- Make-ahead convenience—the cake actually improves with time.
- Clear, foolproof instructions for bakers of all levels.
Traditional Medovik uses a cooked dough method (similar to honeycomb candy technique) that creates the signature chewy-soft texture. We’ll walk through every detail so you succeed on your first try.
Ingredients: Quality and Substitutions
For the Honey Cake Layers (Dough)
- ½ cup (170 g) mild honey – Choose light-colored honey (acacia, clover, or wildflower) for delicate flavor. Dark honey will overpower.
- ¾ cup (150 g) granulated sugar
- ½ cup (115 g) unsalted butter, cut into pieces
- 3 large eggs, room temperature
- 1 teaspoon baking soda
- ½ teaspoon fine sea salt
- 3½–4 cups (440–500 g) all-purpose flour, plus more for dusting (spoon and level method)
- Optional: 1 teaspoon vanilla extract or seeds from ½ vanilla bean for extra aroma
For the Sour Cream Frosting
- 4 cups (960 ml) full-fat sour cream, cold (at least 20–30% fat; higher fat prevents watery frosting)
- 2 cups (480 ml) heavy whipping cream, cold
- 1¼ cups (150 g) powdered sugar, sifted
- 1 tablespoon vanilla extract or vanilla bean paste
- Optional: 1–2 tablespoons lemon juice for brighter tang
For Assembly and Coating
- Reserved cake crumbs from trimmed layers
Equipment You’ll Need
- Double boiler or heatproof bowl over simmering water
- Stand or hand mixer (highly recommended for frosting)
- 8-inch (20 cm) cake ring or springform pan sides (for neat assembly)
- Parchival parchment paper and baking sheets
- Rolling pin
- Offset spatula
- Cake turntable (optional but helpful)
Step-by-Step Instructions: Master the Technique
Day 1: Bake the Layers
- Prepare your workspace. Line 4–6 baking sheets with parchment paper. Draw 8-inch circles on the underside of each parchment (flip so pencil doesn’t touch dough). Preheat oven to 350°F (175°C).
- Cook the honey dough (bain-marie method).
In a heatproof bowl over barely simmering water (double boiler), combine honey, sugar, and butter. Stir until melted and uniform.
In a small bowl, lightly beat eggs with salt. Temper the eggs by adding a few tablespoons of the warm honey mixture while whisking constantly, then pour eggs back into the bowl. Cook, stirring constantly, until mixture reaches 160–170°F (70–75°C)—about 5–7 minutes. It will lighten in color and thicken slightly.
Remove from heat. Stir in baking soda—it will foam dramatically (this creates the honeycomb texture). Let cool 5 minutes. - Incorporate flour.
Gradually add 3½ cups flour, stirring with a wooden spoon until a soft, sticky dough forms. It should be pliable but not firm. If too sticky to handle, add flour 1 tablespoon at a time (up to ½ cup more). Do not over-flour or layers will be tough. - Divide and roll the layers.
Turn dough onto a heavily floured surface. Divide into 10–12 equal pieces (about 90–100 g each for 10 layers).
Working with one piece at a time (keep others covered), roll into an 8–9 inch circle directly on prepared parchment, about 1–2 mm thick. Use plenty of flour to prevent sticking. Prick all over with a fork to prevent bubbling.
Transfer parchment with dough to baking sheet. - Bake the layers.
Bake 4–6 minutes until golden brown (watch carefully—edges darken quickly). Layers should be flexible when hot but crisp when cool.
While still hot, trim to perfect 8-inch circle using a plate or cake ring as guide. Reserve trimmings for crumbs.
Cool completely on rack. Repeat with remaining dough. Bake scraps on a separate sheet for extra crumbs. - Make the crumbs.
Once all trimmings and any extra baked scraps are cool, pulse in a food processor to fine crumbs. Set aside.
Day 2: Make Frosting and Assemble
- Prepare the sour cream frosting.
Chill your mixing bowl and whisk attachment.
Whip heavy cream with powdered sugar and vanilla to stiff peaks.
In a separate large bowl, whisk sour cream until smooth. Gently fold whipped cream into sour cream in three additions. Frosting should be thick but spreadable. If too thin, chill 30 minutes. Taste and add lemon juice if desired. - Assemble the cake.
Place a cake board or plate on a turntable. Add a dab of frosting to secure the first layer.
Stack layers, spreading about ⅓–½ cup frosting between each (use slightly more on upper layers if desired). Don’t frost the top yet.
Use remaining frosting to coat sides and top thinly (crumb coat). Chill 1 hour to set. - Final coating.
Apply a generous final layer of frosting all over. Press reserved crumbs onto sides and sprinkle over top (traditional style leaves some top frosting visible).
For clean edges, chill 30 minutes, then smooth top with a hot offset spatula. - Chill thoroughly.
Cover loosely and refrigerate at least 8 hours (24–48 is ideal). The long rest allows moisture from frosting to soften layers into tender perfection. - Serve.
Remove from fridge 30–60 minutes before slicing for easiest cutting. Use a sharp knife dipped in hot water for clean slices.
Pro Tips for Flawless Medovik
- Rolling thin layers: Work quickly—the dough stiffens as it cools. Re-warm briefly over the double boiler if needed.
- Prevent cracking: Roll between two sheets of floured parchment if sticking is an issue.
- Even baking: Rotate sheets halfway if your oven has hot spots.
- Frosting stability: Use full-fat dairy only. Greek yogurt can substitute sour cream (strain overnight).
- Make ahead: Layers can be baked and stored (airtight) up to 1 week. Assembled cake keeps 5–7 days refrigerated.
- Scaling: For taller cake, increase to 14–16 layers (adjust dough portions).
Common Pitfalls and Fixes
- Layers too tough: Overworked dough or too much flour. Add flour sparingly.
- Frosting too runny: Low-fat ingredients or over-whipping cream. Start over with cold, high-fat dairy.
- Cake sliding during assembly: Chill layers and use a cake ring for support.
- Uneven browning: Roll to uniform thickness and watch closely.
Delicious Variations
- Chocolate Medovik – Add ¼ cup cocoa to dough and use chocolate ganache between some layers.
- Caramel Dulce de Leche Medovik – Replace half the frosting with cooked condensed milk (dulce de leche).
- Berry Medovik – Add thin layers of berry jam or fresh berries between frosting.
- Nutty Version – Fold chopped toasted walnuts into crumbs or between layers.
- Gluten-Free – Use a 1:1 gluten-free flour blend with xanthan gum.
- Vegan Adaptation – Challenging but possible with coconut cream, vegan butter, and egg substitutes.
Serving Suggestions and Pairings
Medovik shines simply sliced with tea or coffee. For elegance:
- Dust with powdered sugar or edible gold.
- Garnish with fresh berries or candied orange.
- Serve with vanilla ice cream or whipped cream rosettes.
- Pair with black tea, Earl Grey, or dessert wines like Sauternes.
Storage and Freezing
- Refrigerator: Up to 7 days, covered.
- Freezer: Wrap individual slices in plastic, then foil. Freeze up to 2 months. Thaw overnight in fridge.
Nutritional Information (Per Slice, 1/14th Cake)
Approximate values:
- Calories: 480
- Fat: 30g
- Carbohydrates: 48g
- Protein: 6g
- Sugar: 30g
Frequently Asked Questions
Why does Medovik need to chill so long?
The cream’s moisture softens the initially crisp layers into tender, cake-like texture.
Can I make fewer layers?
Yes—6–8 layers for a shorter cake, but thin layers are traditional.
Is the dough supposed to foam?
Yes! Baking soda + honey creates the signature aeration.
My layers cracked while rolling.
Dough was too cold or dry. Warm slightly and add a teaspoon of milk.
Can I bake all layers at once?
If you have multiple ovens or large sheets, yes. Otherwise, batches are fine.
The Fascinating History of Medovik
Legend traces Medovik to the early 19th century in Imperial Russia. A young chef at the palace of Emperor Alexander I created a honey cake for Empress Elizabeth Alexeievna, who reportedly disliked honey. To everyone’s surprise (including the chef’s), she adored the cake. The dessert became a court favorite and spread throughout the Russian Empire.
The name “Medovik” derives from “myod” (Russian for honey). Over generations, home cooks refined the recipe, making it a staple at holidays and family gatherings. Soviet-era scarcity made it even more cherished—simple ingredients yielded extraordinary results.
Today, Medovik remains one of Russia’s most beloved desserts, with countless regional variations across Ukraine, Belarus, Poland, and beyond.
Final Thoughts
Making Medovik is a labor of love, but the reward—a towering, honey-scented masterpiece that earns gasps and second helpings—is worth every minute. This recipe honors tradition while incorporating modern tips for reliable success.
Whether you’re celebrating heritage, impressing guests, or simply treating yourself, this honey cake delivers pure joy in every delicate layer. Bake it once, and it will become your signature dessert.
Enjoy the process, savor the results, and share the love—one exquisite slice at a time.