The Ultimate No-Bake Cherry Cheesecake: Creamy, Dreamy, and Effortless
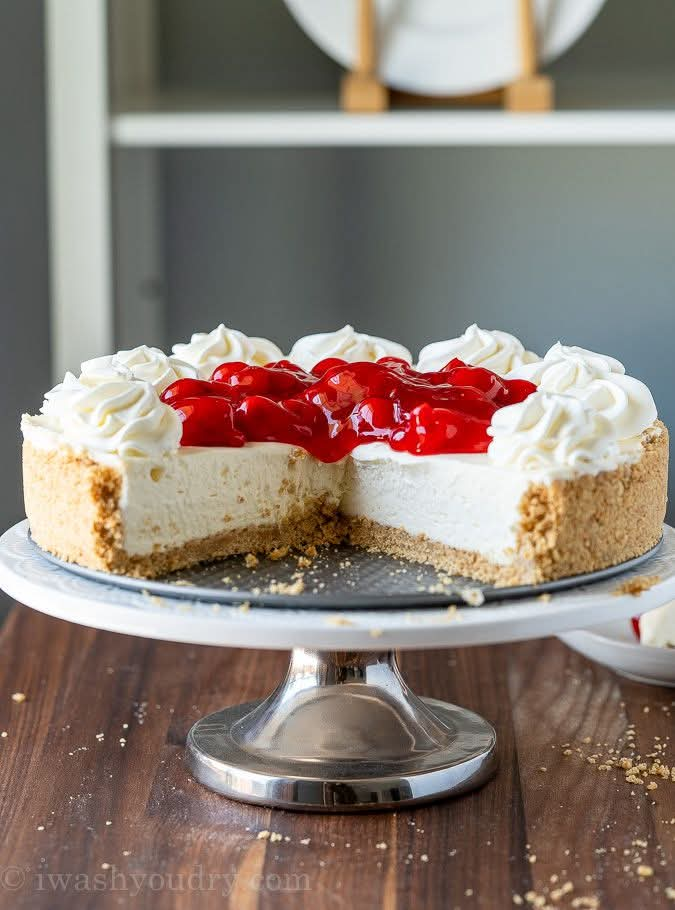
If you’re searching for a dessert that looks impressive, tastes decadent, and requires zero oven time, this no-bake cherry cheesecake is your new go-to recipe. Picture a buttery graham cracker crust that provides the perfect crunchy contrast, a silky-smooth cream cheese filling that’s light yet rich, and a vibrant crown of sweet-tart cherry topping that makes every slice look bakery-worthy. Best of all? It comes together in under 30 minutes of active time, then chills in the fridge until ready to serve.
No-bake cheesecakes have surged in popularity because they eliminate the stress of water baths, cracking tops, and long baking times associated with traditional New York-style cheesecakes. Instead, you get all the tangy, creamy satisfaction with half the effort. This particular version leans on the classic combination of cream cheese, whipped cream (or a stabilized whipped topping alternative), and canned cherry pie filling for convenience—though we’ll cover homemade cherry topping too if you want to elevate it further.
Whether you’re hosting a summer barbecue, contributing to a potluck, celebrating a birthday, or simply craving something sweet on a hot day when turning on the oven sounds unbearable, this recipe delivers every time. Let’s dive into why this dessert works so well, what each component does, and how to make it foolproof.
Why Choose No-Bake Over Baked Cheesecake?
Traditional baked cheesecakes rely on eggs for structure and gentle low-heat baking to set the custard-like filling. No-bake versions swap eggs for whipped heavy cream (or alternatives like Cool Whip for extra stability) and use the refrigerator’s cold temperature to firm everything up. The result is lighter in texture—almost mousse-like—while still delivering that signature cream cheese tang.
Benefits include:
- No risk of overbaking or cracks
- Faster prep (no preheating or long cooling)
- Make-ahead friendly (it actually improves after 8+ hours in the fridge)
- Adaptable to dietary tweaks (gluten-free crust, lower-sugar options, etc.)
This cherry-topped beauty is especially crowd-pleasing because cherries add bright color and a fruity balance to the rich filling.
Ingredients Breakdown (Full List for a 9-inch Cheesecake – Serves 10–12)
For the Graham Cracker Crust
- 2 cups (about 240g) graham cracker crumbs (roughly 14–15 full sheets, finely crushed)
- ½ cup (115g) unsalted butter, melted
- ¼ cup (50g) granulated sugar
- Pinch of salt (optional, enhances flavor)
The crust acts as the sturdy base. Graham crackers provide honeyed sweetness and classic texture; butter binds it together; sugar adds caramelization notes even without baking.
For the Creamy No-Bake Filling
- 24 oz (three 8-oz packages) full-fat cream cheese, softened to room temperature
- 1¼ cups (150g) powdered sugar, sifted (for smoothness)
- 1 cup (240ml) heavy whipping cream, cold
- 2 teaspoons pure vanilla extract
- 1 tablespoon fresh lemon juice (adds subtle brightness and balances sweetness)
- ½ cup (120g) sour cream or Greek yogurt (room temperature; adds tang and extra creaminess)
Full-fat cream cheese is non-negotiable for the richest texture. Powdered sugar dissolves easily without grittiness. Whipping the heavy cream separately incorporates air for that light, fluffy mouthfeel.
For the Cherry Topping
- 1 (21-oz) can cherry pie filling (classic choice for convenience—sweetened cherries in thick syrup)
- Optional homemade upgrade: 4 cups fresh or frozen pitted cherries, ½ cup sugar, 2 tablespoons cornstarch, 1 tablespoon lemon juice, ½ teaspoon almond extract
The canned version saves time and ensures glossy, sliceable results. Homemade allows control over sweetness and chunkiness.
Step-by-Step Instructions
Step 1: Prepare the Crust (10 minutes)
Start by crushing the graham crackers. Place them in a zip-top bag and smash with a rolling pin, or pulse in a food processor until fine crumbs form. Transfer to a medium bowl and stir in the granulated sugar and a pinch of salt. Pour in the melted butter and mix until every crumb is evenly coated—it should resemble wet sand and hold together when squeezed.
Press the mixture firmly into the bottom (and about 1 inch up the sides if using a springform pan) of a 9-inch springform pan. Use the bottom of a measuring cup or glass to create an even, compact layer. This prevents crumbling when slicing. Place the crust in the freezer for 15–20 minutes to firm up while you make the filling. Chilling helps it set faster once the filling is added.
Step 2: Make the Cheesecake Filling (10–15 minutes)
In a large mixing bowl using a hand mixer or stand mixer fitted with the paddle attachment, beat the softened cream cheese on medium speed until completely smooth and lump-free (about 2 minutes). Scrape down the sides often—any lumps now will stay in the final product.
Add the powdered sugar, vanilla extract, lemon juice, and sour cream. Beat on low to incorporate, then increase to medium until silky (another 1–2 minutes).
In a separate clean bowl, whip the cold heavy cream on high speed until stiff peaks form (3–5 minutes). Be careful not to overwhip into butter. Gently fold the whipped cream into the cream cheese mixture in three additions using a spatula. Fold slowly to keep the air in—this creates the light, mousse-like texture that defines great no-bake cheesecake.
Step 3: Assemble and Chill (5 minutes active + chilling time)
Remove the crust from the freezer. Spoon the filling over the crust and smooth the top with an offset spatula or the back of a spoon for a clean finish. Cover loosely with plastic wrap (to avoid absorbing fridge odors) and refrigerate for at least 6 hours—ideally overnight—for the best sliceable texture. The filling needs time to set fully.
Step 4: Add the Cherry Topping (Just before serving)
When ready to serve, spread the cherry pie filling evenly over the top. If using homemade, make it ahead: Combine cherries, sugar, cornstarch, and lemon juice in a saucepan. Cook over medium heat, stirring constantly, until thickened and bubbly (about 5–8 minutes). Stir in almond extract and cool completely before topping.
Run a thin knife around the edge of the pan before releasing the springform ring for clean removal.
Step 5: Slice and Serve
Use a sharp knife dipped in hot water (and wiped dry between slices) for neat pieces. Garnish each slice with extra whipped cream, fresh cherries, chocolate shavings, or mint leaves if desired.
Prep, Chill, and Serving Times
- Prep Time: 25–30 minutes
- Chill Time: 6–12 hours (overnight recommended)
- Total Time: About 6½–12½ hours
- Servings: 10–12 generous slices
Tips for Success and Troubleshooting
- Room temperature cream cheese is crucial—cold cream cheese leads to lumps.
- Don’t skip sifting powdered sugar to avoid graininess.
- For extra stability in warm weather, add 1 teaspoon unflavored gelatin dissolved in 2 tablespoons warm water to the filling.
- If the filling seems too soft after chilling, it may need more time or your cream wasn’t whipped stiff enough.
- Common mistake: Adding whipped cream too aggressively deflates the texture—fold gently.
- Storage: Keeps covered in the fridge for up to 5 days. Freezes well (without topping) for up to 2 months; thaw overnight in fridge.
Variations to Make It Your Own
- Oreo Crust Version: Swap graham crackers for crushed Oreos (no extra sugar needed).
- Gluten-Free: Use certified gluten-free graham-style cookies or nuts.
- Lower Sugar: Reduce powdered sugar to ¾ cup and use no-sugar-added pie filling.
- Mini Cheesecakes: Press crust into muffin liners; divide filling among 12–16 cups. Chill 4 hours.
- Other Toppings: Blueberry, strawberry, lemon curd, chocolate ganache, or caramel.
- Pumpkin Spice Twist: Add 1 teaspoon cinnamon and ½ cup pumpkin puree to filling for fall.
A Bit of History and Why Cherries Pair So Perfectly
Cheesecake traces back to ancient Greece, but the modern American version exploded in popularity in the 20th century with Philadelphia cream cheese marketing. No-bake styles became household staples in the 1950s–60s when convenience foods like canned fillings rose. Cherries became iconic thanks to their tart-sweet contrast—balancing the richness while adding visual pop.
This dessert bridges nostalgic comfort with modern ease. It’s forgiving for beginners yet impressive enough for special occasions.
Nutritional Notes (Approximate per Slice, Based on 12 Servings)
Around 450–550 calories, mostly from fat and carbs. High in calcium from dairy, but enjoy in moderation as a treat.
Perfect Occasions for This Cheesecake
- Summer picnics (no oven heat!)
- Holiday gatherings (make ahead)
- Birthdays or anniversaries
- Potlucks or BBQs
- Weeknight indulgence
This no-bake cherry cheesecake proves that incredible desserts don’t require complicated techniques or hours in a hot kitchen. Once you try it, you’ll wonder why you ever bothered with the baked version on busy days. Give it a whirl, share your results, and enjoy every creamy, fruity bite!