Introduction
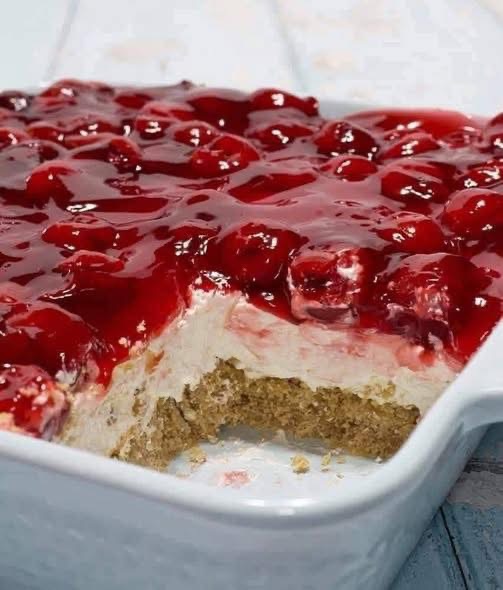
This No-Bake Cherry Cheesecake is rich, creamy, refreshing, and incredibly easy to make. There is no oven required, making it perfect for warm days, busy schedules, or when you want an impressive dessert with minimal effort. A buttery biscuit crust, smooth cream cheese filling, and a glossy cherry topping come together for a classic dessert everyone loves.
Ingredients
For the crust
250 g digestive biscuits or graham crackers, finely crushed
120 g unsalted butter, melted
2 tablespoons sugar (optional, for a sweeter crust)
For the cheesecake filling
500 g cream cheese, softened to room temperature
1 cup heavy whipping cream, very cold
1 cup powdered sugar, sifted
1 teaspoon vanilla extract
1 tablespoon lemon juice (optional, for balance)
1 tablespoon gelatin powder
3 tablespoons cold water
For the cherry topping
1 can cherry pie filling or cherry topping
Optional fresh cherries for decoration
Instructions
Prepare the crust
Crush the biscuits until very fine using a food processor or a rolling pin. Mix the crushed biscuits with melted butter and sugar until the texture resembles wet sand. Press the mixture firmly into the bottom of a springform pan or a glass dish, making an even layer. Chill in the refrigerator for at least 20 minutes to set.
Prepare the gelatin
In a small bowl, sprinkle the gelatin over cold water. Let it bloom for 5 minutes. Gently heat it for a few seconds until fully dissolved. Do not boil. Set aside to cool slightly.
Make the cheesecake filling
In a large bowl, beat the softened cream cheese until smooth and creamy. Add powdered sugar, vanilla extract, and lemon juice, then beat again until fully combined and lump-free.
In a separate bowl, whip the cold heavy cream until stiff peaks form. Gently fold the whipped cream into the cream cheese mixture using a spatula, keeping the texture light and airy. Slowly pour in the cooled gelatin while folding, making sure it is evenly distributed.
Assemble the cheesecake
Pour the cheesecake filling over the chilled crust and smooth the top with a spatula. Refrigerate for at least 4 hours, preferably overnight, until fully set.
Add the cherry topping
Once the cheesecake is firm, spread the cherry pie filling evenly over the top. Decorate with fresh cherries if desired. Chill for another 30 minutes before serving.
Serving
Carefully remove from the pan, slice with a clean sharp knife, and serve cold. This cheesecake pairs beautifully with coffee or tea.
Tips for success
Always use room-temperature cream cheese to avoid lumps. Make sure the whipping cream is very cold for best volume. Allow enough chilling time so the cheesecake sets properly. For cleaner slices, wipe the knife between cuts.
Variations
You can replace the cherry topping with strawberry, blueberry, raspberry, or mango topping. Add chocolate shavings or crushed biscuits on top for extra texture. For a lighter version, use low-fat cream cheese and reduce sugar slightly.
Storage
Store covered in the refrigerator for up to 4 days. This cheesecake is not suitable for freezing as the texture may change.
This No-Bake Cherry Cheesecake is creamy, elegant, and foolproof, making it a perfect dessert for gatherings, celebrations, or a simple sweet treat at home.