Ultimate Guide to Growing Ginger at Home: From Store-Bought Root to Fresh Harvest
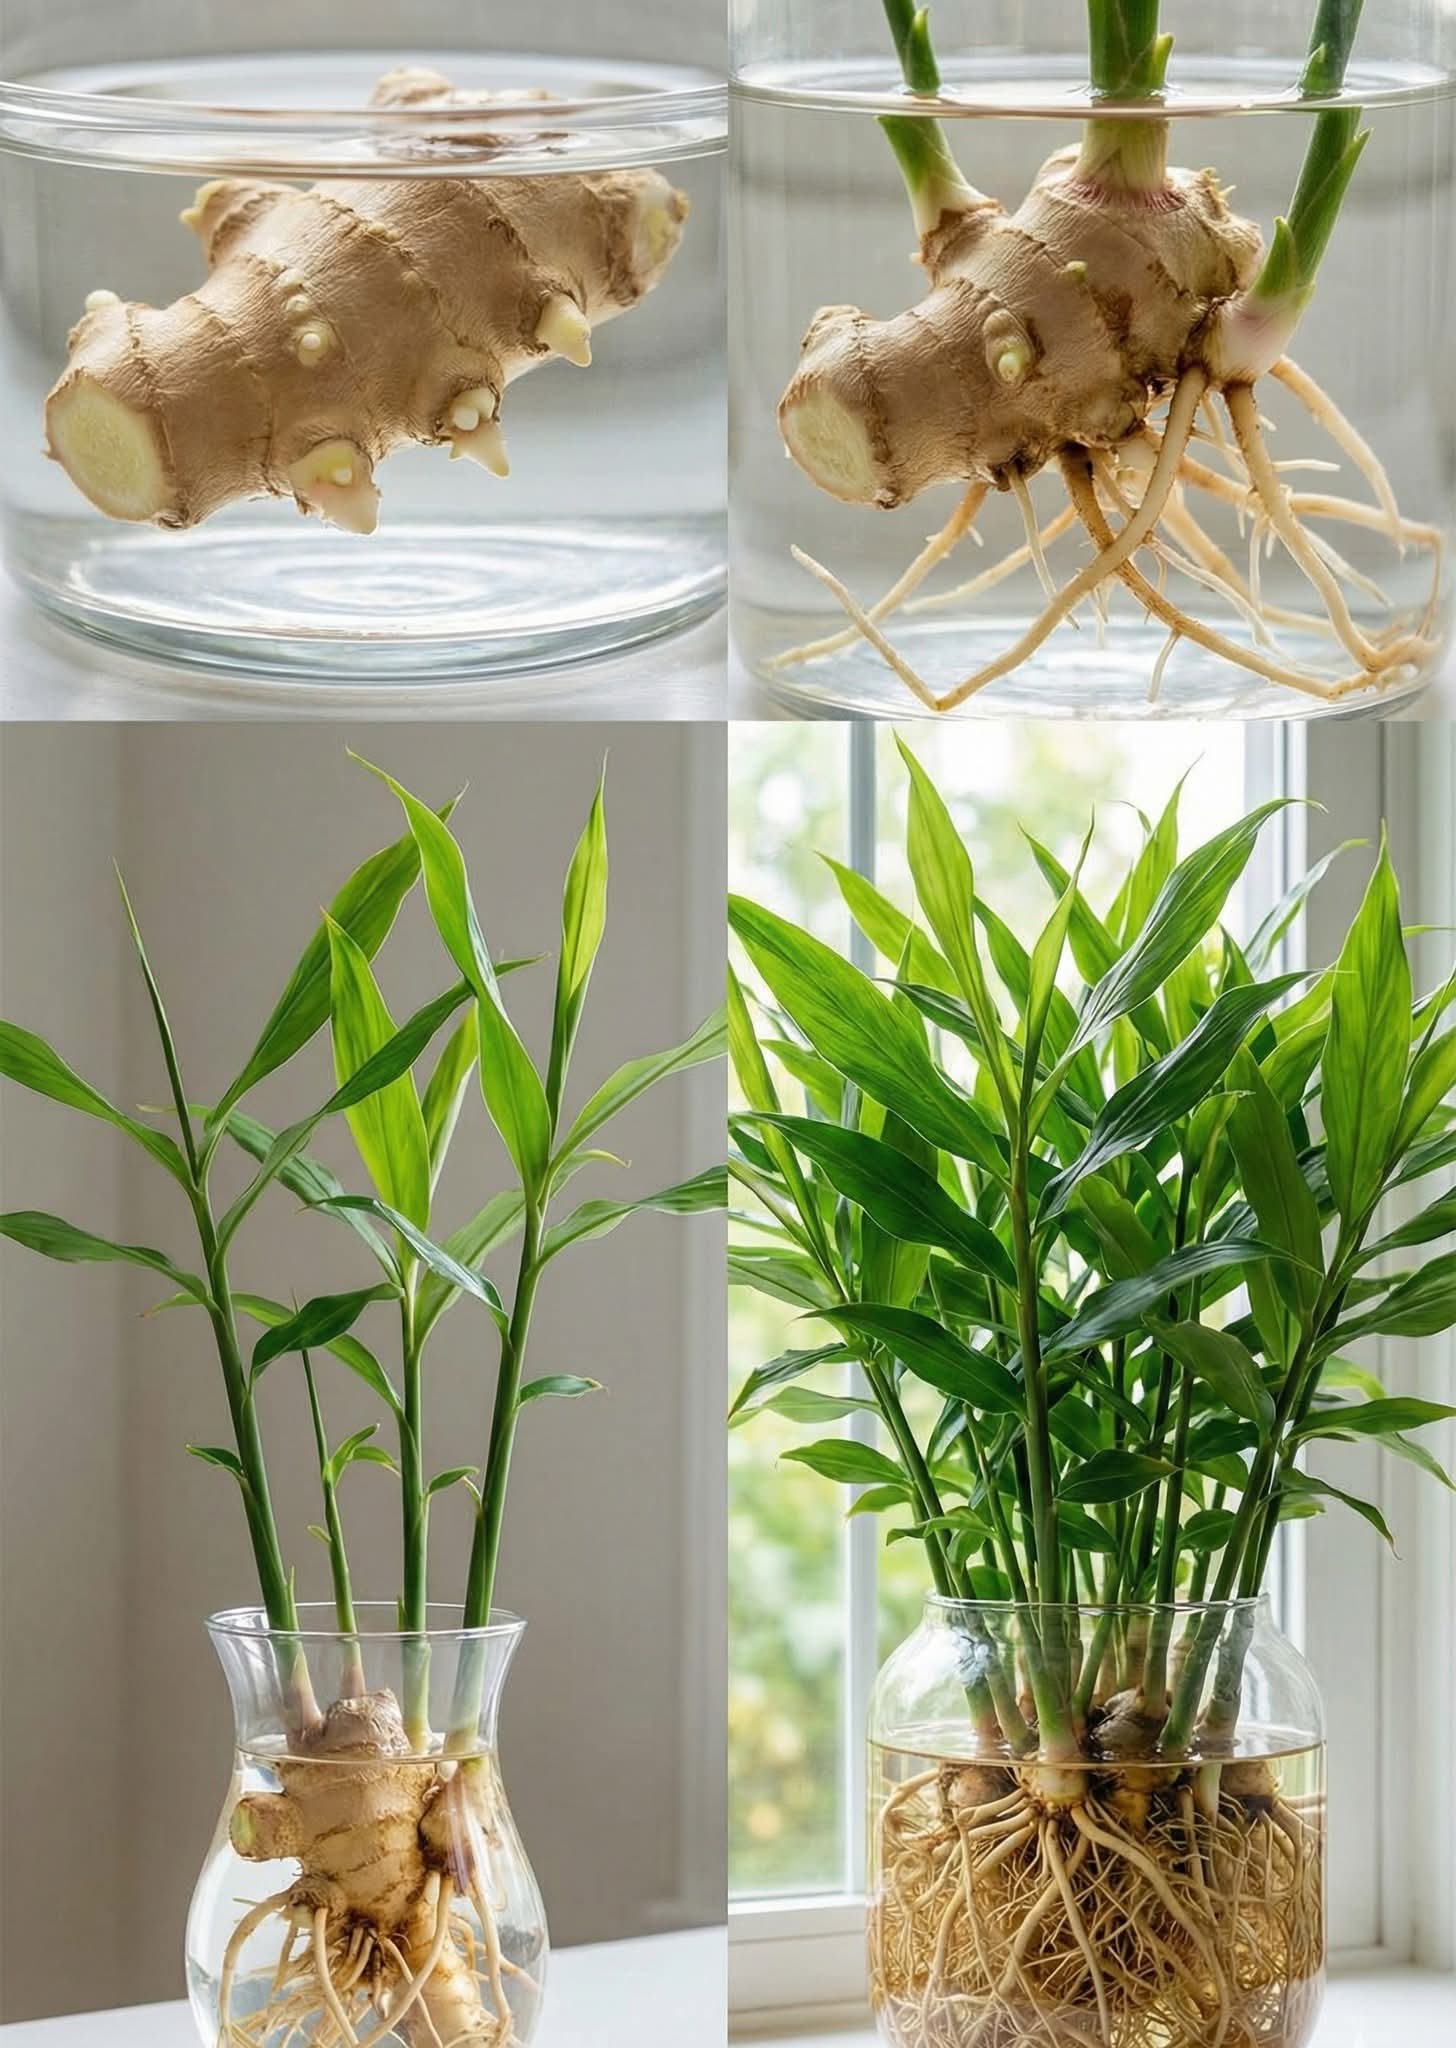
Ginger (Zingiber officinale) is one of the most rewarding plants you can grow at home. This tropical perennial offers aromatic, spicy rhizomes that are staples in kitchens worldwide and prized in traditional medicine for centuries. The images you shared beautifully capture the fascinating journey: starting with a simple grocery-store rhizome suspended in water, developing roots and shoots, and eventually transforming into a lush, green plant with tall, reed-like stems. This process is not only visually captivating but also surprisingly straightforward, even for beginners.
In this comprehensive guide, we’ll explore everything you need to know about growing ginger successfully at home—whether you’re interested in the popular water-rooting method shown in those photos, traditional soil planting, or even advanced hydroponic techniques. We’ll cover selection, propagation, care, troubleshooting, harvesting, and much more. By the end, you’ll be equipped to grow your own endless supply of fresh, organic ginger.
Why Grow Ginger at Home?
Growing your own ginger offers numerous advantages over buying it from the store. Homegrown ginger is fresher, more flavorful, and often more potent. The rhizomes tend to have thinner, more tender skins and a brighter, more citrusy-spicy taste compared to commercially stored ones, which may be treated with sprout inhibitors or waxed.
From a health perspective, ginger is renowned for its anti-inflammatory compounds like gingerol, which convert to shogaols when dried or cooked. These give ginger powerful properties, including:
- Reducing nausea (including morning sickness and chemotherapy-related nausea)
- Aiding digestion and relieving indigestion
- Providing antioxidant and anti-inflammatory effects
- Potentially supporting immune function and reducing muscle pain
Culinary uses are endless: fresh ginger brightens stir-fries, teas, soups, baked goods, smoothies, marinades, and cocktails. Many home growers also appreciate the ornamental value—the plant produces attractive, tropical foliage that can reach 3–4 feet tall, making it a beautiful houseplant.
Growing ginger is cost-effective and sustainable. Once established, a single rhizome can produce multiples over time, providing years of harvest with minimal ongoing effort.
Understanding the Ginger Plant
Ginger is a rhizomatous herb in the Zingiberaceae family, related to turmeric, cardamom, and galangal. The part we eat is the rhizome—an underground stem that stores nutrients and produces roots below and shoots above. The plant grows pseudostems (tightly rolled leaf sheaths) up to 4 feet tall, with narrow, lance-shaped leaves.
In its native Southeast Asian habitat, ginger thrives in warm, humid, partially shaded conditions with rich, moist soil. It doesn’t tolerate frost, so in most temperate regions (like most of the US), it’s grown as an annual or potted indoor/outdoor plant.
There are several varieties, but common edible ginger is Zingiber officinale. Ornamental types like shell ginger or torch ginger exist but aren’t typically eaten.
Selecting the Right Ginger Rhizome
Success starts with quality planting material. The easiest source is organic ginger from the grocery store—look for plump, firm pieces with smooth skin and visible “eyes” (small buds or growth points) that look like little horns or bumps.
Avoid shriveled, moldy, or overly dry pieces. Conventionally grown ginger is often treated with sprout inhibitors or radiation to prevent sprouting in stores. To overcome this:
- Choose organic whenever possible
- Soak non-organic rhizomes in room-temperature water for 12–24 hours (change water if it becomes cloudy) to wash off inhibitors and rehydrate
- Place the rhizome in a warm, bright spot for a few days to encourage sprouting
If eyes aren’t visible, place the whole piece on a windowsill or in a paper bag in a warm area for 1–2 weeks until buds appear.
Two Popular Methods: Water Rooting vs. Direct Soil Planting
The photos you shared demonstrate the water-rooting method (also called hydroponic starting or “jar method”), which is visually engaging and great for beginners.
Method 1: Water Rooting (Hydroponic Start – As Shown in Your Images)
This technique lets you watch roots and shoots develop—perfect for educational or decorative purposes.
Steps:
- Select a healthy rhizome with visible buds.
- Fill a clear glass jar or bowl with room-temperature water.
- Suspend the rhizome using toothpicks (like sprouting an avocado) so the bottom half sits in water while buds point upward.
- Place in bright, indirect light (avoid direct sun to prevent algae).
- Change water every 2–3 days to keep it fresh and oxygenated.
- Within 1–4 weeks, white roots emerge from the bottom, followed by green shoots from the top.
- Once roots are 2–4 inches long and shoots are several inches tall (usually 4–8 weeks), transplant into soil.
Pros: Fun to observe, minimal mess initially, good for small spaces.
Cons: Risk of rot if water isn’t changed; plants need soil eventually for full growth.
Method 2: Direct Soil Planting (Faster for Most Growers)
Many experienced growers skip water rooting and plant directly.
Steps:
- Cut rhizome into 1–2 inch pieces, each with at least one bud.
- Let cuts callus (dry) for 1–2 days to prevent rot.
- Fill a wide, shallow pot (ginger grows horizontally) with well-draining potting mix (add compost for richness).
- Lay pieces horizontally, buds up, cover with 1–2 inches of soil.
- Water thoroughly and keep moist.
This method often sprouts faster since roots develop directly in their final medium.
Soil, Pot, and Location Requirements
Ginger prefers loose, rich, slightly acidic soil (pH 5.5–6.5). Use a high-quality potting mix amended with compost or aged manure. Ensure excellent drainage—add perlite or sand if needed.
Choose a wide container (at least 12–16 inches diameter) to accommodate horizontal growth. Depth of 8–12 inches works well.
Light: Bright, indirect light or dappled shade. Morning sun with afternoon shade is ideal. Indoors, place near an east- or west-facing window. Too much direct sun scorches leaves; too little causes leggy growth.
Temperature: 70–90°F (21–32°C) daytime. Never below 50°F (10°C). Ideal for indoor growing year-round in cooler climates.
Humidity: 40–60%. Mist leaves or use a pebble tray in dry indoor air.
Ongoing Care and Maintenance
Watering is critical—keep soil consistently moist (like a wrung-out sponge) but never waterlogged. Water when the top inch feels dry. In hot weather, daily checks may be needed.
Fertilizing: Use balanced liquid fertilizer (e.g., 10-10-10) every 4–6 weeks during active growth. Organic options like compost tea or worm castings work excellently.
Pruning: Remove yellowing leaves. The plant naturally dies back in cooler months.
Overwintering: In cold areas, bring pots indoors. Reduce watering slightly but don’t let dry out completely. Growth slows in winter.
Hydroponic Ginger: Advanced Option
For space efficiency and potentially faster growth (up to 50% quicker), consider full hydroponics after initial soil rooting. Start in compost, then transfer to a system (NFT, DWC, or ebb-and-flow) with nutrient solution (standard hydroponic formula). Maintain pH 5.5–6.5 and EC around 1.5–2.0. This method uses less water and space but requires more equipment.
Common Problems and Troubleshooting
- No sprouting after weeks: Too cold, treated rhizome, or old piece. Try warmer spot or new rhizome.
- Rotting rhizome: Overwatering or poor drainage. Ensure good airflow and drainage.
- Yellow leaves: Underwatering, overwatering, or nutrient deficiency. Check soil moisture and fertilize.
- Slow growth: Low light/temperature. Move to brighter/warmer location.
- Pests: Rare indoors (occasional spider mites or aphids). Use neem oil if needed.
- Leggy stems: Insufficient light. Provide more indirect brightness.
Harvesting Your Homegrown Ginger
Patience is key—full maturity takes 8–10 months. For small amounts, harvest “baby ginger” after 3–5 months: gently expose outer rhizomes and cut what you need, leaving the plant intact.
For full harvest: When leaves yellow and die back (or before frost), dig up the entire plant. Shake off soil, wash rhizomes, and use immediately or store in fridge (up to months) or freeze.
Homegrown ginger has tender skin—peel lightly or use as-is. Save pieces with buds to replant for perpetual supply.
Final Thoughts: Start Your Ginger Journey Today
Growing ginger from a humble grocery store root into a thriving plant is one of gardening’s most satisfying projects. It combines beauty, utility, health benefits, and the joy of self-sufficiency. Whether you follow the mesmerizing water-rooting process in your photos or go straight to soil, the key is warmth, moisture, patience, and consistent care.
Start small with one rhizome—soon you’ll have fresh ginger for teas on chilly evenings, zesty additions to meals, and perhaps even enough to share. Happy growing!