Soft Christmas Peppermints: Old-Fashioned Butter Mints Recipe
Introduction to a Timeless Holiday Treat
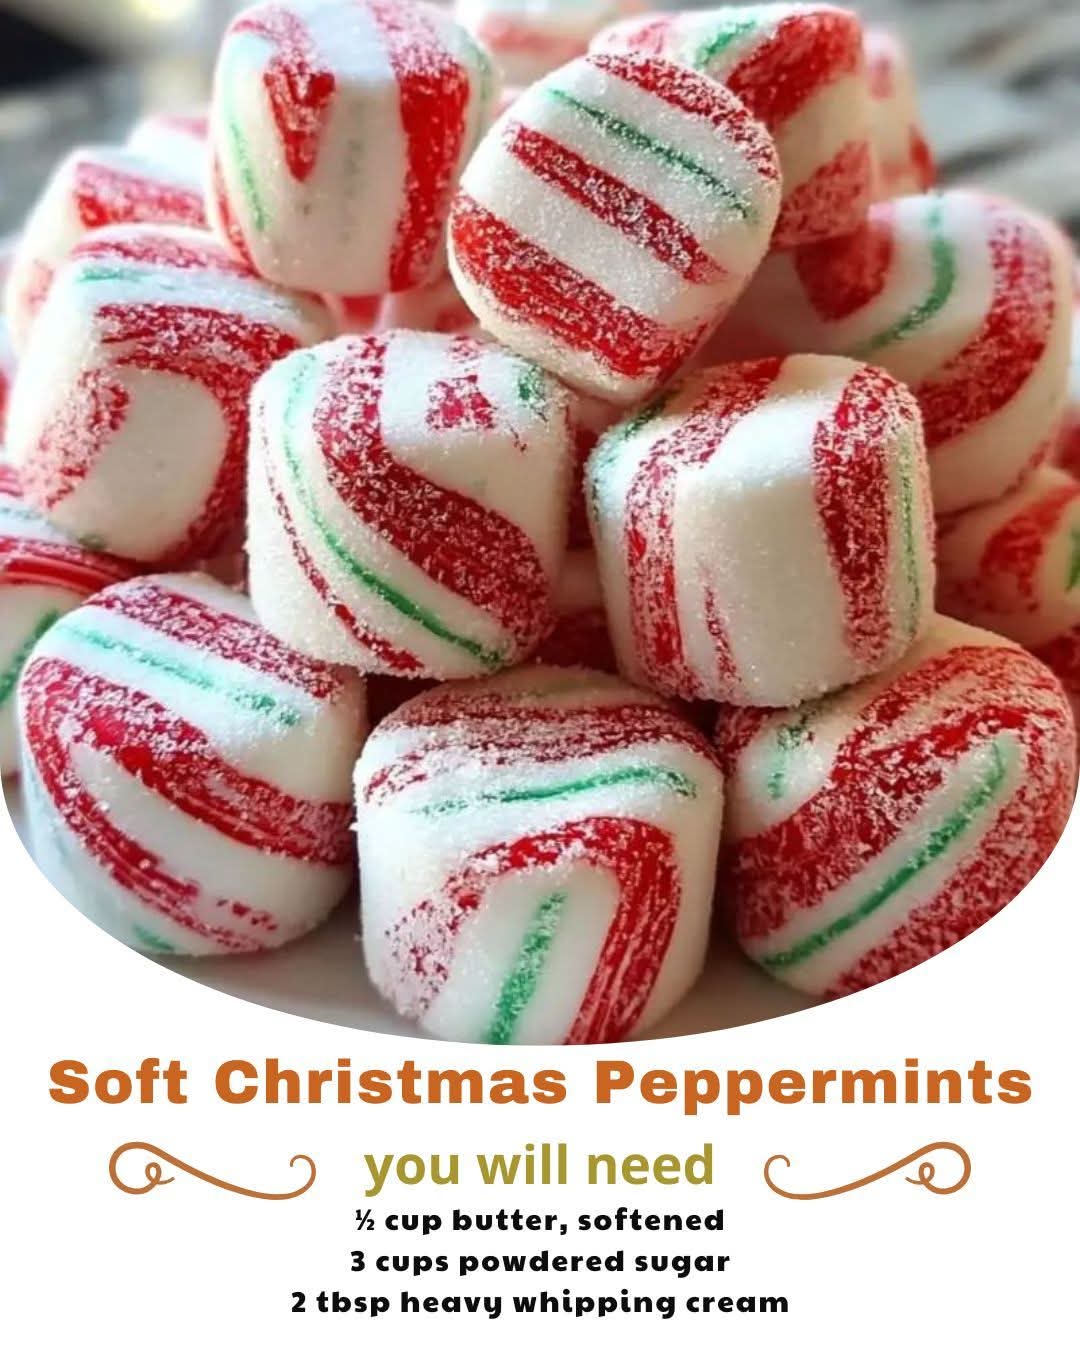
The holiday season is synonymous with sweet traditions, and few treats capture the essence of Christmas quite like soft Christmas peppermints, also known as old-fashioned butter mints. These delicate, melt-in-your-mouth candies have been a staple at holiday gatherings, family dinners, and gift exchanges for generations. With their creamy texture, refreshing peppermint flavor, and festive red-and-white swirls reminiscent of candy canes, they evoke memories of cozy winters, twinkling lights, and joyful celebrations.
Unlike hard peppermint candies that crunch and stick to your teeth, these butter mints are incredibly soft and pillowy, dissolving almost instantly on your tongue with a burst of cool mint. They are often called “pillow mints” or “dinner mints” because of their light, airy feel—perfect for serving after a hearty holiday meal. What makes them truly special is their simplicity: made from just a handful of pantry staples, they require no cooking, no candy thermometer, and no advanced skills. Yet, the result is a homemade candy that rivals anything from a vintage candy shop.
In this comprehensive guide, we’ll dive deep into everything you need to know to make perfect soft Christmas peppermints at home. From the history and origins of butter mints to ingredient breakdowns, step-by-step instructions, troubleshooting tips, variations, storage advice, and even pairing suggestions, this recipe post is designed to be your ultimate resource. Whether you’re a seasoned baker or a beginner looking for an easy holiday project, these mints will become a new tradition in your home.
The History and Nostalgia of Butter Mints
Butter mints have roots in old-fashioned American confectionery, dating back to the early 20th century when homemade candies were common in households. They gained popularity as “after-dinner mints” at restaurants and events, often served in elegant dishes to refresh the palate. In the mid-century, they became favorites at weddings, baby showers, and holidays, tinted in pastel colors or festive reds and greens.
The name “butter mints” comes from the rich, creamy base provided by real butter, which gives them that signature silky smoothness. Combined with heavy cream and powdered sugar, the dough creates a fondant-like texture that’s firm enough to shape but soft enough to melt. Peppermint extract adds the classic holiday flavor, tying them perfectly to Christmas.
Today, store-bought versions are common, but nothing compares to homemade. Making them yourself allows control over freshness, flavor intensity, and appearance—no artificial preservatives or colors needed. Plus, they’re incredibly budget-friendly and make wonderful edible gifts.
Why Make Soft Christmas Peppermints at Home?
There are countless reasons to whip up a batch of these mints this holiday season:
- Ease of Preparation: No baking, no boiling sugar syrup—just mixing and shaping.
- Customizable: Adjust peppermint strength, add colors, or even experiment with shapes.
- Kid-Friendly Activity: Little hands can help roll and twist the dough.
- Perfect for Gifting: Package in clear jars, tins, or cellophane bags for a thoughtful, handmade present.
- Long Shelf Life: They stay fresh for weeks, making them ideal for holiday prep.
- Versatile: Great for cookie trays, stocking stuffers, or party favors.
- Nostalgic Appeal: They bring back childhood memories for many, making them a conversation starter.
Best of all, this recipe yields a large batch—enough to share generously without feeling like you’ve slaved in the kitchen.
Ingredients: Simple and Pantry-Friendly
One of the beauties of soft Christmas peppermints is the short ingredient list. You’ll need:
- ½ cup (1 stick) unsalted butter, softened to room temperature: The star ingredient! Butter provides richness and that creamy, melt-in-your-mouth texture. Use real butter for the best flavor—margarine or spreads won’t yield the same results. Unsalted allows you to control the sweetness, but salted works in a pinch (just omit any added salt).
- 3 to 4 cups powdered sugar (confectioners’ sugar): This sweetens and thickens the dough. Start with 3 cups and add more as needed for a firm, non-sticky consistency. Sift it if it’s clumpy to ensure smoothness.
- 2 tablespoons heavy whipping cream: Adds extra creaminess and helps bind the dough. Heavy cream is key for velvety texture—milk substitutes will make the mints too firm or dry.
- ¼ to ½ teaspoon peppermint extract: The flavor powerhouse. Start with ¼ teaspoon and taste the dough, adding more for stronger mintiness. Use pure peppermint extract (not oil, which is much stronger) for balanced flavor. Avoid imitation extracts for authentic taste.
- Red gel food coloring: For the classic festive swirls. Gel coloring is preferred because it doesn’t water down the dough like liquid versions. Use a toothpick for precise control— a little goes a long way.
- Optional: Green gel food coloring: For more varied swirls or a tri-color effect.
- Extra powdered sugar for dusting: To prevent sticking while rolling and shaping.
These ingredients are affordable and likely already in your kitchen, especially during baking season.
Equipment You’ll Need
No fancy tools required! Gather these basics:
- Large mixing bowl
- Electric mixer (stand or hand-held) for creaming the butter
- Rubber spatula for scraping the bowl
- Parchment paper or wax paper for rolling
- Clean work surface dusted with powdered sugar
- Knife or bench scraper for cutting (optional)
- Baking sheet or platter for drying
Step-by-Step Instructions: How to Make Soft Christmas Peppermints
Follow these detailed steps for foolproof results. The process takes about 30-45 minutes of active time, plus resting.
Step 1: Prepare Your Workspace
Line a baking sheet or platter with parchment paper—this is where the shaped mints will rest and firm up. Dust a clean counter or large sheet of parchment with powdered sugar to prevent sticking.
Step 2: Cream the Butter
Place the softened butter in a large mixing bowl. Using an electric mixer on medium speed, beat until light, fluffy, and pale in color—about 2-3 minutes. This incorporates air for a lighter texture.
Step 3: Incorporate the Wet Ingredients
Add the heavy whipping cream and ¼ teaspoon peppermint extract. Beat on low until combined. Taste the mixture and add more extract if desired (up to ½ teaspoon total). Remember, the flavor intensifies as the mints rest.
Step 4: Add the Powdered Sugar
Gradually add the powdered sugar, starting with 3 cups. Mix on low speed to avoid a sugar cloud, increasing to medium as it incorporates. The dough will start crumbly but become smooth and firm. If it’s too sticky, add up to 1 more cup of sugar, a little at a time. The final dough should be pliable like playdough—firm but not dry.
Knead briefly by hand if needed to ensure even distribution.
Step 5: Divide and Color the Dough
Divide the dough in half (or thirds for more colors). Leave one portion white. For the colored portion, add a small amount of red gel food coloring (start with a toothpick dip). Knead until evenly tinted. Add more for deeper red. For green accents, color a small portion separately.
Step 6: Create the Festive Swirls
This is the fun part! To make classic candy cane-like mints:
- Roll each dough portion into long ropes about ½-inch thick.
- Twist a white rope and red rope together gently.
- Roll the twisted rope slightly to smooth and elongate.
- Cut into ½-inch pieces with a knife.
For pillow-shaped mints:
- Pinch off small balls (about 1 teaspoon each).
- Flatten slightly with a sugared fork for ridges, or roll in granulated sugar for sparkle.
For swirled rounds:
- Layer thin sheets of white and colored dough, roll up like a jelly roll, then slice.
Place shaped mints on the prepared parchment, spacing them apart.
Step 7: Let Them Rest
Allow the mints to air-dry at room temperature for 12-24 hours. This firms them up slightly while keeping them soft inside. Flip halfway if desired for even drying. They should feel dry to the touch but yield softly when pressed.
Tips and Tricks for Perfect Butter Mints Every Time
- Room Temperature Ingredients: Butter must be softened but not melted. If too cold, the dough won’t come together smoothly.
- Humidity Matters: In humid climates, add extra powdered sugar and dry longer to prevent stickiness.
- Flavor Balance: Peppermint extract varies in strength—taste as you go to avoid overpowering mint.
- Coloring Technique: Gel colors prevent thinning the dough. Knead thoroughly for even distribution without streaks.
- Shaping Variations: Use mint molds for fancy shapes, or a cookie press for uniform pillows.
- Don’t Overwork: Excessive handling can make the dough oily from the butter warming up.
- Batch Size: This recipe makes about 100-150 small mints—double for larger gatherings.
Common Troubleshooting Issues
- Dough Too Sticky? Add more powdered sugar, ¼ cup at a time. Chill briefly if needed.
- Dough Too Dry/Crumbly? Add a splash (1 teaspoon) of cream and knead.
- Mints Too Soft After Drying? They may need longer air exposure or more sugar next time.
- Colors Bleeding? Use less coloring and knead quickly.
- Flavor Too Mild? Extracts mellow over time—add more initially or brush finished mints with extra extract.
Variations and Flavor Twists
While classic peppermint is unbeatable for Christmas, try these ideas:
- Wintergreen or Spearmint: For a different mint profile.
- Chocolate-Dipped: Dip dried mints in melted dark chocolate.
- Multi-Color: Use green for a holly effect or pastels for non-holiday occasions.
- Lemon or Orange: Swap extract for citrus zest and yellow/orange coloring.
- Spiced: Add a pinch of cinnamon for a holiday twist.
- Vegan/Dairy-Free: Use vegan butter and coconut cream.
Storage and Shelf Life
Store in an airtight container at room temperature for up to 4 weeks. Layer with parchment to prevent sticking. For longer storage, refrigerate up to 2 months or freeze up to 6 months (thaw at room temp).
Avoid direct sunlight or heat, which can cause melting.
Serving Suggestions and Pairings
These mints shine on holiday dessert tables alongside cookies, fudge, and bark. Pair with:
- Hot cocoa or peppermint mocha
- Coffee or tea after dinner
- As palate cleansers between rich courses
- In candy bowls at parties
They complement chocolate desserts beautifully, balancing sweetness with cool mint.
Gifting Ideas
Package in mason jars tied with ribbon, clear ornament balls filled with mints, or festive tins. Add a tag with the recipe for a personal touch.
Nutritional Information (Per Serving)
Approximate per mint (based on 150 pieces):
- Calories: 25-30
- Fat: 1g
- Carbs: 5g
- Sugar: 5g
These are indulgent treats—enjoy in moderation!
Frequently Asked Questions
Can I make these ahead? Yes! They improve with a day or two of resting.
Are they gluten-free? Naturally, as long as your ingredients are certified.
Can kids help? Absolutely—shaping is great fun.
Why are mine not as soft as store-bought? Homemade versions are fresher; rest longer for softer texture.
Final Thoughts: Make This Your Holiday Tradition
Soft Christmas peppermints are more than just candy—they’re a bite of holiday magic. Simple to make yet impressively elegant, they’ll delight everyone from kids to grandparents. This season, fill your home with the scent of peppermint and the joy of handmade treats. Happy holidays, and enjoy every melt-in-your-mouth moment!