Ultimate No-Bake Chocolate Caramel Icebox Cake: Decadent Layers of Bliss
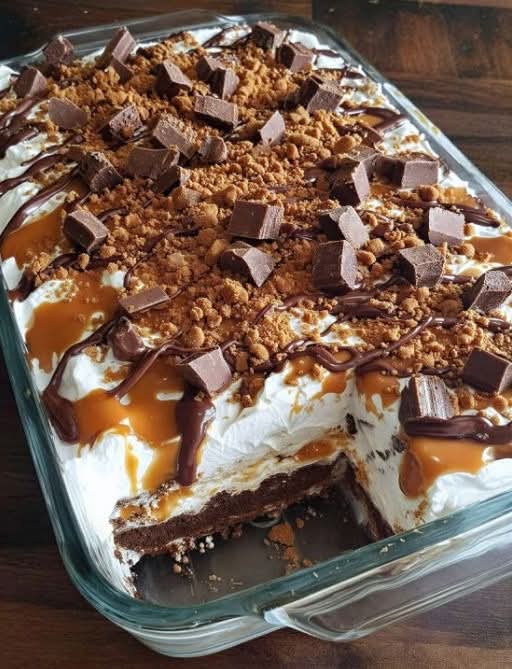
No-bake chocolate caramel icebox cake is the epitome of indulgent, effortless dessert perfection—a towering masterpiece of crisp chocolate wafers softened into tender cake-like layers, enveloped in clouds of whipped cream, drenched in rich caramel sauce, drizzled with chocolate ganache, and crowned with crunchy toffee bits and chocolate candy pieces. This show-stopping treat combines the best elements of a classic icebox cake with the irresistible flavors of a turtle candy or millionaire bar, delivering waves of chocolate, caramel, cream, and crunch in every bite.
Icebox cakes have been beloved since the 1920s and 1930s, when recipes began appearing on boxes of Nabisco Famous Chocolate Wafers. The genius lies in the transformation: thin, crisp wafers absorb moisture from the cream filling overnight in the refrigerator (the original “icebox”), turning into soft, sliceable cake without any baking. This chocolate-caramel version takes the concept to luxurious heights, making it a favorite for holidays, birthdays, potlucks, and summer gatherings when turning on the oven is unthinkable.
What makes this the “ultimate” version is the perfect symphony of textures and flavors: silky whipped cream, gooey homemade or store-bought caramel, bittersweet chocolate drizzle, and the satisfying snap of toffee and chocolate candies on top. The chocolate wafers provide deep cocoa flavor that pairs beautifully with salted caramel, while the cream keeps everything light and balanced. It’s decadent without being cloying, impressive without being fussy.
This dessert feeds a crowd, requires minimal active time, and actually improves with age—make it a day or two ahead for the best texture and flavor melding. It’s endlessly customizable (add nuts, peanut butter, or coffee undertones) yet stunning in its classic form. Kids go wild for the candy topping; adults swoon over the sophisticated layers.
In this comprehensive guide, we’ll dive deep into every aspect of creating the perfect no-bake chocolate caramel icebox cake—from ingredient selection and substitutions to detailed assembly steps, chilling secrets, troubleshooting, storage tips, creative variations, and serving suggestions. Whether you’re a novice or experienced dessert maker, this recipe will become your signature showstopper.
Why This No-Bake Chocolate Caramel Icebox Cake is Irresistible
- Decadent Flavor Combination: Chocolate + caramel + cream + toffee = pure bliss.
- Incredible Texture Contrast: Soft cake layers, silky cream, gooey caramel, crunchy topping.
- Classic Icebox Transformation: Wafers magically become cake overnight.
- No Oven Needed: Ideal for hot weather or busy schedules.
- Make-Ahead Champion: Best after 24-48 hours; perfect for entertaining.
- Crowd-Feeding Size: Serves 12-16 generously.
- Customizable Luxury: Adjust sweetness, add-ins, and toppings to taste.
- Stunning Presentation: Beautiful layers revealed with every slice.
Serves 12-16. Prep time: 30-45 minutes. Chill time: At least 8 hours (24-48 hours optimal).
Ingredients You’ll Need
Quality ingredients elevate this dessert—use the best you can find.
For the Cake Layers:
- 3-4 boxes (9 oz each) Nabisco Famous Chocolate Wafers (about 90-120 wafers; may need extra for breakage)
For the Whipped Cream Filling:
- 4 cups (960ml) heavy whipping cream, very cold
- 1/2 cup (60g) powdered sugar (adjust to taste)
- 2 teaspoons pure vanilla extract
- Pinch of salt
- Optional: 8 oz mascarpone or cream cheese for extra richness and stability
For the Caramel Layer:
- 1 1/2 cups thick caramel sauce (homemade or high-quality store-bought like salted caramel)
- Optional homemade caramel: 1 cup sugar, 6 tbsp butter, 1/2 cup heavy cream, 1 tsp salt
For the Chocolate Drizzle:
- 4 oz semisweet or dark chocolate, finely chopped
- 1/2 cup heavy cream (for ganache)
- Or use chocolate syrup for simpler version
For the Crunchy Topping:
- 1 cup crushed chocolate-covered toffee bits (like Heath or Skor)
- 10-15 fun-size chocolate caramel candies (like Twix, Milky Way, or Rolos), chopped
- Optional: chopped pecans or hazelnuts
Pro tip: If Famous Chocolate Wafers are unavailable (they’re sometimes seasonal), substitute chocolate graham crackers, Oreo thins (scraped), or European chocolate biscuits.
Essential Tools
- 9×13-inch baking dish (glass for pretty presentation)
- Electric mixer (stand or hand) with chilled bowl
- Offset spatula or spoon for spreading
- Microwave-safe bowls
- Plastic wrap
- Sharp knife for clean slices
Detailed Step-by-Step Instructions
Step 1: Prepare Components
Chill mixing bowl and beaters for faster whipping.
Make or warm caramel sauce to pourable consistency.
Prepare chocolate ganache: Heat 1/2 cup cream until steaming; pour over chopped chocolate. Let sit 2 minutes, then stir smooth. Cool slightly.
Step 2: Whip the Cream
In chilled bowl, beat heavy cream on medium until frothy.
Add powdered sugar, vanilla, and salt.
Increase speed to high; whip to stiff peaks (holds shape firmly but not grainy).
If using mascarpone/cream cheese: Beat it smooth first, then fold into whipped cream for ultra-stable filling.
Step 3: Begin Assembly
Spread thin layer of whipped cream on bottom of 9×13 dish (anchors first wafer layer).
Arrange single layer of chocolate wafers, breaking as needed to fit snugly.
Spread generous layer of whipped cream (about 1/4 of total) over wafers.
Drizzle generously with caramel sauce (about 1/3).
Repeat layers: wafers, cream, caramel—aim for 4-5 wafer layers total.
Finish with thick layer of remaining whipped cream.
Step 4: Add Toppings
Drizzle cooled chocolate ganache artistically over whipped cream.
Sprinkle generously with crushed toffee bits.
Scatter chopped chocolate candies over top.
For extra drama: Drizzle more caramel in zigzags.
Step 5: Chill to Perfection
Cover tightly with plastic wrap (press gently onto surface to prevent skin).
Refrigerate at least 8 hours, preferably 24-48 hours.
Wafers will soften completely into cake texture.
Step 6: Serve and Enjoy
Remove from fridge 10-15 minutes before serving for easier slicing.
Cut with sharp knife dipped in hot water; wipe clean between cuts for beautiful layers.
Serve chilled—spectacular cross-section revealed!
Pro Tips for Flawless Results
- Perfect Whipped Cream: Cold everything; don’t overwhip or it becomes grainy.
- Even Layers: Use offset spatula; press wafers gently but firmly.
- Caramel Consistency: Warm slightly for easy drizzling but not hot (melts cream).
- Maximum Softening: 24-48 hours chilling yields best cake-like texture.
- Prevent Sliding Layers: Chill between adding layers if kitchen is warm.
- Candy Choices: Twix for crunch, Rolos for gooey caramel centers.
- Make It Boozy: Add tablespoon Kahlua or bourbon to cream.
- Cleaner Slices: Freeze 30 minutes before cutting for perfect edges.
Common Problems and Solutions
- Wafers still crunchy: Didn’t chill long enough—give it more time.
- Cream too runny: Overwhipped into butter or used warm cream—start over.
- Layers slide apart: Too much caramel; use less or chill between layers.
- Topping sinks: Add after partial chilling or use thicker ganache.
- Too sweet: Use dark chocolate wafers, bittersweet ganache, salted caramel.
- Can’t find wafers: Make homemade chocolate cookies or use alternatives.
Storage and Make-Ahead Strategies
- Refrigerator: Covered tightly, up to 5 days. Best days 1-3.
- Make-Ahead: Assemble up to 3 days ahead—flavors improve dramatically.
- Freezer: Freeze whole (without candy topping) up to 1 month, wrapped well. Thaw overnight in fridge; add fresh toppings.
- Individual Slices: Freeze portions for quick treats.
Creative Variations to Explore
- Peanut Butter Twist: Swirl peanut butter into cream; top with Reese’s.
- Salted Caramel Pretzel: Add crushed pretzels for salty crunch.
- Mocha Version: Add instant espresso to cream; use coffee liqueur.
- Turtle Cake: Add toasted pecans between layers.
- Millionaire’s Icebox: Use shortbread cookies instead of wafers.
- Individual Trifles: Layer in glasses or jars for portable servings.
- Holiday Edition: Crush peppermint candies on top for Christmas.
- Vegan Adaptation: Coconut whipped cream, vegan wafers, dairy-free caramel.
Serving Suggestions and Pairings
Perfect with:
- Strong coffee or espresso
- Glass of cold milk
- Irish coffee for adults
- Vanilla ice cream on the side
- Fresh berries to cut richness
Ideal for birthdays, holidays, potlucks, or “just because” indulgence.
Nutritional Information (Per Serving, Approximate)
Based on 16 servings:
- Calories: 450-550
- Fat: 32g
- Carbohydrates: 45g
- Protein: 4g
- Sugar: 32g
Values vary significantly with brands and portion size.
Why This Dessert Will Become Your Signature Showstopper
No-bake chocolate caramel icebox cake proves that the most impressive desserts can be the simplest to make. The magical transformation of crisp wafers into tender cake, the luxurious interplay of flavors and textures, the make-ahead convenience, and the universal appeal make it unforgettable. One bite, and you’ll understand why people beg for the recipe.
There you have it—the complete blueprint for creating the ultimate no-bake chocolate caramel icebox cake that will earn endless compliments and empty pans. Get ready for dessert stardom!