Ultimate Homemade Canned Tomato Salsa: The Best Water Bath Canning Recipe for Year-Round Fresh Flavor
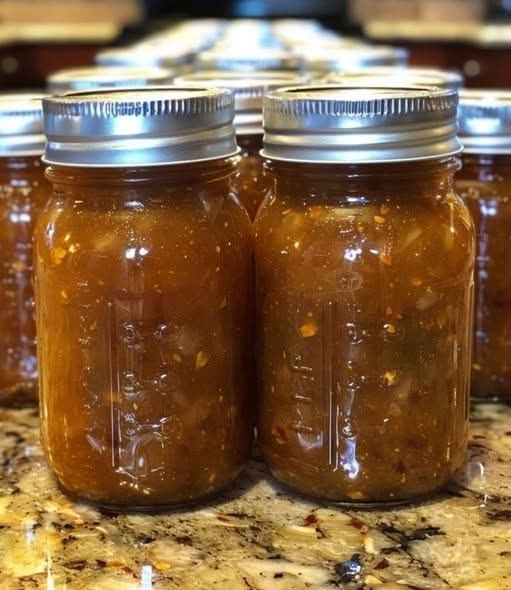
Homemade canned tomato salsa is one of the most rewarding preserving projects you can tackle in your kitchen. With rows of gleaming mason jars filled with vibrant, chunky salsa lined up on your pantry shelf, you’ll capture the essence of summer gardens—ripe tomatoes, crisp peppers, pungent onions, and fresh herbs—all ready to brighten up winter meals. This classic tomato-based salsa features a perfect balance of tangy acidity, mild to medium heat, fresh cilantro brightness, and subtle garlic depth, making it infinitely versatile for dipping with chips, topping tacos, nachos, eggs, grilled meats, or stirring into soups and stews.
Canning your own salsa not only saves money compared to store-bought versions but also allows complete control over ingredients and heat level. No preservatives, no weird additives—just pure, fresh flavor preserved at its peak. This recipe is specifically formulated for safe water bath canning, adhering to tested guidelines from reliable sources like the USDA and National Center for Home Food Preservation. The addition of vinegar ensures proper acidity to prevent bacterial growth, making it shelf-stable for up to 18 months.
The beauty of this salsa lies in its chunky texture: bite-sized pieces of tomato, pepper, and onion suspended in a lightly thickened sauce. It’s medium-spicy as written (thanks to jalapeños with seeds partially removed), but easily adjustable for mild or hot preferences. Roma or paste tomatoes yield the thickest results due to lower water content, but any garden-fresh tomatoes work beautifully.
Preserving salsa has deep roots in home canning traditions, especially in regions abundant with summer produce. It’s a staple in Tex-Mex and Mexican-inspired cuisines, where fresh pico de gallo evolves into canned versions for year-round enjoyment. Whether you’re a beginner canner preserving your first harvest or a seasoned pro stocking the pantry, this recipe delivers consistent, delicious results every time.
In this detailed guide, we’ll explore everything from selecting the best produce and essential canning safety to precise ingredient measurements, step-by-step preparation and processing, troubleshooting tips, storage guidelines, customization ideas, and more. By the end, you’ll have the confidence to produce jars of restaurant-quality salsa that your family and friends will rave about.
Why This Homemade Canned Salsa Recipe is the Best
- Superior Fresh Flavor: Made with garden-ripened ingredients for authentic taste far better than commercial brands.
- Safe for Water Bath Canning: Tested ratios ensure proper acidity—no pressure canner required.
- Customizable Heat: Adjust jalapeños and seeds for mild, medium, or fiery salsa.
- Thick and Chunky Texture: No watery runoff; perfect consistency for scooping.
- Versatile Uses: Chips and dip, taco topping, enchilada sauce base, gift-giving.
- Economical: Preserves bountiful harvests affordably.
- Make-Ahead Pantry Staple: Shelf-stable for 12-18 months; flavors improve with age.
- Beginner-Friendly: Clear instructions with safety prioritized.
Yields approximately 6-8 pint jars (or 12-16 half-pints). Prep time: 1-2 hours (depending on peeling method). Processing time: 15-25 minutes (altitude-adjusted).
Important Canning Safety Guidelines
Home canning is incredibly safe when following tested recipes, but salsa requires special attention due to low-acid ingredients like onions and peppers. Always:
- Use tested recipes—do not alter ratios of tomatoes, peppers, onions, or acid (vinegar/lemon juice).
- Add specified acid: Vinegar (5% acidity) or bottled lemon/lime juice is essential.
- Process in boiling water bath for recommended time.
- Use new lids for reliable seals.
- Check seals after cooling; refrigerate unsealed jars and use within a week.
- Store in cool, dark place; discard if signs of spoilage (mold, fizzing, off odors).
For altitude adjustments: Add 5 minutes over 1,000 ft, 10 minutes over 3,000 ft, etc.
Ingredients for Perfect Canned Salsa
Use fresh, high-quality produce at peak ripeness. Measurements are after prep (peeled, chopped, etc.).
- 10 pounds ripe tomatoes (preferably Roma/paste for thickness; about 20-25 medium)
- 3-4 large onions (about 4 cups chopped; yellow or white)
- 4-6 green bell peppers (about 3 cups chopped)
- 8-12 jalapeño peppers (about 1-1.5 cups chopped; adjust for heat)
- 8-10 cloves garlic, minced
- 1-1.5 cups white vinegar (5% acidity) or bottled lime/lemon juice
- 1/2 cup fresh cilantro, finely chopped (added at end)
- 2-3 tablespoons salt (canning or kosher)
- 1-2 tablespoons sugar (optional, balances acidity)
- 1 tablespoon ground cumin (optional, for depth)
- 1 teaspoon black pepper
- Optional: 1-2 cans (6 oz each) tomato paste for extra thickness
Note: Roma tomatoes reduce liquid best. For hotter salsa, include jalapeño seeds/membranes or add hotter peppers (keeping total pepper volume similar).
Essential Canning Equipment
- Water bath canner or large stockpot with rack
- 6-8 pint mason jars (or half-pints) with new lids and bands
- Jar lifter, funnel, bubble remover/headspace tool
- Large stainless steel stockpot for cooking salsa
- Cutting boards, knives, food processor (optional for chopping)
- Ladle, clean towels, magnetic lid lifter
Step-by-Step Instructions for Making and Canning Salsa
Step 1: Prepare Your Workspace and Equipment
Wash jars, lids, and bands in hot soapy water; keep jars hot (in canner or dishwasher).
Fill water bath canner halfway with water; bring to simmer.
Gather ingredients and tools for efficient workflow.
Step 2: Prep the Tomatoes
Score an “X” on bottom of each tomato.
Blanch in boiling water 30-60 seconds until skins crack.
Transfer to ice bath; peel skins easily.
Core, seed if desired (for less liquid), and chop into 1/4-1/2 inch dice.
Drain in colander 15-30 minutes to remove excess juice.
Measure 14-16 cups chopped tomatoes (for large batch).
Step 3: Chop Vegetables
Dice onions and bell peppers finely.
Mince garlic.
For jalapeños: Wear gloves; remove stems, seeds/membranes for milder heat.
Chop finely (food processor pulses work well).
Chop cilantro and set aside (add later to preserve freshness).
Step 4: Cook the Salsa
In large stockpot, combine tomatoes, onions, bell peppers, jalapeños, garlic, vinegar, salt, sugar, cumin, and pepper.
Bring to boil over medium-high heat, stirring frequently.
Reduce heat; simmer 20-45 minutes until thickened to desired consistency (stir often to prevent sticking).
Taste and adjust seasoning (salt/sugar).
Stir in cilantro and optional tomato paste during last 5 minutes.
Step 5: Fill the Jars
Remove hot jars from canner.
Ladle hot salsa into jars using funnel, leaving 1/2-inch headspace.
Remove air bubbles with tool.
Wipe rims clean with damp cloth.
Place lids and bands (fingertip tight).
Step 6: Process in Water Bath
Place jars in canner rack; ensure covered by 1-2 inches water.
Bring to full rolling boil.
Process pints 15 minutes (sea level); adjust for altitude.
Turn off heat; let sit 5 minutes.
Remove jars to towel-lined counter; cool undisturbed 12-24 hours.
Step 7: Check Seals and Store
Press lids—sealed ones won’t flex.
Remove bands; wipe jars.
Label with date.
Store cool, dark place up to 18 months.
Refrigerate after opening; use within 1-2 weeks.
Pro Tips for Perfect Canned Salsa
- Thicker Salsa: Use paste tomatoes, drain well, simmer longer, add tomato paste.
- Heat Control: Remove all jalapeño seeds for mild; leave some for medium; add habaneros carefully.
- Flavor Boost: Roast peppers/garlic before chopping for smoky depth.
- No Watery Jars: Drain tomatoes thoroughly; slotted spoon for filling if needed.
- Batch Size: Double safely, but cook in batches if pot too small.
- Fresh vs Canned Taste: Flavors mellow and blend after 4-6 weeks resting.
- Gift Ideas: Add cute labels and ribbon—perfect homemade holiday gifts.
Common Issues and Troubleshooting
- Too Watery: Over-simmer next time or strain excess liquid before jarring.
- Too Acidic: Rest jars longer; vinegar taste softens with time.
- No Seal: Reprocess within 24 hours with new lid or refrigerate.
- Too Spicy/Mild: Note pepper amounts for next batch.
- Salsa Darkens on Top: Normal oxidation; safe if sealed properly.
- Fermentation Signs: Bulging lids, leaks—discard immediately.
Storage and Shelf Life
Properly processed and sealed: 12-18 months in cool (50-70°F), dark pantry.
After opening: Refrigerate up to 2 weeks.
Freezing alternative: Freeze in containers up to 12 months (texture may soften).
Creative Variations (Safe Adjustments)
- Mild Salsa: Replace jalapeños with more bell peppers.
- Restaurant-Style: Blend half the batch smooth before canning (still chunky overall).
- Smoky Chipotle: Add canned chipotles in adobo (limit to maintain acidity).
- Pineapple Salsa: Not safe to can—make fresh or freeze.
- Green Tomatillo Salsa: Requires separate tested recipe.
Stick to acid/vegetable ratios for safety.
Nutritional Information (Per 1/4 Cup Serving, Approximate)
- Calories: 25-35
- Carbs: 6g
- Protein: 1g
- Fat: 0g
- Sodium: 200-300mg (varies with salt)
Low-calorie, vitamin-rich snack.
Why Homemade Canned Salsa is Worth the Effort
Opening a jar of your own salsa in the dead of winter transports you back to summer abundance. The satisfaction of preserving your harvest (or farmers’ market haul), the customizable flavors, and the joy of sharing homemade goodness make this recipe timeless. Safe, delicious, and versatile—this canned tomato salsa will become your annual tradition.
Grab those tomatoes and start canning—you’ll be glad you did all year long!