The Ultimate All Butter Pie Crust
Introduction
A perfect pie crust is the foundation of a great pie, whether sweet or savory. This all-butter pie crust is a classic recipe that delivers a flaky, buttery, and crisp texture. Using butter instead of shortening or lard provides a rich flavor and a beautiful golden color when baked. Whether you’re making a fruit pie, quiche, or tart, this homemade pie crust will elevate your dish to the next level.
History of Pie Crust
Pie crusts have been around for centuries, dating back to ancient Egypt and Rome, where early forms of pastry were used to encase meats and other fillings. The modern pie crust, as we know it today, became popular in the 1600s in England and later in America. While early recipes often used lard or suet, butter has remained a favorite choice due to its superior flavor and texture
Pie crust has a long and fascinating history that dates back thousands of years. From ancient civilizations to modern kitchens, it has evolved into the flaky, buttery, and delicious pastry we love today.
Ancient Beginnings: The First Pie Crusts
- The earliest form of pie crust can be traced back to ancient Egypt, Greece, and Rome.
- These early crusts, called coffyns (a medieval term for a pastry casing), were made from flour and water, serving as a container for meat and other fillings.
- The crust wasn’t always meant to be eaten—it acted as a preservative to keep food fresh during long voyages.
Medieval Europe: The Rise of Butter-Based Pastry
- By the 13th and 14th centuries, butter and lard were introduced, making pie crusts flakier and more palatable.
- European bakers developed shortcrust pastry, a richer dough that combined butter and flour for a delicate, crumbly texture.
- During the Renaissance period, pies became more decorative, with bakers sculpting intricate designs into the crusts.
Colonial America: The Birth of Sweet Pies
- When European settlers arrived in America, they brought pie-making traditions with them.
- Butter, lard, and suet were common fats used in early American pie crusts.
- Fruit pies became popular, especially apple, cherry, and pumpkin pies, which remain American staples today.
The 20th Century: Commercial Pie Crusts & Modern Baking
- With the rise of commercial food production, pre-made pie crusts became available in stores.
- However, homemade pie crusts continued to be cherished for their flavor, texture, and tradition.
- The all-butter crust became a favorite among home bakers and professional chefs for its flakiness and rich taste.
Why All-Butter Pie Crust Remains Popular
- The butter-based crust has a superior flavor compared to shortening or lard versions.
- It creates the perfect balance of crispness and tenderness.
- Today, the all-butter crust is a staple for pies, tarts, quiches, and pastries, cherished by bakers worldwide.
Final Thoughts
Pie crust has come a long way from its humble beginnings as a hard, protective shell to the buttery, flaky masterpiece we enjoy today. Whether for a sweet fruit pie or a savory quiche, the all-butter crust remains a symbol of comfort, tradition, and homemade goodness.
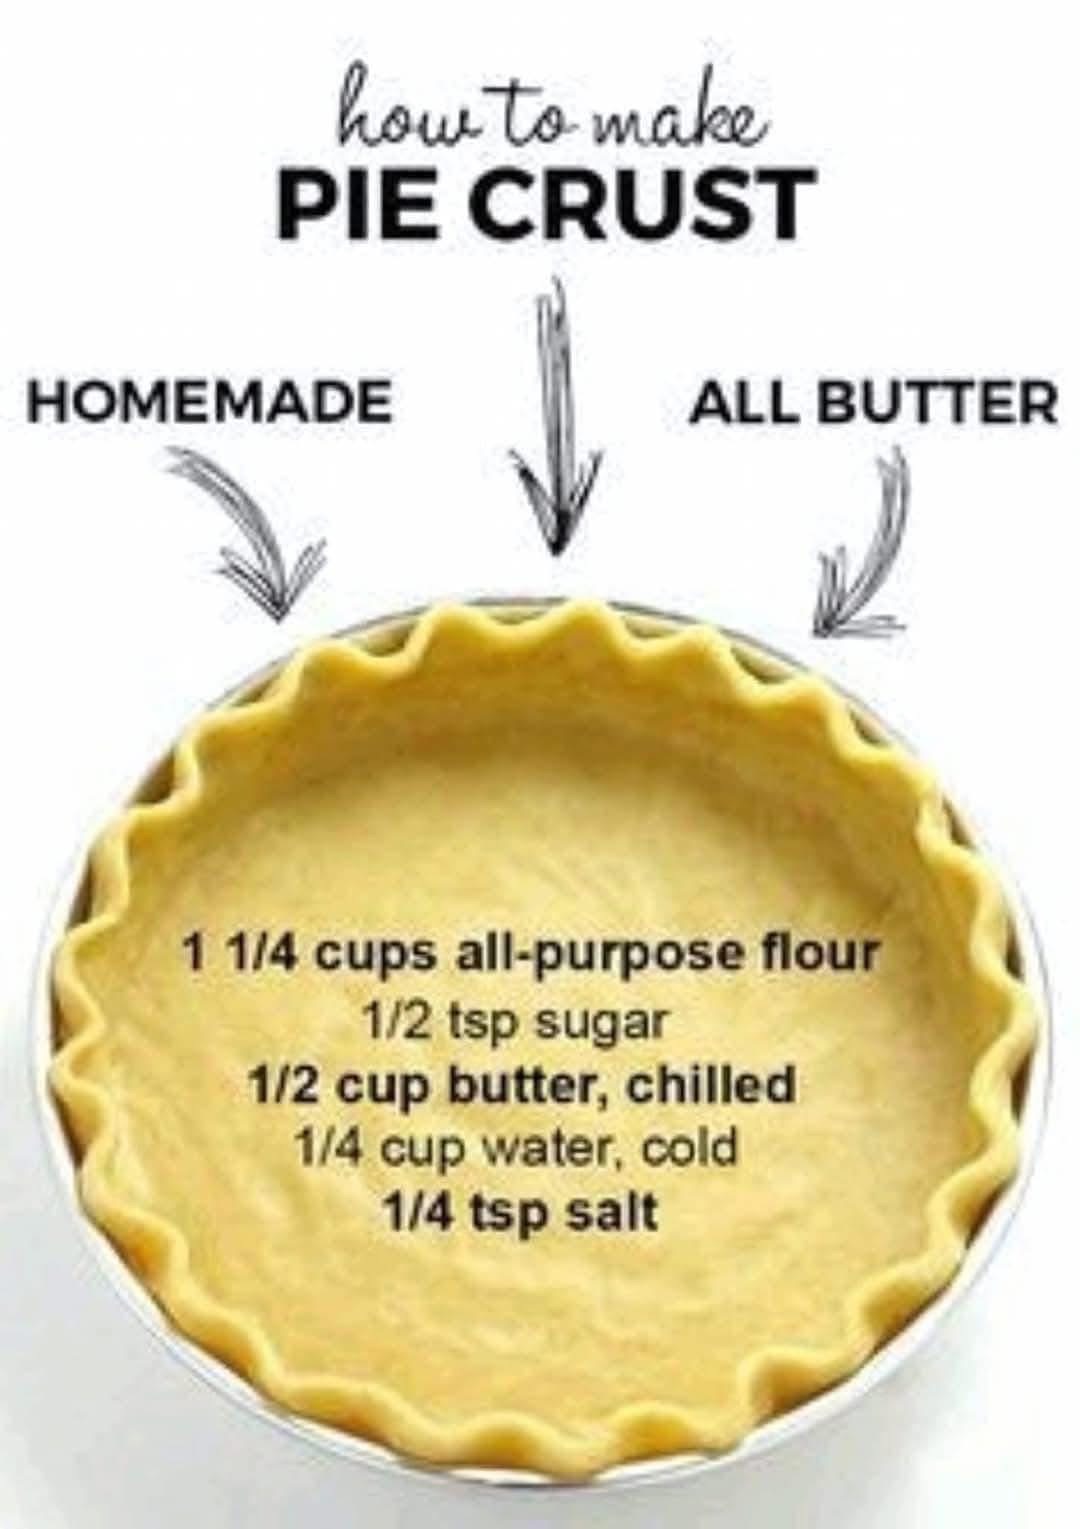
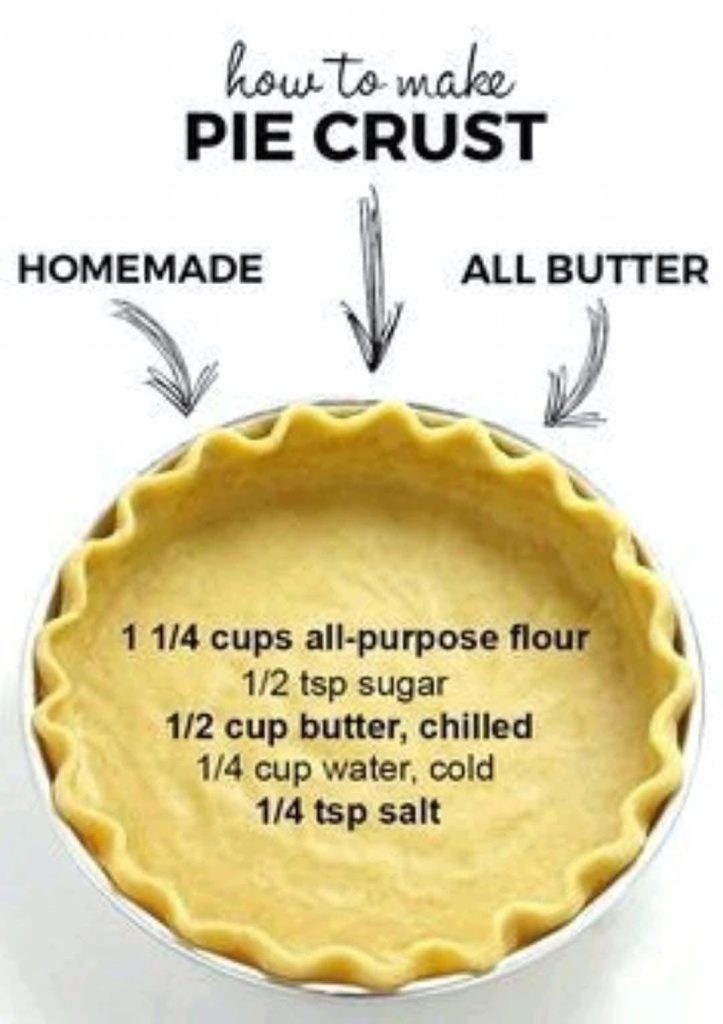
Ingredients
- 1 1/4 cups all-purpose flour
- 1/2 teaspoon sugar (optional, for sweet pies)
- 1/2 teaspoon salt
- 1/2 cup (1 stick) unsalted butter, chilled and cut into small cubes
- 1/4 cup cold water (add 1-2 tablespoons more if needed)
Instructions
Step 1: Prepare the Dry Ingredients
In a large mixing bowl, combine the all-purpose flour, sugar (if using), and salt. Stir to evenly distribute the ingredients.
Step 2: Cut in the Butter
Add the chilled butter cubes to the flour mixture. Use a pastry cutter, fork, or your fingertips to blend the butter into the flour until the mixture resembles coarse crumbs with pea-sized bits of butter. This step is crucial for creating a flaky texture.
Step 3: Add Cold Water
Gradually add the cold water, 1 tablespoon at a time, mixing gently with a fork or your hands until the dough starts to come together. Be careful not to overwork the dough. If it feels too dry, add a little more water.
Step 4: Form the Dough
Gather the dough into a ball and flatten it into a disc. Wrap it in plastic wrap and refrigerate for at least 30 minutes to allow the gluten to relax and the butter to firm up.
Step 5: Roll Out the Dough
Lightly flour a clean surface and rolling pin. Roll out the dough from the center outward, turning occasionally to prevent sticking, until it forms a 12-inch circle (for a 9-inch pie dish).
Step 6: Transfer to the Pie Dish
Carefully lift the rolled dough and place it into the pie dish. Gently press it into the bottom and sides without stretching. Trim any excess dough and crimp the edges for a decorative look.
Step 7: Chill Again
Refrigerate the crust for another 15-20 minutes before baking. This helps solidify the butter and prevents shrinkage during baking.
Step 8: Bake (If Needed)
- For a pre-baked crust: Preheat the oven to 375°F (190°C). Line the crust with parchment paper and fill it with pie weights or dried beans. Bake for 15 minutes, remove the weights, and bake for another 5-7 minutes until golden brown.
- For a filled pie: Follow the baking instructions for your pie recipe.
Why This Recipe Works (Methods & Techniques)
- Cold Butter = Flaky Layers – Keeping the butter cold prevents it from melting too soon, creating distinct flaky layers.
- Minimal Mixing – Overworking the dough develops too much gluten, making the crust tough instead of tender.
- Chilling the Dough – This step prevents shrinkage and enhances texture.
- Baking with Pie Weights – Helps keep the crust from puffing up and losing its shape.
Benefits of Homemade Pie Crust
- Better Taste – Freshly made dough has a rich, buttery flavor that store-bought crusts lack.
- Healthier – No artificial preservatives, additives, or hydrogenated oils.
- Customizable – Can be adjusted for sweet or savory pies by modifying sugar and salt levels.
- Economical – Homemade pie crust costs a fraction of pre-made crusts
A homemade pie crust isn’t just about taste—it comes with multiple benefits, from nutrition to cost-effectiveness and customization. Here’s why making your own all-butter pie crust is worth it:
1. Rich, Buttery Flavor
- Store-bought crusts often use hydrogenated oils or shortening, which lack the rich, deep flavor of real butter.
- Butter provides a natural, delicious taste that enhances both sweet and savory pies.
2. Flaky & Tender Texture
- The key to a perfect pie crust is flakiness, and butter creates that effect beautifully by forming thin layers in the dough.
- The result? A light, crispy bite that melts in your mouth.
3. No Artificial Ingredients or Preservatives
- Pre-packaged pie crusts often contain additives, preservatives, and artificial flavors.
- Homemade crust is 100% natural, using just flour, butter, water, salt, and (optional) sugar.
4. Healthier Alternative
- No trans fats – Many store-bought crusts use hydrogenated oils, which have harmful trans fats linked to heart disease.
- Less sodium – You can control the amount of salt, making it a healthier option.
- No unnecessary chemicals – You avoid emulsifiers, stabilizers, and artificial colorings.
5. Customizable for Dietary Needs
- Gluten-free version – Swap all-purpose flour for a gluten-free blend.
- Whole wheat option – Use whole wheat flour for a fiber-rich crust.
- Dairy-free option – Substitute butter with plant-based alternatives like coconut oil or vegan butter.
- Low-sugar version – Skip the sugar for a savory pie crust.
6. Cost-Effective & Budget-Friendly
- Making your own crust is cheaper than buying pre-made dough.
- You only need a few basic pantry staples, and it can be made in batches and frozen for later use.
7. Versatile for Different Pies
- Works for both sweet and savory dishes like apple pie, quiche, chicken pot pie, and tarts.
- Can be made into mini hand pies, galettes, and turnovers.
8. Freezer-Friendly & Convenient
- Make extra dough, wrap it tightly, and freeze it for up to 3 months.
- Just thaw in the fridge overnight before rolling it out.
9. Satisfaction of Baking from Scratch
- There’s nothing more rewarding than making a pie from start to finish.
- Baking is a stress reliever, and the process of rolling out dough can be therapeutic.
10. Impress Your Guests & Family
- A homemade crust makes a huge difference in the final pie.
- Your friends and family will taste the love and effort, making every bite more special.
Final Thoughts
Making your own all-butter pie crust is healthier, tastier, more affordable, and more rewarding than store-bought versions. It gives you full control over ingredients, ensuring a flaky, buttery, and delicious crust every time.
Nutritional Information (Per Serving – 1/8 of the crust)
- Calories: 180
- Total Fat: 12g
- Saturated Fat: 7g
- Carbohydrates: 14g
- Fiber: 0.5g
- Protein: 2g
- Sodium: 90mg
This all-butter pie crust is rich in flavor but also provides essential nutrients. Below is an approximate breakdown of the nutritional values per slice (assuming one 9-inch pie crust makes 8 slices).
Per Serving (1/8 of the pie crust)
- Calories: ~170 kcal
- Total Fat: 11g
- Saturated Fat: 7g
- Unsaturated Fat: 3g
- Cholesterol: 30mg
- Sodium: 100mg
- Carbohydrates: 15g
- Dietary Fiber: 0.5g
- Sugars: 0.5g
- Protein: 2g
Breakdown of Key Nutrients
1. Healthy Fats from Butter
- Provides saturated fats, which help with vitamin absorption and brain function.
- Contains omega-3 and omega-6 fatty acids, which support heart health in moderation.
2. Carbohydrates for Energy
- The flour provides quick energy, making this crust a great base for nutrient-dense fillings.
- Whole wheat alternatives can increase fiber content.
3. Essential Vitamins & Minerals
- Vitamin A (from butter): Supports vision, skin health, and immunity.
- Calcium: Small amounts contribute to bone health.
- Iron: Present in flour, aids in oxygen transport in the blood.
4. Low Sugar Content
- This crust contains minimal sugar, making it versatile for both sweet and savory dishes.
How to Make It Healthier
- Use whole wheat flour: Increases fiber and reduces blood sugar spikes.
- Reduce butter slightly: Lowers calorie and fat content.
- Use unsalted butter: Allows you to control sodium intake.
- Swap water with Greek yogurt: Adds protein and makes the crust more tender.
This homemade all-butter pie crust is a delicious, natural, and versatile option that’s nutrient-rich while still delivering that flaky, melt-in-your-mouth texture. While it’s indulgent, it can be modified for healthier alternatives without sacrificing taste!
Pie Lovers’ Favorite Uses
Pie crust lovers enjoy this recipe for:
- Apple Pie – A classic American favorite.
- Pumpkin Pie – A must-have for the holidays.
- Pecan Pie – A Southern delicacy.
- Quiche – A savory breakfast or brunch option.
- Hand Pies – Perfect for on-the-go snacking.
Conclusion
Mastering this all-butter pie crust recipe will take your baking to the next level. Whether you’re making a sweet or savory dish, this simple yet delicious crust is the perfect foundation for your favorite pies. With its flaky texture, rich flavor, and easy-to-follow method, this homemade crust is a must-try for all baking lovers. So grab your rolling pin and get baking