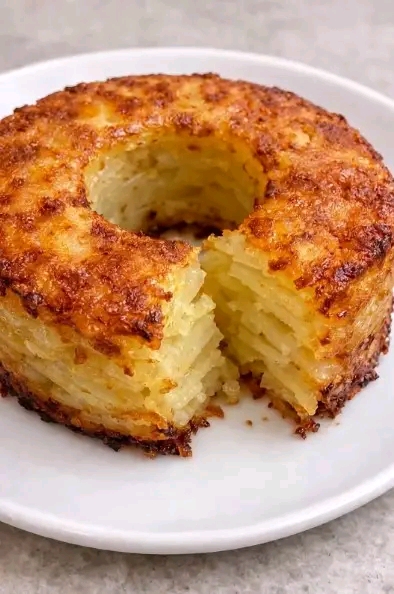
Crispy Golden Layered Potato Ring
(A Modern Take on Classic Pommes Anna)
Introduction
There are few dishes in the world of home cooking that manage to look so impressive while remaining so fundamentally simple. The golden layered potato ring you see in the image is one of those rare creations. At first glance it appears almost pastry-like: a perfectly formed ring with a deep amber crust, delicate concentric layers visible where a slice has been removed, and a soft, almost creamy interior that still holds its structure. Yet the ingredient list is astonishingly short. Potatoes, butter, salt, and pepper form the foundation. Everything else is technique, patience, and a little culinary history.
This dish belongs to the family of tightly packed, thinly sliced potato preparations most famously represented by the French classic Pommes Anna. The ring shape adds drama and increases the amount of crispy surface area, making every serving a contrast of textures: shattering golden edges against meltingly tender centers. It works equally well as an elegant side dish for a dinner party, a vegetarian main course with a simple salad, or even a show-stopping brunch item topped with a soft-fried egg and herbs.
What makes this potato ring particularly satisfying is the way it transforms the most ordinary of ingredients. A humble potato, when sliced paper-thin, layered with care, and cooked slowly, develops a depth of flavor that feels luxurious. The natural starches in the potato bind the layers together so that, once cooled slightly, the entire ring can be unmolded and sliced cleanly. The result looks like something that required hours of professional training, yet it is entirely achievable in a home kitchen.
In the pages that follow you will find not only a complete recipe but also the history behind the technique, the practical and nutritional benefits, detailed formation guidance, troubleshooting tips, flavor variations, serving suggestions, and nutritional analysis. The goal is to give you everything you need to recreate this dish with confidence and to understand why it has remained beloved for generations.
History of the Dish
The story of tightly layered potato cakes begins in nineteenth-century Paris. Pommes Anna is widely credited to the kitchens of Café Anglais, one of the most celebrated restaurants of the era. The dish is said to have been created in honor of Anna Deslions, a famous courtesan known for her beauty and her influence in Parisian high society. Some accounts also link the name to the actress Anna Judic. Whatever the exact origin of the name, the technique itself became a hallmark of refined French cooking.
The original Pommes Anna was cooked in a special heavy copper pan designed to conduct heat evenly. Thin slices of potato were arranged in overlapping circles, generously buttered, and cooked slowly so that the exterior formed a deep golden crust while the interior steamed in its own moisture and butter. The pan was often inverted midway through cooking so both sides could brown. The finished cake was then turned out onto a plate, revealing a perfectly formed disk of layered potatoes.
Over time the technique traveled beyond restaurant kitchens and into home cooking. Variations appeared across Europe and later in North America. Some cooks added garlic or herbs; others used duck fat or clarified butter for an even richer result. In the twentieth century, the dish found new life in cookbooks by authors such as Julia Child, who helped introduce classic French techniques to a wider audience.
The ring shape you see in the accompanying image is a more recent adaptation. By baking the potatoes in a tube pan, bundt pan, or ring mold, cooks gain several advantages: increased surface area for crisping, an attractive presentation that needs no further garnish, and easier portioning. The hole in the center also allows heat to circulate more evenly, reducing the risk of an undercooked middle. While the spirit remains pure Pommes Anna, the form has evolved to suit modern kitchens and contemporary tastes for dramatic plating.
This evolution reflects a broader truth about great recipes: the best ones are flexible enough to adapt while remaining true to their essential character. The layered potato ring is still built on the same principles that made the original famous—thin slices, generous fat, tight packing, and patient cooking.
Benefits of the Layered Potato Ring
Beyond its visual appeal and comforting flavor, this dish offers a range of practical, culinary, and nutritional advantages.
From a practical standpoint, it is remarkably forgiving once the basic technique is understood. The potatoes can be sliced and layered several hours ahead and held in the refrigerator until you are ready to bake. Leftovers reheat beautifully in a hot oven, regaining much of their crispness. The dish is naturally gluten-free, making it suitable for guests with dietary restrictions. It also scales easily: a smaller ring serves four as a main or six as a side; a larger one can feed a crowd.
Culinary benefits are equally strong. The contrast between the deep golden crust and the soft interior creates textural interest that few other potato dishes match. Because the potatoes are sliced so thinly, they cook relatively quickly once the exterior begins to brown, and the natural starches act as a binder so the finished ring holds its shape when sliced. The flavor is clean and buttery, allowing the potato itself to remain the star, yet the dish accepts subtle additions—garlic, thyme, rosemary, or even a touch of cheese—without losing its identity.
Nutritionally, potatoes are often underestimated. They provide meaningful amounts of potassium, vitamin C, vitamin B6, and fiber, especially when the skin is left on (though for this particular preparation the skin is usually removed for a more refined texture). When prepared with a moderate amount of butter, the dish delivers satisfying richness without excessive heaviness. Portion control is straightforward because the ring can be sliced into elegant wedges. For those watching saturated fat, a portion of the butter can be replaced with olive oil or a high-quality neutral oil, though the classic flavor relies on dairy butter.
Perhaps the greatest benefit is psychological. There is a quiet satisfaction in transforming a bag of ordinary potatoes into something that looks and tastes special. In a world of complicated recipes and long ingredient lists, the layered potato ring reminds us that excellence often comes from doing simple things with care and attention.
Ingredients
The beauty of this recipe lies in its restraint. High-quality ingredients matter more than quantity.
Core ingredients (serves 6–8 as a side, 4–6 as a main):
- 1.6–1.8 kg (approximately 3.5–4 pounds) starchy or all-purpose potatoes. Yukon Gold, Maris Piper, King Edward, or similar varieties work best. Waxy potatoes can be used but will produce a slightly denser result.
- 100–120 g (7–8½ tablespoons) unsalted butter, melted, plus additional butter for greasing the mold.
- 2–2½ teaspoons fine sea salt, or to taste.
- 1 teaspoon freshly ground black pepper.
- Optional but recommended: 1–2 garlic cloves, finely grated or pressed; 1 teaspoon fresh thyme leaves; a small pinch of freshly grated nutmeg.
Optional finishing touches:
Flaky sea salt, chopped fresh parsley, chives, or a drizzle of good olive oil just before serving.
Notes on ingredients:
Potato variety is the single most important choice. Starchy potatoes release more surface starch, which helps the layers adhere and contributes to a creamier interior. Very waxy potatoes hold their shape almost too well and can result in a less cohesive cake. Butter should be unsalted so you can control the seasoning precisely; if you only have salted butter, reduce the added salt. Freshly ground pepper makes a noticeable difference compared with pre-ground.
Formation and Equipment
The ring shape is achieved by packing the seasoned potato slices into a rigid mold that has a central tube or hole. Suitable options include:
- A 20–23 cm (8–9 inch) tube pan or angel-food cake pan
- A bundt pan of similar capacity
- A springform pan fitted with a metal ring insert or oven-safe ramekin placed in the center to create the hole
- A silicone ring mold (though metal conducts heat more effectively for browning)
Whatever mold you choose, it must be sturdy enough to support the weight of the packed potatoes and able to withstand oven temperatures of 200 °C / 400 °F. Generously butter every surface that will touch the potatoes, including the central tube. Some cooks line the base with a circle of parchment for easier release, though this is optional if the mold is well buttered.
The key to successful formation is tight packing. Each layer of overlapping potato slices should be pressed down firmly before the next is added. This eliminates air pockets, encourages the slices to fuse together through their released starch, and produces clean layers when the finished ring is sliced.
Detailed Methods and Instructions
Step 1: Prepare the potatoes
Peel the potatoes. Using a sharp knife or, preferably, a mandoline, slice them into rounds 1–2 mm thick. Uniformity is important for even cooking. As you slice, place the potatoes in a large bowl of cold water. This prevents oxidation and removes excess surface starch. Once all the potatoes are sliced, drain them thoroughly and spread them on clean kitchen towels or paper towels. Pat them as dry as possible. Moisture is the enemy of a crisp crust.
Step 2: Season
Transfer the dried slices to a large mixing bowl. Pour the melted butter over them, add the salt, pepper, and any optional seasonings, and toss gently but thoroughly with your hands until every slice is lightly coated. The butter should look glossy on the surface of the potatoes rather than pooling at the bottom of the bowl.
Step 3: Layer the mold
Preheat the oven to 200 °C / 400 °F (180 °C if using a fan/convection setting). Generously butter the chosen mold. Begin arranging the potato slices in the base of the mold in overlapping concentric circles, starting from the outer edge and working inward. Once the base is covered, continue adding layers, pressing down firmly after every two or three layers. Aim for a compact fill that reaches just below the rim of the mold. The tighter the pack, the better the final structure.
Step 4: Initial covered bake
Cover the mold tightly with aluminum foil. Place it on a baking sheet to catch any butter that may bubble over. Bake for 40–45 minutes. This covered stage allows the potatoes to steam and soften while the butter distributes evenly.
Step 5: Uncover and crisp
Remove the foil. Using a spatula or the back of a spoon, press the potatoes down once more to compact them. Return the mold to the oven, uncovered, and bake for an additional 25–40 minutes, depending on your oven and the depth of the mold. The top should become deep golden brown and the edges should pull slightly away from the sides of the pan. A thin skewer or knife inserted into the center should meet little resistance.
For maximum color, some cooks finish the dish under a hot grill/broiler for 2–4 minutes, watching constantly to avoid burning.
Step 6: Rest and unmold
Remove the mold from the oven and let it rest for 10–15 minutes. This resting period allows the starches to set so the ring holds its shape. Run a thin knife around the outer edge and around the central tube. Place a serving plate over the mold and, using oven mitts, invert the two together in one confident motion. Lift the mold away. If any slices stick, gently coax them back into place with a spatula. The finished ring should be a uniform deep gold with visible layers.
Alternative stovetop-to-oven method
For a more traditional Pommes Anna approach, pack the potatoes into a heavy, oven-safe skillet. Cook over medium heat for 10–15 minutes to establish a crust on the bottom, then transfer to the oven to finish. The skillet can be inverted onto a plate at the end if desired.
Troubleshooting and Tips
- If the exterior browns too quickly, tent loosely with foil and continue baking until the center is tender.
- If the ring feels loose when unmolding, it may need a longer rest or slightly more packing pressure next time.
- Excess butter that pools at the bottom can be poured off before unmolding for a less rich result.
- For make-ahead convenience, assemble the layered mold up to eight hours in advance, cover, and refrigerate. Add 5–10 minutes to the covered baking time if starting from cold.
Flavor Variations
While the classic version is hard to improve upon, several thoughtful additions work well:
- Garlic and thyme: Add grated garlic and fresh thyme leaves to the butter before tossing.
- Cheese: A light scattering of finely grated Parmesan or Gruyère between layers adds savoriness without overwhelming the potato.
- Herb crust: Brush the top with a little extra butter and sprinkle with chopped rosemary or sage in the final fifteen minutes of baking.
- Duck fat or olive oil: Replace part or all of the butter for a different flavor profile.
- Truffle: A few drops of truffle oil tossed with the potatoes or drizzled at serving turns the dish into a special-occasion centerpiece.
Nutrition Information
Approximate values per serving (based on 8 side-dish servings, using 110 g butter):
- Calories: 290–330 kcal
- Total fat: 14–16 g
- Saturated fat: 9–10 g
- Carbohydrates: 38–43 g
- Fiber: 3–4 g
- Protein: 4–5 g
- Sodium: variable according to salt used
- Potassium: significant contribution from the potatoes
- Vitamin C: moderate amounts, partially retained through baking
Potatoes are a good source of complex carbohydrates and several micronutrients. The butter contributes fat-soluble vitamins and satisfying richness. For a lighter version, reduce the butter to 70–80 g and accept a slightly less luxurious texture, or replace half the butter with olive oil.
Serving Suggestions and Who Loves This Dish
This potato ring is remarkably versatile. Serve it alongside roast chicken, grilled steak, pan-seared fish, or a simple green salad dressed with lemon and olive oil. At brunch it pairs beautifully with smoked salmon, soft scrambled eggs, or a fried egg placed in the center of each wedge. A dollop of crème fraîche or a spoonful of aioli on the side adds another layer of pleasure.
Children tend to love the crispy edges and mild flavor. Adults appreciate the elegant presentation and the way the dish elevates an everyday vegetable. It is equally at home on a weeknight table and at a holiday feast. Potato lovers, of course, form the core audience, but anyone who values the transformation of simple ingredients into something greater will find themselves returning to this recipe.
Conclusion
The golden layered potato ring is more than a side dish. It is a quiet demonstration of what careful technique can achieve with almost nothing. In an age of elaborate recipes and long lists of specialty ingredients, there is something deeply reassuring about a preparation that asks only for potatoes, butter, salt, and time. The history that stretches back to nineteenth-century Paris, the satisfying contrast of textures, the visual drama of the finished ring, and the pure comfort of each bite all combine to make this dish worth mastering.
Once you have made it successfully, you will find yourself looking at ordinary potatoes with new respect. You will understand why generations of cooks have returned to this method. And you will have, in your repertoire, a reliable way to create something beautiful and delicious from the most humble of beginnings. Slice it carefully, serve it warm, and watch the reaction around the table. That moment of surprise and pleasure is the real reward.