The Ultimate Guide to Classic British Scones: A Masterclass in Afternoon Tea Baking
There is a profound, undeniable magic in the ritual of Afternoon Tea. In a world that constantly rushes forward, the act of pausing at three o’clock in the afternoon to brew a pot of loose-leaf Earl Grey, warm the fine bone china, and serve a platter of freshly baked goods is a beautiful act of culinary rebellion. And at the absolute center of this time-honored tradition stands the undisputed king of the pastry tier: the Classic British Scone.
Picture this: a towering, golden-brown pastry, boasting a slightly crisp, rugged exterior that gives way to an impossibly tender, flaky, and buttery crumb inside. It is split horizontally (never sliced with a knife, but gently pulled apart), still radiating the warmth of the oven, and generously slathered with a thick, decadent layer of clotted cream and a vibrant, sweet-tart dollop of strawberry jam. It is not merely a baked good; it is a cultural institution.
Today, we are diving deep into the absolute perfection of the Double Cream Scone. Whether you are hosting a lavish, Bridgerton-inspired garden party, preparing a Mother’s Day surprise, or simply craving a comforting, aromatic treat for a rainy Sunday afternoon, this comprehensive masterclass will provide you with every ounce of knowledge you need.
In this exhaustive guide, we are not simply going to give you a list of ingredients and a baking time. We are going to explore the fascinating history of the scone, delve into the rigid cultural etiquette surrounding its consumption, dissect the fundamental food science of baking powder and gluten, master the delicate hand techniques required for a sky-high rise, and provide you with a foolproof, bakery-quality recipe that will elevate your home baking to unprecedented heights. Let us tie on our aprons, chill our butter, and embark on the ultimate scone-baking journey.
Chapter 1: The Rich History and Etiquette of the Scone
Before we plunge our hands into flour and butter, it is essential to understand the heritage of the pastry we are creating. The scone is deeply woven into the fabric of British culinary history, carrying with it centuries of tradition, royal approval, and fiercely passionate regional debates.
Scottish Origins and the Stone of Destiny
The earliest known printed reference to a scone dates back to the early 16th century in Scotland. Originally, scones were not the tall, individually cut pastries we know today. They were made with oats, shaped into a large, flat round called a bannock, and cooked on a griddle over an open fire. Once baked, the bannock was cut into triangular wedges.
The name itself is widely believed to be derived from the “Stone of Scone” (also known as the Stone of Destiny), the ancient, sacred stone upon which Scottish kings were traditionally crowned. As baking powder and baking soda became commercially available to the masses in the mid-19th century, the scone evolved. It moved from the griddle to the oven, transitioning from a heavy, dense oatcake into the light, airy, oven-sprung delicacy we recognize today.
Anna Russell and the Invention of Afternoon Tea
The scone’s elevation to high-society status is largely credited to Anna Russell, the 7th Duchess of Bedford, a lifelong friend of Queen Victoria. In the 1840s, it was customary to eat only two main meals a day: a massive breakfast and a late dinner around 8:00 PM. The Duchess found herself experiencing a “sinking feeling” in the late afternoon. To stave off her hunger, she began requesting a tray of tea, bread, butter, and small cakes to be brought to her boudoir at four o’clock.
She soon began inviting friends to join her, and the practice exploded across aristocratic circles. The scone quickly became the centerpiece of this new social event, beloved for its ability to be split and topped with rich creams and sweet preserves.
The Great Pronunciation Debate
Before you serve your masterpiece, you must know how to announce it. In the United Kingdom, the pronunciation of the word “scone” is a matter of intense, good-natured (and sometimes genuinely heated) debate, strictly divided by geography and class.
Rhymes with “Gone”: This is the most common pronunciation in Scotland, Northern England, and among the upper classes in the South.
Rhymes with “Bone”: This pronunciation is more prevalent in the Midlands, Southern England, and the United States. Linguists and historians have argued about this for decades, but both are technically accepted.
The Cream Tea Wars: Devonshire vs. Cornwall
If the pronunciation wasn’t contentious enough, the method of dressing the scone sparks an even fiercer rivalry between two neighboring counties in Southwest England, both famous for their dairy production.
The Devon Method: In Devon, the etiquette dictates that the scone is split in two, a generous layer of thick clotted cream is spread directly onto the warm pastry (acting like butter), and the jam is spooned on top of the cream.
The Cornish Method: In Cornwall, the ritual is strictly reversed. The sweet strawberry or raspberry jam is spread onto the scone first, and a massive dollop of clotted cream crowns the top. The Cornish argue that the jam is easier to spread on the pastry, and the cream is the crowning glory that should not be squashed.
Whichever method you choose, remember the golden rule of afternoon tea: a scone is never eaten like a sandwich. You must eat the two halves separately.
Chapter 2: The Science of Scone Baking
Baking is applied chemistry, and scones are a fascinating study in thermodynamics, aeration, and gluten management. To achieve a scone that is tall, straight-sided, and impossibly tender, you must understand the science occurring in your mixing bowl and your oven.
The Enemy of Tenderness: Gluten
Flour contains two proteins: glutenin and gliadin. When these proteins come into contact with a liquid (like cream or eggs) and are physically agitated (mixed or kneaded), they bond together to form gluten. Gluten is an elastic, stretchy network. In bread baking, strong gluten is exactly what you want—it provides chewiness and structure.
In scone baking, gluten is your ultimate enemy. If you overmix your dough, the gluten network becomes tight and rubbery. When the scone hits the hot oven, the tough gluten strands refuse to stretch and expand, resulting in a flat, dense, rock-hard pastry that shrinks sideways instead of springing upward. The secret to a perfect scone is combining the wet and dry ingredients as quickly and gently as humanly possible, stopping the moment the dough comes together.
The Power of Chemical Leavening
Because we are actively preventing gluten development, we cannot rely on yeast for a rise. Scones rely entirely on chemical leaveners—specifically, baking powder. Baking powder is a mixture of an alkaline powder (baking soda) and an acidic salt. When it is dry, it is inert. However, baking powder is “double-acting.”
The First Action: The moment the baking powder is hydrated by the cream and eggs, a chemical reaction occurs, creating millions of microscopic carbon dioxide bubbles within the dough.
The Second Action: When the cold dough hits the blistering heat of the oven, the heat triggers a second, massive release of carbon dioxide. These bubbles rapidly expand, pushing the weak, tender dough straight up toward the sky.
If your baking powder is expired, your scones will be completely flat. Always test your baking powder by dropping a half teaspoon into a cup of hot water; if it bubbles violently, it is active and ready to use.
Thermal Shock and “Oven Spring”
The final scientific pillar of scone baking is temperature contrast. You want your dough to be as cold as possible going into an oven that is as hot as possible. When the ice-cold butter pieces inside the dough hit a 400°F (200°C) environment, the water inside the butter instantly vaporizes into steam. This steam pushes the dough layers apart, creating the signature flaky, layered texture. If your dough is warm before it goes into the oven, the butter will simply melt and leak out onto the baking tray, resulting in a greasy, flat puddle.
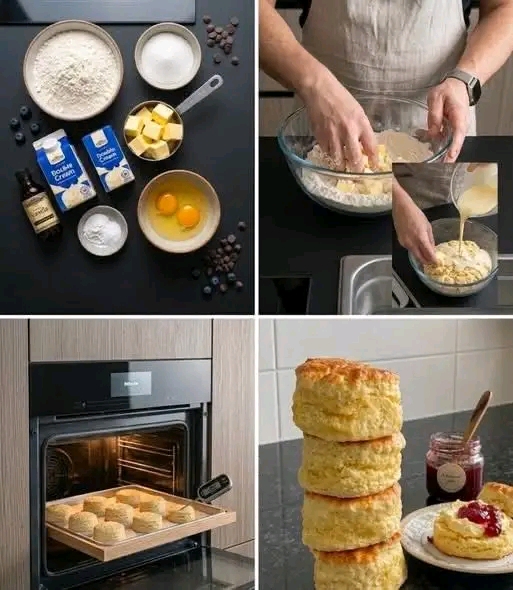
Chapter 3: The Master Ingredient Breakdown
A classic scone contains incredibly few ingredients. Therefore, the quality, fat content, and temperature of every single component matter immensely. Let us examine the anatomy of our perfect dough.
1. The Flour: The Structural Framework
For the ideal scone texture, standard Plain (All-Purpose) Flour is the optimal choice. It possesses a moderate protein content (around 10%), providing just enough structure to hold a tall shape without becoming tough. While some recipes call for self-raising flour (which already has baking powder mixed in), using plain flour and adding your own fresh baking powder allows you to control the exact chemical lift, ensuring a towering result.
2. The Butter: Cold and Unsalted
Butter provides the essential flavor and the crucial flaky texture.
Unsalted is Mandatory: Using unsalted butter allows you to perfectly control the sodium level of the pastry. Salted butters vary wildly in their salt content from brand to brand.
Temperature: The butter must be ice cold. Professional bakers often cube their butter and place it in the freezer for 15 minutes before mixing. If the butter softens and incorporates completely into the flour like a paste, you lose the flakiness. You want distinct, microscopic pebbles of cold butter suspended in the flour.
3. The Sugar: A Delicate Balance
A classic British scone is not a cupcake; it is not meant to be aggressively sweet. The sweetness comes from the jam served alongside it. We use a minimal amount of fine Caster Sugar (or superfine white granulated sugar). The sugar provides a subtle background sweetness, assists in tenderizing the crumb, and helps the exterior achieve a beautiful golden caramelization during baking.
4. The Liquid: The Magic of Double Cream
While many traditional recipes use whole milk or buttermilk, the absolute pinnacle of luxury scone baking utilizes heavy cream, or as it is known in the UK, Double Cream. Double cream has a massive fat content (around 48%, compared to American heavy cream at 36%). This intense butterfat content coats the flour proteins, further inhibiting gluten formation and guaranteeing a crumb that is rich, velvety, and impossibly soft. It provides a luxurious mouthfeel that standard milk simply cannot replicate.
5. The Eggs: Binders and Glaze
Eggs act as the binding agent in the liquid mixture, holding the crumb together without making it heavy. We use one whole egg in the dough for structure and richness. Furthermore, we use a beaten egg yolk (often mixed with a splash of cream) to brush exclusively on the tops of the scones before baking. This “egg wash” creates a stunning, glossy, mahogany-brown finish that makes the pastry look like it belongs in the window of a Parisian patisserie.
6. The Optional Add-Ins (Blueberries and Chocolate)
As pictured in our expansive ingredient collection, a masterful scone recipe is a blank canvas.
Blueberries: Fresh blueberries provide bursts of tart, jammy liquid. However, they introduce excess moisture. They must be folded in at the very last microsecond to prevent crushing them and turning the dough a murky purple.
Chocolate Chips: High-quality semi-sweet or dark chocolate chips transform the scone into a decadent dessert, pairing beautifully with the subtle vanilla extract in the dough.
Chapter 4: Mastering the Hand Techniques
You cannot make a perfect scone in a food processor or a stand mixer. The machine is too aggressive, too fast, and will develop the gluten in seconds. To achieve greatness, you must use the oldest culinary tools in the world: your own two hands.
Phase 1: The “Rubbing In” Method
This is the most critical step in the entire process. You must combine the cold, cubed butter into the dry flour mixture. Do not squeeze the butter. Instead, use only your fingertips (the coolest part of your hands; avoid the palms, which generate heat). Gently rub the cubes of butter and the flour together, sliding your thumbs across your fingers.
The Aeration Trick: As you rub, physically lift the flour and butter mixture high up into the air above the bowl and let it fall back down. This introduces vital air into the mixture, making the final scone lighter. Continue this process until the mixture resembles coarse, damp sand with a few larger, pea-sized pieces of butter remaining.
Phase 2: The “Claw” Mixing Technique
Once the butter is rubbed in, make a well in the center of the flour and pour in your cold liquid (the cream, egg, and vanilla mixture). Do not use a wooden spoon to stir aggressively in circles. Instead, hold your hand in the shape of a rigid claw. Use your “claw” to gently cut through the wet and dry ingredients in a sweeping, folding motion. You are tossing the flour over the liquid, gently encouraging them to meet. Stop the moment the dough looks shaggy, clumpy, and barely holding together. It should not be smooth.
Phase 3: The Gentle Fold (No Kneading!)
Turn the shaggy, messy dough out onto a lightly floured surface. Do not knead it like bread dough. Kneading develops gluten. Instead, gently use the sides of your hands to pat the dough together into a cohesive mound. If the dough is too loose, fold it completely in half over itself once, press gently, and fold it in half one more time. This single folding action builds beautiful, flaky layers inside the dough without overworking the proteins.
Phase 4: The Cut (The Golden Rule)
Pat the dough down gently with your hands (do not use a heavy rolling pin) until it is an incredibly thick disc—at least 1.5 inches (4 cm) thick. If you roll it thin, you will have flat scones.
Take a fluted or plain metal pastry cutter. Dip the cutting edge in loose flour. Place it over the dough and push straight down. Do not twist the cutter. This is the most common mistake in scone baking. If you twist the cutter as you press down, you physically seal and crimp the edges of the dough together. This crimp acts as a straightjacket, locking the dough in place and completely preventing it from rising in the oven. Press straight down, and pull straight up.
Chapter 5: Advanced Variations and Customizations
Once you have mastered the foundational Double Cream Scone dough, a massive, exciting world of culinary creativity awaits you. The base dough is remarkably adaptable.
1. The Bursting Blueberry Scone
If you wish to incorporate the fresh blueberries seen in our ingredient prep, you must manage their moisture.
The Coating Trick: Wash your fresh blueberries and dry them incredibly thoroughly with paper towels. Any excess water will ruin the dough. Toss the dry berries in one tablespoon of flour. This flour coating acts as a barrier, preventing the fruit juices from bleeding into the dough.
The Final Fold: Do not add the berries to the liquid. Add the floured berries to the dough at the very end of the “claw” mixing phase. When you turn the dough out onto the counter, gently pat it together around the berries. Do not squeeze, or they will pop.
2. The Decadent Chocolate Chip Scone
For a richer, dessert-forward variation, high-quality chocolate is the perfect addition.
Use semi-sweet or dark chocolate chips (or a chopped 70% cacao baking bar). Avoid milk chocolate, as it makes the scone overly sweet and cloying.
Toss 3/4 cup of chocolate chips into the dry flour mixture before you add the liquid. This ensures they are evenly distributed throughout the dough and don’t clump together at the bottom.
3. The Classic Lemon and Earl Grey Scone
For the ultimate Afternoon Tea experience, infuse the dough with citrus and tea.
Empty the contents of two high-quality Earl Grey tea bags into a spice grinder and pulse into a fine powder. Whisk this powder into the dry flour.
Zest two bright yellow lemons directly into the caster sugar. Use your fingers to vigorously rub the zest into the sugar until it is fragrant and resembles wet sand, then proceed with the recipe. The citrus oils and bergamot create an intoxicating aroma.
4. The Savory Cheddar and Chive Scone
Scones do not have to be sweet. To create a savory masterpiece perfect for pairing with soups or sharp butter:
Omit the sugar and vanilla extract entirely. Increase the salt by a half teaspoon.
Add 1.5 cups of sharp, aged, finely grated Cheddar cheese, a heavy pinch of cayenne pepper, and a handful of finely chopped fresh chives to the flour before adding the cream.
Chapter 6: The Bake – Mastering Oven Dynamics
A perfect, meticulously handled dough can be completely ruined by improper oven management. To achieve those beautiful, straight-sided, golden towers, we must manipulate the thermodynamics of your kitchen.
The Initial Heat Blast
Preheat your oven to a blazing hot 400°F (200°C). Scones require extreme, sudden heat to achieve “oven spring.” If your oven is too cool, the butter will melt slowly, leaking out of the pastry before the baking powder has a chance to push the dough upward, resulting in flat, greasy discs. Ensure the oven has been preheated for at least 30 minutes before baking.
The Chill Factor
Once you have cut out your scones and placed them on your parchment-lined baking tray, do not put them straight into the oven. Place the entire tray into the refrigerator for 15 to 20 minutes. This crucial resting period allows the butter, which was warmed by your hands during the cutting process, to re-solidify. It also allows the gluten to relax one final time. Cold dough entering a screaming hot oven is the absolute secret to a towering, flaky pastry.
The Careful Egg Wash
When brushing the tops of the chilled scones with your beaten egg yolk, you must be incredibly precise. Use a high-quality pastry brush to paint only the very top surface. Do not let the egg wash drip down the sides. If the egg washes drips down the sides, it will cook instantly in the hot oven, creating a hard, scrambled-egg shell that literally glues the layers of the scone together, restricting the rise.
Chapter 7: Troubleshooting Common Scone Disasters
Even experienced bakers can occasionally run into trouble. Here are the most common pitfalls and the scientific reasons behind them, ensuring you can diagnose and fix any issues on your culinary journey.
The Problem: My scones are hard, dense, and heavy like bricks.
The Cause: You overmixed the dough and developed tough gluten strands, or your baking powder was completely expired and inactive.
The Solution: Treat the dough like fragile glass. Stop mixing the second it comes together. Never knead it. Buy fresh baking powder every six months.
The Problem: My scones spread out sideways and look like flat cookies.
The Cause: The dough was too warm going into the oven, causing the butter to melt before the rise could occur. Alternatively, your oven was not hot enough.
The Solution: Always chill the cut scones for 15 minutes before baking. Ensure your oven is fully preheated to 400°F (200°C) and use an oven thermometer to verify accuracy.
The Problem: My scones rose, but they are completely lopsided and leaning over like the Tower of Pisa.
The Cause: You twisted the pastry cutter when stamping them out, sealing one side of the dough, or you rolled the dough out unevenly.
The Solution: Press the cutter straight down and pull straight up. Ensure your dough disc is patted out to an even, level thickness before cutting.
The Problem: The bottoms of my scones are burnt black, but the insides are raw.
The Cause: Your baking tray is too thin and is conducting too much heat directly from the bottom heating element of your oven, or you placed the tray too low.
The Solution: Bake on the middle rack of the oven. Use a heavy-duty, light-colored aluminum baking tray. Dark-colored baking pans absorb and hold significantly more heat and will scorch the bottoms of delicate pastries.
Chapter 8: Proper Storage, Freezing, and Reheating Guide
A scone is a fleeting culinary miracle. Because they contain very little sugar and fat compared to a cake, they have an incredibly short shelf life. A scone is truly at its peak for only about four hours after it leaves the oven. However, proper storage can extend their magic.
Room Temperature Storage: If you have leftover baked scones, allow them to cool completely to room temperature. Place them in an airtight container or a heavy-duty zip-top bag. They will keep at room temperature for up to two days. Do not put them in the refrigerator; the cold air will cause the starches to crystallize rapidly, staling the pastry and turning it to stone.
The Freezing Masterclass (The Best Method): Scones freeze exceptionally well, but the secret is freezing the dough before you bake it. Cut the dough out into rounds. Place the unbaked rounds on a parchment-lined baking tray and place the tray in the freezer for one hour until the dough is rock solid. Transfer the frozen, unbaked scones to a zip-top freezer bag. They will keep for up to 3 months. When a craving strikes, you do not need to thaw them! Simply place the frozen hockey pucks directly onto a baking tray, brush with egg wash, and bake in a 400°F (200°C) oven, adding an additional 3 to 5 minutes to the baking time. You will have fresh, hot scones on demand.
The Reheating Revival: If you are eating day-old baked scones, you must reheat them to restore the melted butterfat and soften the crumb. Place the scones on a baking tray in a 300°F (150°C) oven for 5 to 7 minutes until warm to the touch. Do not microwave them, as the microwave will steam the interior, turning the delicate crumb into a chewy, rubbery sponge.
The Ultimate Master Recipe: Towering Double Cream Scones
Here is the distilled, precise formula to create this culinary masterpiece. Read through the entire list and the instructions before you begin to ensure your workflow is seamless and your ingredients stay ice cold.
Prep time: 20 minutes
Chill time: 15 minutes
Bake time: 12 to 15 minutes
Total active time: 50 minutes
Yields: 8 to 10 towering scones
Cuisine: British / Afternoon Tea
Category: Baking / Pastry
The Ingredient List
For the Dry Mix:
3 ½ cups (450g) Plain (All-Purpose) Flour, plus extra for dusting
1 Tablespoon plus 1 teaspoon (20g) Baking Powder (Ensure it is fresh!)
½ teaspoon (3g) Fine Sea Salt
⅓ cup (70g) Caster Sugar (or Superfine White Sugar)
½ cup (115g / 1 stick) Unsalted Butter, cut into small cubes and chilled in the freezer for 15 minutes
For the Wet Mix:
¾ cup (180ml) Double Cream (or Heavy Whipping Cream), ice cold
1 Large Egg, straight from the fridge
1 ½ teaspoons Pure Vanilla Extract
For the Glaze and Variations:
The Egg Wash: 1 large egg yolk beaten with 1 Tablespoon of double cream
Optional Blueberry Variation: 1 cup fresh blueberries, washed, dried completely, and tossed in 1 Tablespoon of flour
Optional Chocolate Variation: ¾ cup high-quality semi-sweet chocolate chips
The Step-by-Step Instructions
Prep the Oven and Tray: Preheat your oven to a blistering 400°F (200°C). Line a heavy-duty, light-colored baking tray with parchment paper or a silicone baking mat.
Combine the Dry: In a large, wide mixing bowl, whisk together the plain flour, the massive amount of baking powder, the fine sea salt, and the caster sugar until thoroughly combined.
Rub in the Butter: Add the ice-cold, frozen cubes of unsalted butter to the flour mixture. Toss the butter in the flour so the cubes are coated. Using strictly the tips of your fingers, gently rub the butter and flour together. Lift the mixture high in the air as you rub to aerate the bowl. Stop when the mixture looks like coarse, damp sand with a few pea-sized lumps of butter remaining. Work quickly to keep the butter cold.
Add the Variations (If Using): If you are making the chocolate chip variation, gently toss the chips into the dry flour mixture now. (If making blueberries, hold them back for step 6).
Mix the Liquids: In a separate small jug or bowl, thoroughly whisk together the ice-cold double cream, the whole cold egg, and the pure vanilla extract.
The “Claw” Mix: Make a well in the center of the buttery flour mixture. Pour the cold liquid mixture into the well. Form your hand into a rigid claw shape. Sweep your hand around the bowl, gently lifting and folding the flour over the liquid. Do this very quickly. Stop mixing the absolute second the dough looks shaggy and clumpy. If using the floured blueberries, gently fold them into the shaggy clumps right now.
The Gentle Press: Turn the shaggy dough out onto a very lightly floured kitchen counter. Use the sides of your hands to gently push and pat the dough together into a cohesive mound. Do not knead. Fold the dough entirely in half over itself once, and press down gently.
Pat and Cut: Pat the dough out with your hands into a thick, even disc. It must be at least 1.5 inches (4 cm) thick. Dip a 2.5-inch (6 cm) fluted or plain metal pastry cutter into loose flour. Place the cutter over the dough and press straight down. Pull straight up. Do not twist.
The Chill: Place the cut scones onto the prepared baking tray, leaving about 2 inches of space between them. Gently gather the scraps, pat them together once, and cut the remaining dough. Place the entire baking tray into the refrigerator for 15 to 20 minutes to chill the butter and relax the gluten.
The Glaze: Remove the tray from the fridge. Using a pastry brush, carefully paint only the flat tops of the cold scones with the prepared egg wash. Be incredibly meticulous to ensure the egg wash does not drip down the sides of the dough.
The High-Heat Bake: Place the tray on the middle rack of the preheated 400°F (200°C) oven. Bake for exactly 12 to 15 minutes. Do not open the oven door for the first 10 minutes, or the steam will escape and the scones will collapse.
Cool and Serve: The scones are done when they have risen spectacularly and the tops are a deep, glossy, golden-brown. Remove from the oven and transfer them immediately to a wire cooling rack.
The Ritual: Allow the scones to cool for at least 15 minutes. Serve them warm. Gently pull them apart at their natural horizontal fault line. Serve alongside a massive jar of high-quality strawberry preserve, a tub of luxurious, thick clotted cream, and a steaming pot of your favorite tea.
Conclusion
Mastering the art of the Classic British Scone is not merely about following a recipe; it is about honoring a centuries-old tradition through technique and intention. By respecting the volatile nature of gluten, utilizing the high fat content of double cream, keeping your ingredients exceptionally cold, and expertly managing the thermal shock of your oven, you have transformed simple pantry staples into a masterpiece of the pastry tier.
These towering, golden beauties are more than just a baked good; they are a sensory experience, a vehicle for connection, and a perfect excuse to slow down in the middle of a busy afternoon. Armed with this comprehensive knowledge and meticulous technique, you are now fully equipped to bake the most spectacular, tender, and deeply flavorful scones imaginable. Brew the tea, prepare the clotted cream, and enjoy every flaky, magnificent bite!