Funfetti Layer Cake with Chocolate Frosting: The Ultimate Celebration Cake Recipe
Funfetti cake, also known as confetti cake, is the ultimate joyful dessert that turns any occasion into a true celebration. This vibrant vanilla cake studded with colorful rainbow sprinkles brings nostalgia and happiness in every bite. When paired with rich, silky chocolate frosting and stacked into a dramatic three-tier masterpiece, it becomes the show-stopping centerpiece that both kids and adults adore.
In this comprehensive 3000-word guide, we’ll explore everything you need to create the perfect Funfetti layer cake. From its fun origins and the science behind its moist texture to a detailed step-by-step recipe, professional tips, creative variations, troubleshooting advice, storage secrets, and serving suggestions, this article will equip you to bake a bakery-worthy confetti cake at home.
The History and Enduring Charm of Funfetti Cake
Funfetti cake was popularized in the 1980s by Pillsbury with their boxed Funfetti cake mix, which cleverly included a packet of rainbow sprinkles. The idea of adding sprinkles directly into cake batter quickly captured the hearts of home bakers looking for something festive and whimsical.
While the boxed version made it famous, the concept draws inspiration from older “speckled” or “confetti” cakes found in American and European baking traditions. Today, from-scratch Funfetti cakes have become a staple for birthdays, graduations, gender reveal parties, weddings, and everyday joy. The combination of tender vanilla cake with pops of color and a contrasting chocolate frosting creates a perfect balance of fun and indulgence.
This three-tier version elevates the classic into a dramatic centerpiece while remaining surprisingly achievable for home bakers.
Why Funfetti Cake Is So Irresistible
Several elements make this cake special:
- Visual Appeal: Bright sprinkles create a cheerful, polka-dotted interior that surprises and delights when sliced.
- Texture: Buttermilk and oil create an incredibly moist, tender crumb that stays fresh for days.
- Flavor Balance: Classic vanilla cake pairs beautifully with rich chocolate frosting.
- Customizability: Easy to scale, flavor, or decorate for any theme.
- Nostalgia Factor: It instantly brings smiles and memories of childhood celebrations.
The sprinkles not only add color but also a subtle crunch and fun texture contrast.
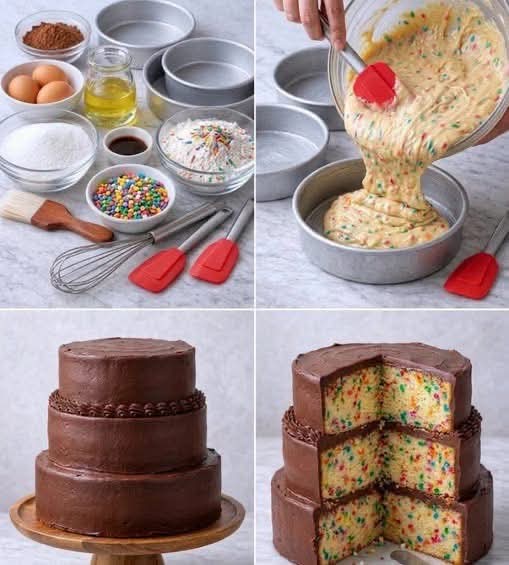
Classic Three-Tier Funfetti Cake Recipe (Serves 20-24)
Ingredients for the Cake Layers:
- 3½ cups (420g) all-purpose flour
- 2½ teaspoons baking powder
- ½ teaspoon baking soda
- 1 teaspoon salt
- 1 cup (226g) unsalted butter, softened
- 2 cups (400g) granulated sugar
- 4 large eggs, room temperature
- 2 large egg whites, room temperature (for extra lightness)
- 1 tablespoon pure vanilla extract
- 1 cup (240ml) buttermilk, room temperature
- ½ cup (120ml) vegetable oil or canola oil
- ¾ cup (130g) rainbow jimmies sprinkles (avoid nonpareils as they bleed)
Ingredients for the Chocolate Frosting:
- 2 cups (452g) unsalted butter, softened
- 7–8 cups (840–960g) powdered sugar
- 1 cup (85g) unsweetened cocoa powder (Dutch-processed preferred)
- ½ cup (120ml) heavy cream or milk
- 2 teaspoons vanilla extract
- ½ teaspoon salt
- Optional: 4 oz melted semi-sweet chocolate, cooled
Additional Items:
- Simple syrup (equal parts sugar and water) for brushing layers
- Extra sprinkles for decoration
Step-by-Step Instructions
Step 1: Prepare the Pans and Oven
Preheat oven to 350°F (175°C). Grease and line three 8-inch or 9-inch round cake pans with parchment paper. For taller tiers, use 8-inch pans.
Step 2: Mix Dry Ingredients
In a medium bowl, whisk together flour, baking powder, baking soda, and salt. Set aside.
Step 3: Cream Butter and Sugar
In the bowl of a stand mixer fitted with the paddle attachment, beat butter and sugar on medium-high speed for 4–5 minutes until light and fluffy. Scrape down the sides as needed.
Step 4: Add Eggs and Vanilla
Add whole eggs one at a time, beating well after each addition. Add egg whites and vanilla, mixing until fully incorporated. The mixture may look slightly curdled—this is normal.
Step 5: Alternate Wet and Dry Ingredients
With the mixer on low speed, add the dry ingredients in three additions, alternating with the buttermilk and oil (beginning and ending with dry ingredients). Mix just until combined. Do not overmix.
Step 6: Fold in Sprinkles
Gently fold the rainbow sprinkles into the batter using a spatula. Pour batter evenly among the prepared pans (approximately 2½–3 cups per pan).
Step 7: Bake
Bake for 28–35 minutes (depending on pan size) or until a toothpick inserted in the center comes out clean or with a few moist crumbs. Cool in pans for 15 minutes, then turn out onto wire racks to cool completely.
Step 8: Make the Chocolate Frosting
Beat softened butter until creamy. Sift together powdered sugar and cocoa powder. Gradually add to butter, alternating with heavy cream. Add vanilla, salt, and melted chocolate if using. Beat on high for 2–3 minutes until fluffy and smooth. Adjust consistency with more cream or sugar.
Step 9: Assemble the Cake
Level the cooled cake layers if needed. Brush each layer lightly with simple syrup. Place the first layer on a cake board or stand. Spread a generous layer of chocolate frosting on top. Repeat with the second layer. Add the final layer and apply a thin crumb coat of frosting over the entire cake. Chill for 20–30 minutes.
Step 10: Final Frosting and Decoration
Apply a final smooth or textured layer of chocolate frosting. Decorate with extra sprinkles on the bottom border, top edge, or piped rosettes. For a dramatic finish, press sprinkles onto the sides or create a sprinkle cascade.
Pro Tips for Baking Success
- Room Temperature Ingredients: Ensures better emulsification and rise.
- Don’t Overmix: Overmixing develops gluten and leads to a tough cake.
- Sprinkle Choice: Use “jimmies” style sprinkles—they hold their color better during baking.
- Even Layers: Use a kitchen scale to divide batter equally.
- Crumb Coat: Essential for a clean, professional finish with dark frosting.
- Make-Ahead: Bake layers up to 2 days ahead (wrap tightly) or freeze for up to 2 months.
- Leveling: Use a serrated knife or cake leveler for flat layers.
Creative Variations
Classic Vanilla Funfetti: Skip chocolate frosting and use vanilla buttercream with extra sprinkles.
Chocolate Funfetti: Add cocoa powder to the cake batter for a chocolate confetti base.
Lemon Funfetti: Add lemon zest and juice, pair with lemon curd filling and vanilla frosting.
Red Velvet Funfetti: Classic red velvet cake with sprinkles and cream cheese frosting.
Birthday Cake Flavor: Add almond extract and a touch of imitation cake batter flavoring.
Cupcake Version: Divide batter into liners and bake 18–22 minutes.
Sheet Cake: Bake in a 9×13 pan and frost generously.
Gluten-Free Funfetti: Use a high-quality 1:1 gluten-free flour blend.
Vegan Adaptation: Plant-based butter, milk, and egg replacers with vegan sprinkles.
Serving Suggestions and Occasions
This cake is perfect for:
- Birthday parties (especially kids and milestone birthdays)
- Gender reveal parties (pink or blue sprinkles inside)
- Weddings and anniversaries
- Graduations and celebrations
- Holiday gatherings
Serve at room temperature for the best texture. Pair with vanilla ice cream, fresh berries, or a glass of cold milk.
Troubleshooting Common Problems
- Sprinkles Bleed: Use jimmies and fold them in gently at the end.
- Dense Cake: Check baking powder freshness and avoid overmixing.
- Dry Layers: Brush with simple syrup and don’t overbake.
- Frosting Too Soft: Chill briefly and add more powdered sugar.
- Cracked Top: Oven temperature too high—use an oven thermometer.
- Uneven Layers: Rotate pans halfway through baking.
Nutritional Information (Approximate per Slice)
A generous slice contains roughly:
- 550–750 calories
- High in carbohydrates and fats from butter, sugar, and oil
- Moderate protein from eggs and flour
While indulgent, you can lighten it slightly by reducing sugar or using Greek yogurt in the batter. The sprinkles add minimal nutritional value but maximum joy.
Storage and Freezing Tips
- Room Temperature: Frosted cake keeps for 1–2 days under a cake dome.
- Refrigerator: Up to 5–6 days in an airtight container. Bring to room temp before serving.
- Freezer: Freeze unfrosted layers or fully frosted cake (whole or sliced) for up to 2–3 months. Thaw overnight in the refrigerator.
Advanced Techniques for Bakers
- Reverse Creaming Method: For even more tender texture.
- Italian Meringue Buttercream: For a silkier frosting alternative.
- Drip Cake: Add a chocolate ganache drip and sprinkle cascade.
- Ombré or Themed Colors: Tint batter or frosting for custom looks.
- Fondant Accents: For ultra-professional decorations.
Why Funfetti Cake Remains a Timeless Favorite
In a world of complicated desserts, Funfetti cake stands out for its simplicity and pure joy. It requires no fancy techniques yet delivers impressive results. The bright sprinkles transform an ordinary vanilla cake into something magical that creates lasting memories.
Whether you’re a beginner baker or a seasoned pro, this recipe offers reliable success and endless opportunities for creativity. It’s more than just a cake—it’s a celebration in dessert form.
Final Thoughts: Bake Joy Into Every Occasion
A homemade three-tier Funfetti cake with rich chocolate frosting is guaranteed to be the highlight of any gathering. The contrast between the cheerful sprinkle-filled interior and elegant chocolate exterior makes it both fun and sophisticated.
Gather your ingredients, preheat your oven, and prepare to create a cake that will have everyone asking for the recipe. With its moist crumb, vibrant colors, and perfect chocolate-vanilla pairing, this Funfetti masterpiece will quickly become your signature celebration cake.
Happy baking and even happier celebrating!