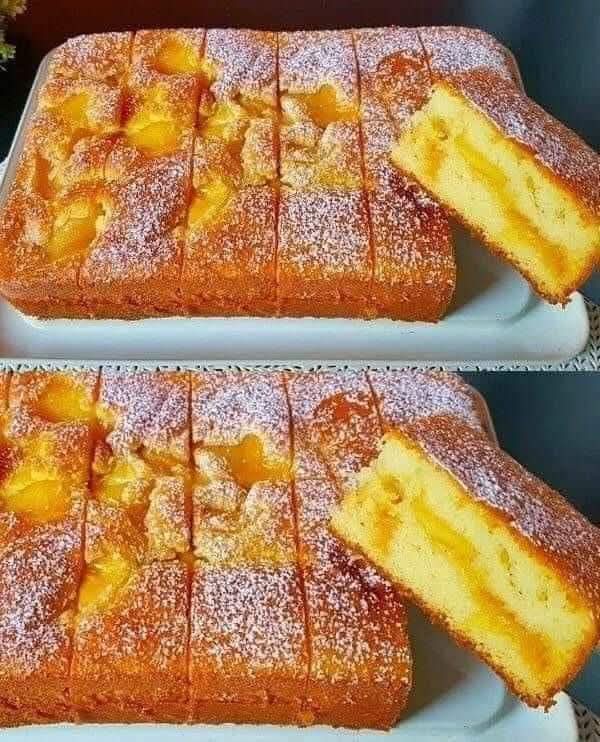
The Ultimate Peach & Vanilla Custard Traybake: A Complete Guide
There is something inherently nostalgic about a fruit-laden sponge cake cooling on a wire rack. This Peach and Custard Traybake is the bridge between a sophisticated afternoon tea and a cozy, rustic Sunday bake. It features a buttery, velvet-crumbed sponge, pockets of creamy vanilla custard, and the bright, jammy sweetness of sun-ripened peaches.
In this comprehensive guide, we will explore why this recipe works, how to master the “sunken fruit” technique, and how to adapt this recipe for any season.
1. Why This Recipe Works: The Science of the Crumb
The foundation of this cake is a Creamed Sponge. Unlike a whisked sponge (like a Genoise), a creamed sponge relies on the mechanical aeration of butter and sugar.
- The Emulsion: By beating room-temperature butter and sugar together, you create millions of tiny air bubbles. These bubbles expand in the oven thanks to the leavening agents (baking powder), resulting in that signature “lofty” texture.
- The Custard Barrier: The addition of custard provides a moisture barrier. While the cake crumb can sometimes dry out, the custard pockets remain creamy, providing a beautiful textural contrast.
- The Fruit Placement: Peaches have a high water content. In this recipe, we dust them slightly in flour (or simply place them on top) to prevent them from sinking straight to the bottom and creating a “soggy bottom.”
2. Equipment You Will Need
To achieve the look in the photo, you will need:
- A 9×13 inch Rectangular Baking Pan: This ensures the cake is thin enough to cook evenly but thick enough to hold the custard.
- Handheld or Stand Mixer: Essential for the creaming process.
- Fine Mesh Sieve: For that snowy finish of powdered sugar.
- Parchment Paper: To ensure easy removal and clean-looking slices.
3. The Ingredients Breakdown
For the Vanilla Custard Layer
- 2 cups Whole Milk: Provides the necessary fat for a rich mouthfeel.
- 4 Large Egg Yolks: The yolks provide the golden color and thickening power.
- 1/2 cup Granulated Sugar: Just enough to sweeten without overpowering the peaches.
- 1/4 cup Cornstarch: This stabilizes the custard so it doesn’t “run” inside the cake.
- 1 tbsp Vanilla Bean Paste: Using paste instead of extract gives you those beautiful black specks.
For the Peach Element
- 2-3 Large Peaches: You can use fresh, freestone peaches or high-quality canned peach halves (thoroughly drained and patted dry).
- 1 tbsp Lemon Juice: To toss fresh peaches in, preventing oxidation and brightening the flavor.
For the Sponge Cake
- 1 ½ cups (340g) Unsalted Butter: Must be softened to room temperature (approx. 65°F or 18°C).
- 1 ½ cups (300g) Granulated Sugar.
- 4 Large Eggs: Room temperature is vital to prevent the batter from curdling.
- 1 tsp Almond Extract: This is the “secret ingredient” that makes peach desserts taste professional.
- 3 cups (375g) All-Purpose Flour.
- 1 tbsp Baking Powder.
- 1/2 tsp Salt.
- 1/2 cup Sour Cream or Greek Yogurt: This adds acidity to react with the baking powder and ensures a moist crumb.
4. Step-by-Step Instructions
Phase 1: The Custard (The “Heart”)
You must make the custard first so it has time to cool and set.
- In a medium saucepan, whisk together the egg yolks, sugar, and cornstarch until smooth. Slowly pour in the milk while whisking.
- Place over medium heat. Whisk constantly—do not walk away! Once the mixture begins to bubble, it will thicken rapidly.
- Cook for 1 minute once thickened to “cook out” the starchy taste of the cornstarch.
- Remove from heat, stir in the vanilla, and transfer to a bowl. Cover the surface directly with plastic wrap to prevent a skin from forming. Let it cool completely.
Phase 2: Preparing the Fruit
- If using fresh peaches, blanch them in boiling water for 30 seconds, then shock in ice water to slip the skins off easily.
- Slice into thick wedges or cubes.
- Toss with a squeeze of lemon juice and set aside.
Phase 3: The Batter
- Preheat & Prep: Preheat your oven to 350°F (175°C). Grease your pan and line it with parchment paper, leaving an overhang on the sides.
- Creaming: In your mixer, beat the butter and sugar for at least 5 minutes. The mixture should turn from yellow to a pale ivory color and look fluffy.
- Eggs: Add the eggs one at a time, beating well after each addition. If the mixture looks like it’s curdling, add a tablespoon of your measured flour.
- Dry Meets Wet: Sift together the flour, baking powder, and salt. Add half of the dry ingredients to the butter mixture, followed by the sour cream and almond extract. Finish with the remaining flour. Do not overmix! Stop as soon as no flour streaks remain.
Phase 4: Assembly & Baking
- Spread the cake batter into the prepared pan. Level the top with an offset spatula.
- The Marble Effect: Spoon dollops of the cooled custard over the batter. Use a knife to gently swirl it into the top half of the batter.
- Adding Fruit: Press your peach slices into the batter/custard mix. Don’t push them all the way to the bottom; they will naturally sink a bit as the cake rises.
- Bake: Place in the center of the oven for 45–55 minutes.
- The Test: The cake is done when the sponge sections spring back when touched, and a skewer inserted into a cake section (not a custard section) comes out clean.
5. The Finishing Touch: The Powdered Sugar Veil
Wait for the cake to cool for at least 30 minutes before dusting. If the cake is too hot, the powdered sugar will melt into a glaze. Use a fine-mesh sieve to create a thick, even coating of confectioners’ sugar. This highlights the golden ridges of the baked peaches.
6. Pro-Tips for the Perfect WordPress-Worthy Bake
Achieving the “Golden Brown” Crust
If you notice the edges are browning too quickly while the center is still wobbly, tent the pan loosely with aluminum foil. This allows the center to cook through without burning the exterior.
Using Canned vs. Fresh
- Fresh: Best in peak summer (July/August). They offer a slightly tart edge that cuts through the sugar.
- Canned: Great for year-round baking. Ensure you pat them very dry with paper towels. Excess syrup will make the cake gummy.
The Importance of Temperature
Ensure your eggs and butter are the same temperature. When you combine cold eggs with warm creamed butter, the fat seizes, leading to a dense, heavy cake rather than the light sponge seen in the photo.
7. Storage and Make-Ahead Advice
- Countertop: Because of the custard and fresh fruit, this cake should only stay at room temperature for about 6 hours.
- Refrigeration: Store in an airtight container in the fridge for up to 4 days. Note that the powdered sugar will dissolve in the fridge, so you may need to re-dust before serving.
- Freezing: This cake freezes surprisingly well! Wrap individual slices in plastic wrap and foil. Thaw in the fridge overnight.
8. Variations to Keep Your Readers Coming Back
Once you master the peach and custard base, the possibilities are endless:
| Variation | Fruit Swap | Spice Addition |
|---|---|---|
| The Autumn Harvest | Sliced Apples | 1 tsp Cinnamon & Nutmeg |
| The Berry Delight | Fresh Raspberries | Lemon Zest in the batter |
| The Tropical Twist | Mango Chunks | Coconut Milk in the custard |
| The Black Forest | Pitted Cherries | 2 tbsp Cocoa Powder in the batter |
9. Frequently Asked Questions (FAQs)
Can I use store-bought custard?
Yes, but ensure it is a “thick” style or “ready-to-serve” custard. Avoid thin pouring custards, as they will soak into the batter and prevent it from rising.
Why did my peaches sink to the bottom?
Usually, this happens if the batter is too thin or the fruit is too heavy/wet. Make sure your butter is properly creamed to create a sturdy structure, and pat your fruit dry.
Can I make this gluten-free?
Absolutely. Swap the all-purpose flour for a high-quality 1-to-1 gluten-free baking blend that includes xanthan gum.
10. Conclusion: A Slice of Sunshine
This Peach and Custard Traybake isn’t just a dessert; it’s a centerpiece. It’s a testament to the fact that simple, high-quality ingredients—butter, eggs, fruit, and cream—can create something far greater than the sum of its parts. Whether you’re serving it at a summer BBQ or as a mid-winter pick-me-up, it’s guaranteed to be the first thing to disappear from the table.
Happy Baking!