Guide 1: The Art of the Raspberry Jam Pinwheel Cookie
There is something inherently magical about a pinwheel cookie. They are the perfect marriage of texture and taste: a crisp, buttery shortbread outer layer that yields to a sweet, slightly tart, jam-filled center. Visually, they are a showstopper—the distinct spiral looks intricate, making them the perfect centerpiece for holiday trays, tea parties, or simple afternoon snacking.
But don’t let their sophisticated appearance intimidate you. While they look like they belong in a high-end French bakery, these cookies are surprisingly achievable. With a few professional tips on dough temperature and rolling techniques, you can master these classic treats.
The Science of the Pinwheel
For a pinwheel cookie, we need a dough that is sturdy enough to hold its shape during the rolling process but tender enough to crumble perfectly upon the first bite. Unlike cookies with chemical leaveners (like baking powder), true shortbread relies on the ratio of fat to flour and sugar. The goal is to avoid over-working the gluten, which would result in a tough, bread-like cookie.
Ingredients You Will Need
- Unsalted Butter (Room Temperature): Use high-quality, high-fat European-style butter if possible. The fat content is critical for the flavor and the tender crumb.
- Granulated Sugar: Provides the structure and the sweetness.
- Large Egg: Acts as the binder.
- Pure Vanilla Extract: Adds depth. Consider adding a splash of almond extract for a marzipan-like nuance.
- All-Purpose Flour: Use a standard AP flour. You do not need cake flour here; we want a little bit of structure.
- Salt: Essential to balance the sugar and highlight the butter.
- Raspberry Jam: Look for high-fruit-content jams. If your jam has large fruit chunks, press it through a sieve for a smoother spread.
Step-by-Step Instructions
Phase 1: Preparing the Dough
- Creaming: In a large mixing bowl (or stand mixer fitted with the paddle attachment), beat the room-temperature butter and granulated sugar together. You aren’t looking for a light, fluffy airy texture like a sponge cake—just cream them until smooth and well-combined.
- Binding: Add the egg and the vanilla extract. Mix until the egg is fully emulsified.
- Dry Ingredients: Whisk the flour and salt together in a separate bowl. Gradually add this to your wet ingredients on low speed. Mix only until the flour streaks disappear. Stop mixing immediately.
- Chilling: Divide the dough into two equal portions. Wrap each in plastic wrap and pat them into rectangular blocks. Chill for at least 45 minutes.
Phase 2: The Roll and Spread
- Rolling: Place one block of dough between two large sheets of parchment paper. This prevents the dough from sticking without needing extra flour. Roll it out into a rectangle, roughly 1/8 to 1/4 inch thick.
- Jam Application: Peel off the top layer of parchment. Spread your raspberry jam evenly. Crucial Tip: Leave a small 1/2-inch border of clean dough along the edge you will finish rolling on. This helps seal the log so the jam doesn’t leak during baking.
- The Roll: Using the bottom parchment paper to help lift, begin rolling the dough tightly away from you. The tighter the roll, the more distinct the “pinwheel” spiral will be.
- The Second Chill: Place your logs in the freezer for at least 30 minutes. This firms the log so that it maintains a perfect circular shape when sliced.
Phase 3: Slicing and Baking
- Slice: Use a very sharp, thin knife. Slice the log into 1/2-inch thick rounds. If the dough becomes too soft, pop the log back into the freezer.
- Bake: Preheat to 350°F (175°C). Place the rounds on the baking sheet, spaced about 2 inches apart. Bake for 10–12 minutes, or until the edges are just barely golden.
Guide 2: The Ultimate Slow-Cooker Pulled Pork Masterclass
There are few dishes in the culinary world that command as much respect and comfort as a perfectly prepared pulled pork. It is the backbone of backyard barbecues, the star of game-day sliders, and the ultimate “set-it-and-forget-it” meal for busy weeknights.
But pulled pork is more than just throwing meat into a slow cooker and hoping for the best. It is a precise intersection of protein science, flavor balancing, and temperature control.
The Foundation: Choosing Your Cut
The secret to incredible pulled pork starts long before the slow cooker is turned on. It begins at the butcher counter.
The Boston Butt (Pork Shoulder)
The “Boston Butt” is a portion of the shoulder, and it is non-negotiable for pulled pork. This cut is packed with intramuscular fat (marbling) and, crucially, a significant amount of connective tissue (collagen). As the pork cooks slowly, that collagen breaks down and transforms into gelatin, giving the meat its silky, moist texture.
The Master Recipe
Ingredients
- 4–5 lb Bone-in Pork Shoulder
- 1 tbsp Vegetable or Canola oil (for searing)
- The Master Rub: 1/2 cup brown sugar, 2 tbsp smoked paprika, 1 tbsp kosher salt, 1 tbsp black pepper, 1 tbsp garlic powder, 1 tsp mustard powder.
- 1 cup liquid base (Chicken broth, apple cider vinegar, or a mix of beer and water)
Instructions
- Prep the Meat: Remove the pork from the refrigerator 30 minutes before seasoning. Pat it extremely dry. Excess moisture on the surface prevents the rub from adhering.
- The Sear: While optional, searing the meat in a hot pan with oil for 2–3 minutes per side creates the Maillard reaction—this adds an incredible depth of flavor.
- Rub Application: Generously coat every inch of the pork with your spice rub.
- The Bed: Place sliced onions at the bottom of the slow cooker. This creates a “rack” that lifts the meat out of the liquid, preventing it from boiling in its own drippings.
- The Liquid: Pour your liquid base into the bottom of the slow cooker. Do not pour it over the meat, or you will wash the rub away.
- The Cook: Cover and cook on LOW for 8–10 hours. Avoid the temptation to lift the lid! Every time you lift the lid, you lose about 20–30 minutes of cooking time.
- The Rest: Once the meat is fork-tender (205°F internally), remove it and let it rest for at least 20 minutes before shredding.
Guide 3: The Secret to the Perfect Slow-Cooker Fruit Cobbler
There is a misconception that slow cookers are only for savory roasts. The reality is that the slow, even heat of a slow cooker is arguably the best environment for a fruit cobbler. It allows the fruit juices to thicken into a jammy consistency while the topping steams to perfection.
The Secret to Texture: The Topping-to-Fruit Ratio
The biggest challenge with slow-cooker fruit desserts is sogginess. Because the slow cooker traps steam, liquid doesn’t evaporate.
The Fix: Use a topping that is slightly denser than a traditional oven biscuit. By adding a bit of cornstarch to your fruit, you stabilize the juices before the topping ever touches them.
The Master Recipe
Ingredients
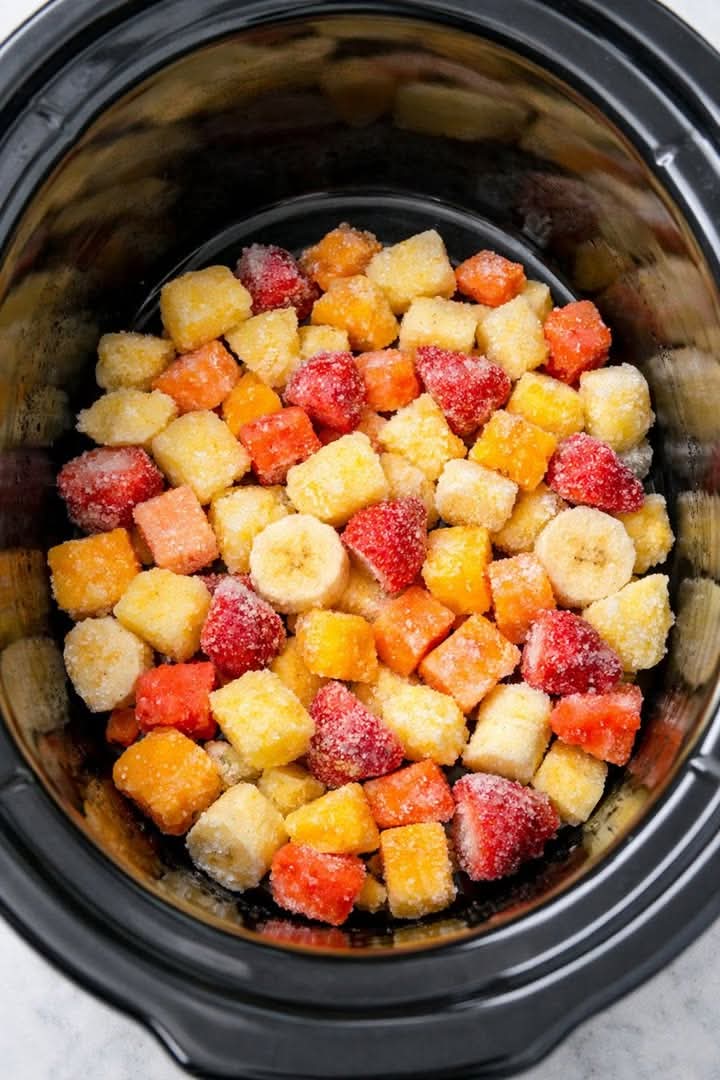
- The Fruit Base: 6 cups of fresh fruit (strawberries, peaches, mangoes, bananas). Cut into uniform, bite-sized pieces.
- Sugar: 1/2 cup granulated sugar (adjust based on the sweetness of your fruit).
- Thickener: 2 tablespoons cornstarch tossed with the fruit.
- The Topping: 1 box yellow cake mix OR 2 cups flour, 1/2 cup sugar, 1 tsp baking powder, 1/2 cup cold butter cut into cubes.
Instructions
- Prepare the Fruit: Toss your fruit, sugar, and cornstarch together in a large bowl. Ensure every piece of fruit is coated. Dump this into the slow cooker.
- The Topping: If using cake mix, sprinkle it evenly over the top. If making a homemade biscuit topping, drop spoonfuls of the batter over the fruit.
- The Butter: If using cake mix, top with thin pats of butter. If using biscuit topping, brush the tops with a little melted butter and cinnamon sugar.
- The Vent: Place a paper towel between the slow cooker and the lid. This is the secret. The paper towel absorbs excess condensation, preventing your cobbler from becoming a soup.
- Cook: Cook on HIGH for 2–3 hours. The edges will be bubbly, and the top will be set.
Troubleshooting Your Cobbler
- “My cobbler is runny.” You likely skipped the cornstarch or the paper towel trick. If it’s done and still runny, remove the lid and let it cook on High for another 20 minutes to reduce.
- “The topping is raw.” Ensure you aren’t over-filling the slow cooker. It should only be about 2/3 full. If the topping is raw, the fruit likely released too much juice, drowning the batter.
Conclusion: Mastering Your Kitchen
Whether you are baking delicate pinwheel cookies, braising a pork shoulder, or creating a warm fruit cobbler, the principles remain the same:
Respect the Ingredients: Buy quality, prepare them correctly (like grating your own cheese or drying your meat), and don’t rush the process.
Understand the Tools: Know that the slow cooker creates a moist environment and the oven creates a dry one. Use this knowledge to your advantage.
Patience: In all three of these recipes, patience—whether it’s chilling dough or letting the meat rest—is the invisible ingredient that makes the difference between “good” and “great.”
Happy cooking, and enjoy sharing these incredible meals with your friends and family!