Part 1: The Art of the Raspberry Jam Pinwheel Cookie
There is something inherently magical about a pinwheel cookie. They are the perfect marriage of texture and taste: a crisp, buttery shortbread outer layer that yields to a sweet, slightly tart, jam-filled center. Visually, they are a showstopper—the distinct spiral looks intricate, making them the perfect centerpiece for holiday trays, tea parties, or simple afternoon snacking.
But don’t let their sophisticated appearance intimidate you. While they look like they belong in a high-end French bakery, these cookies are surprisingly achievable. With a few professional tips on dough temperature and rolling techniques, you can master these classic treats.
The Science of the Pinwheel
For a pinwheel cookie, we need a dough that is sturdy enough to hold its shape during the rolling process but tender enough to crumble perfectly upon the first bite. Unlike cookies with chemical leaveners (like baking powder), true shortbread relies on the ratio of fat to flour and sugar. The goal is to avoid over-working the gluten, which would result in a tough, bread-like cookie.
Ingredients You Will Need
- Unsalted Butter (Room Temperature): Use high-quality, high-fat European-style butter if possible. The fat content is critical for the flavor and the tender crumb.
- Granulated Sugar: Provides the structure and the sweetness.
- Large Egg: Acts as the binder.
- Pure Vanilla Extract: Adds depth. Consider adding a splash of almond extract for a marzipan-like nuance.
- All-Purpose Flour: Use a standard AP flour. You do not need cake flour here; we want a little bit of structure.
- Salt: Essential to balance the sugar and highlight the butter.
- Raspberry Jam: Look for high-fruit-content jams. If your jam has large fruit chunks, press it through a sieve for a smoother spread.
Step-by-Step Instructions
Phase 1: Preparing the Dough
- Creaming: In a large mixing bowl (or stand mixer fitted with the paddle attachment), beat the room-temperature butter and granulated sugar together. You aren’t looking for a light, fluffy airy texture like a sponge cake—just cream them until smooth and well-combined.
- Binding: Add the egg and the vanilla extract. Mix until the egg is fully emulsified.
- Dry Ingredients: Whisk the flour and salt together in a separate bowl. Gradually add this to your wet ingredients on low speed. Mix only until the flour streaks disappear. Stop mixing immediately.
- Chilling: Divide the dough into two equal portions. Wrap each in plastic wrap and pat them into rectangular blocks. Chill for at least 45 minutes.
Phase 2: The Roll and Spread
- Rolling: Place one block of dough between two large sheets of parchment paper. This prevents the dough from sticking without needing extra flour. Roll it out into a rectangle, roughly 1/8 to 1/4 inch thick.
- Jam Application: Peel off the top layer of parchment. Spread your raspberry jam evenly. Crucial Tip: Leave a small 1/2-inch border of clean dough along the edge you will finish rolling on. This helps seal the log so the jam doesn’t leak during baking.
- The Roll: Using the bottom parchment paper to help lift, begin rolling the dough tightly away from you. The tighter the roll, the more distinct the “pinwheel” spiral will be.
- The Second Chill: Place your logs in the freezer for at least 30 minutes. This firms the log so that it maintains a perfect circular shape when sliced.
Phase 3: Slicing and Baking
- Slice: Use a very sharp, thin knife. Slice the log into 1/2-inch thick rounds. If the dough becomes too soft, pop the log back into the freezer.
- Bake: Preheat to 350°F (175°C). Place the rounds on the baking sheet, spaced about 2 inches apart. Bake for 10–12 minutes, or until the edges are just barely golden.
Troubleshooting Common Issues
| Problem | Likely Cause | Solution |
|---|---|---|
| Dough breaks while rolling | Dough is too cold | Let it sit at room temp for 5-10 minutes to become more pliable. |
| Jam leaks everywhere | Not enough chilling time | Ensure the log is firm to the touch before slicing. |
| Cookies flattened out | Butter was too warm | Always use chilled dough logs; never put soft dough in a hot oven. |
| Spiral isn’t tight | Not rolled tight enough | Use the parchment paper to press the dough log as you roll it. |
Part 2: The Ultimate Southern Pimento Cheese
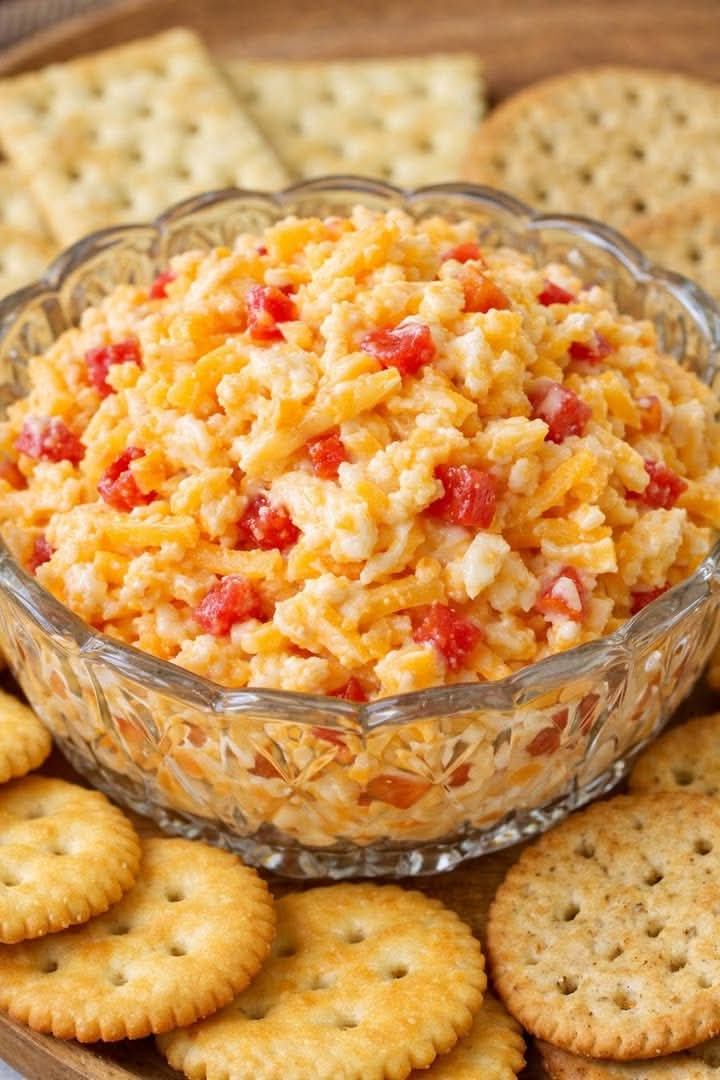
Pimento cheese is not just a dip; it is a Southern institution. Often called the “pâté of the South,” it is a staple at Masters Tournament parties, church gatherings, and casual Sunday brunches. While it is simple—essentially cheese, peppers, and mayonnaise—the difference between a mediocre batch and an incredible one lies entirely in the preparation.
The “Holy Trinity” of Pimento Cheese
To make a truly authentic pimento cheese, you must respect the integrity of the ingredients.
- The Cheese: You must grate your own cheese. Pre-shredded cheese in bags is coated in cellulose (a starch) to prevent clumping. This powder ruins the texture of pimento cheese, preventing the mayo from adhering and giving the dip a gritty, dry mouthfeel. Use a block of extra-sharp yellow cheddar for that classic color and bite.
- The Pimentos: These are sweet, mild red peppers. You can find them canned in the grocery store aisle. Do not skip them; they provide the essential sweetness that balances the sharp cheese.
- The Mayonnaise: This is the binder. Use a high-quality full-fat mayonnaise (Duke’s is the gold standard in the South). Avoid “salad dressing” or low-fat options, as they lack the richness required to emulsify the cheese.
The Master Recipe
Ingredients
- 1 lb (16 oz) Extra Sharp Cheddar, freshly grated
- 1 can (4 oz) Diced Pimentos, drained well
- 1/2 cup High-quality Mayonnaise (adjust to preference)
- 1/4 tsp Garlic powder
- 1/4 tsp Onion powder
- 1/4 tsp Smoked paprika (for depth)
- 1 dash Cayenne pepper (optional, for a slight kick)
- Salt and freshly cracked black pepper to taste
The Technique
- Grating: Grate the cheddar using the medium holes of a box grater. Do not use a food processor unless you want a paste-like texture; the hand-grated shreds are essential for the desired consistency.
- The Mix: In a large bowl, combine the grated cheddar, drained pimentos, mayonnaise, and all spices.
- Folding: Use a spatula to fold the ingredients together. Do not over-mix. You want the shreds of cheese to remain visible and distinct.
- The Rest: This is the most important step. Cover the bowl and refrigerate for at least 2 hours, preferably overnight. This allows the flavors to meld and the cheese to soften slightly into the mayonnaise. Pimento cheese is always better on day two.
Variations to Elevate Your Dip
- The “Kick”: Add finely diced pickled jalapeños. The acidity and heat work beautifully with the sharpness of the cheddar.
- The Creamy Upgrade: Fold in 2 ounces of softened cream cheese. This makes the dip much more spreadable and velvety.
- The Herb Infusion: Add fresh chopped chives or scallions just before serving to add a bright, fresh onion note.
Serving Suggestions
Pimento cheese is versatile. Here are the classic ways to serve it:
- The Classic Cracker: Serve with buttery round crackers (like the ones in the photo).
- The Celery Boat: Use thick celery sticks for a crunchy, low-carb scoop.
- The Grilled Sandwich: Spread it between two slices of sourdough bread and grill with butter until the cheese is oozing and golden. This is arguably the best way to eat it.
- The Burger Topper: Add a generous scoop to a hot-off-the-grill burger. The heat will melt the cheese into a luxurious, gooey sauce.
Storage
Pimento cheese will keep in an airtight container in the refrigerator for up to one week. Because it is mayonnaise-based, keep it chilled. If you notice a small amount of liquid separating, simply give it a good stir before serving.
Final Thoughts: The Joy of Simple Cooking
Whether you are rolling buttery cookie dough or hand-grating sharp cheddar for a dip, these two recipes share a common theme: they prove that you don’t need complex, expensive ingredients to create something truly delicious.
The Raspberry Jam Pinwheels offer a moment of patience and precision, perfect for a quiet afternoon of baking. The Pimento Cheese offers a moment of rustic, savory comfort, perfect for sharing with friends. Both rely on the quality of your ingredients and the care you put into the technique. We hope these recipes become staples in your kitchen!