The Ultimate No-Bake Strawberry Delight: A Symphony of Layers
There is an undeniable magic to the “No-Bake” genre of desserts. It is the perfect marriage of convenience and indulgence, a culinary strategy that relies not on the intense heat of an oven, but on the patience of the refrigerator. The No-Bake Strawberry Delight is perhaps the crown jewel of this category. It is a stunning, multi-layered masterpiece that highlights the vibrant, sweet-tart profile of fresh strawberries against a velvety canvas of cream cheese and a buttery, crisp foundation.
Whether you are hosting a summer garden party, preparing a show-stopping dessert for a family gathering, or simply craving something elegant yet straightforward to assemble, this recipe offers a tactile and flavor-rich experience that rivals any professional bakery creation.
The History of the Icebox Cake
To understand the delight, we must look at its ancestor: the “Icebox Cake.” Gaining massive popularity in the United States during the 1930s and 1940s, the icebox cake was a revolutionary concept in home cooking. As refrigeration became more accessible, the ability to create desserts that “set” without heat became a symbol of modern domestic convenience.
During the post-war era, these desserts became iconic. They were affordable, utilized pantry staples (like graham crackers and cream), and were easily adaptable to seasonal fruits. While the name “Icebox Cake” has evolved into modern iterations like the Strawberry Delight, the soul of the dish remains the same: the transformation of simple, humble ingredients into a chilled, sophisticated treat through the passage of time and temperature.
Benefits: Why You Should Master This Recipe
- Zero Heat Dependency: Perfect for hot climates or when you simply don’t want to heat up the kitchen.
- Textural Contrast: It offers a triple threat of textures: the buttery crunch of the crust, the cloud-like smoothness of the filling, and the juicy snap of fresh berries.
- Aesthetic Appeal: The layers—distinct white, red, and golden brown—make this one of the most Instagram-worthy desserts you can plate.
- Student & Budget Friendly: It uses accessible, affordable ingredients that are easy to find in any grocery store, making it a high-reward project with a low-cost barrier.
- Advance Preparation: This dessert actually tastes better after it has rested for 24 hours, making it the ultimate stress-free “make-ahead” dish for any event.
The Complete Ingredient List
To create the perfect version of this dessert—filling in the blanks from your original recipe image—we have balanced the ratios for optimal structural integrity.
The Crust
- Graham Crackers: 1.5 cups, finely crushed (roughly 10–12 sheets).
- Unsalted Butter: 1/2 cup (1 stick), melted.
- Granulated Sugar: 2 tablespoons (to help stabilize the crust).
The Filling (The “Delight”)
- Cream Cheese: 16 ounces (2 blocks), softened to room temperature.
- Granulated Sugar: 3/4 cup (1/4 cup from the base recipe, plus an additional 1/2 cup for balance).
- Heavy Whipping Cream: 1.5 cups (chilled).
- Vanilla Extract: 1 teaspoon (pure extract adds depth).
The Strawberry Layer
- Fresh Strawberries: 2 lbs, washed, hulled, and sliced.
- Strawberry Glaze (Optional but Recommended): 1/2 cup of strawberry jam, warmed and strained, to toss the berries in for that glossy, professional shine.
Methods and Preparation
Success in a no-bake recipe relies entirely on your preparation method. Because there is no baking to “bind” the ingredients, you must rely on the fat content and chilling time to provide structure.
Phase 1: The Crust Construction
- Crush: Place graham crackers in a food processor or a sealed bag and crush until they resemble fine sand. Large chunks will cause the crust to crumble when served.
- Combine: Mix the crumbs, melted butter, and sugar in a bowl until the mixture feels like damp, clumping sand.
- Compress: Press this mixture firmly into the bottom of your dish (a glass dish is preferred to show off the layers). Use the back of a measuring cup to pack it tightly.
- Chill: Place this in the freezer for 15 minutes to set the butter.
Phase 2: The Creamy Filling
- Aeration: In a large bowl, beat the softened cream cheese and sugar until completely smooth. There should be no lumps.
- The Whip: In a separate, chilled bowl, whip the heavy cream and vanilla until stiff peaks form.
- The Fold: Gently fold the whipped cream into the cream cheese mixture. Do not rush this; folding keeps the air in the mixture, resulting in a lighter, “delightful” texture.
Phase 3: The Strawberry Prep
- Dryness is Key: After washing your strawberries, lay them out on paper towels. Water is the enemy of a no-bake dessert—if the berries are wet, they will water down your filling.
- The Glaze: If using the jam, toss the sliced berries in the warm, strained jam. This acts as a protective barrier, keeping the berries vibrant and preventing them from bleeding too much moisture into the cream.
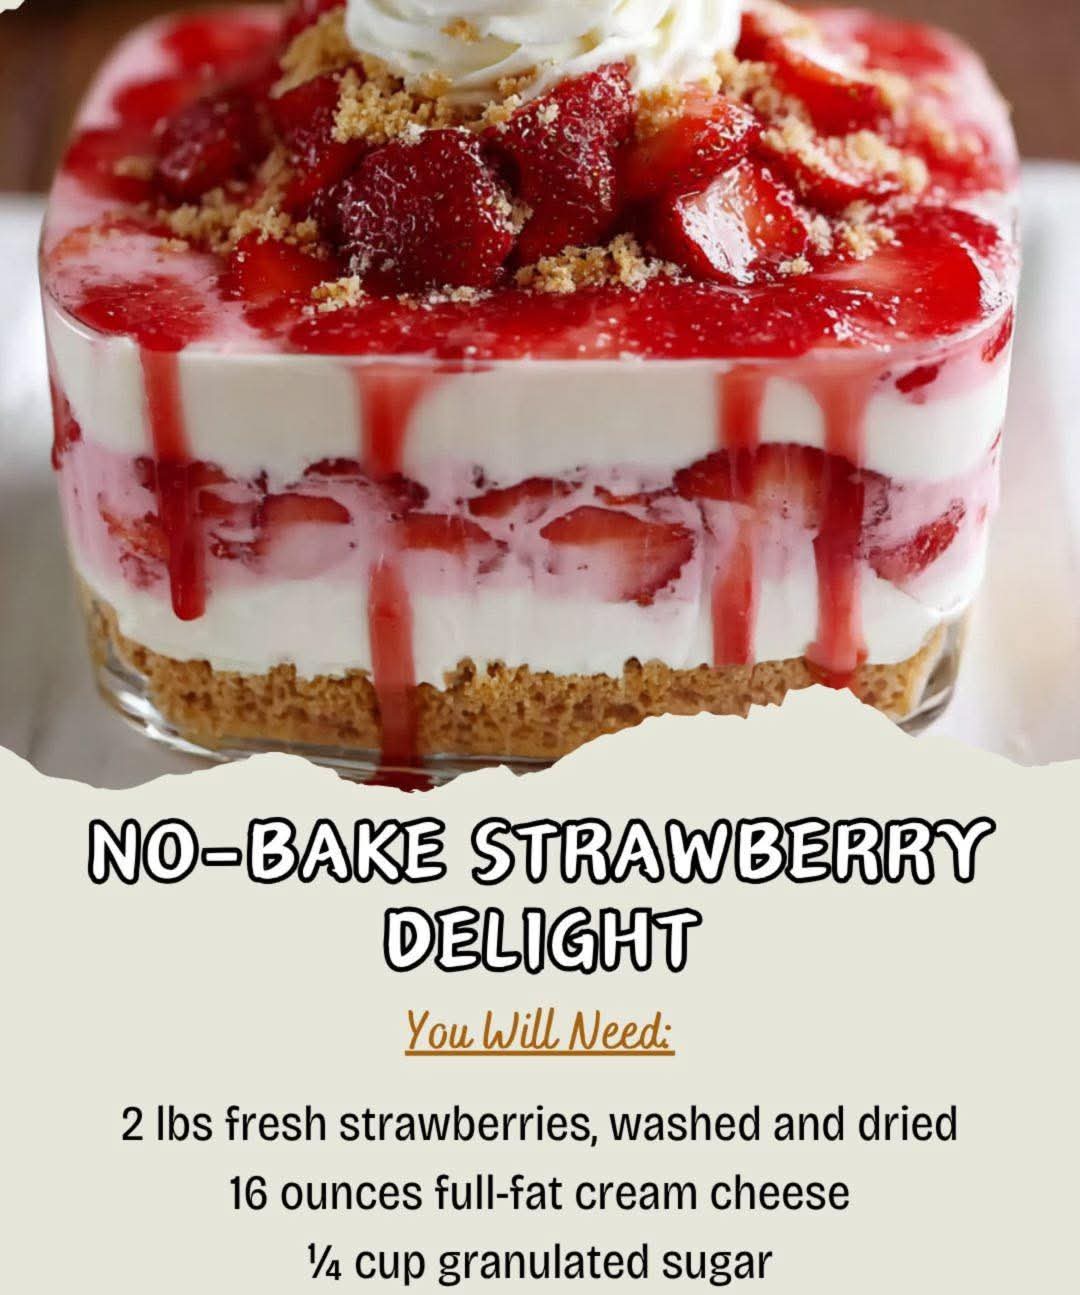
Formation: The Architecture of the Layers
The “Formation” is what transforms a simple mixture into a visual delight. Follow this sequence for the perfect result:
- Layer 1 (The Foundation): Spread your chilled crust base evenly.
- Layer 2 (The Cream): Add half of your cream cheese mixture. Smooth it out with a spatula so it touches the edges of the glass.
- Layer 3 (The Strawberries): Arrange a layer of sliced strawberries, ensuring they are tightly packed.
- Layer 4 (The Second Cream): Spread the remaining cream cheese mixture, sealing the strawberries in.
- Layer 5 (The Crown): Top with the remaining strawberries.
- The Final Rest: Cover the dish and place it in the refrigerator for at least 6 hours (preferably overnight). This resting period allows the graham cracker crust to soften just enough to be sliceable, and the cream filling to firm up.
Nutrition Breakdown (Per Serving)
Note: This is an indulgent dessert. Portion control is key.
| Nutrient | Amount |
|---|---|
| Calories | ~380 kcal |
| Total Fat | 22g |
| Saturated Fat | 14g |
| Sugars | 28g |
| Protein | 4g |
Lovers (Pairings & Community Reviews)
The “Lovers” of this dish—the pairings that elevate it—are generally bright, acidic, or textural counterparts.
- The Drink Pairings:
- Earl Grey Tea: The bergamot notes in the tea cut through the rich, creamy fat of the cream cheese.
- Sparkling Rosé: A light, bubbly wine creates a refreshing contrast to the sweetness.
- Espresso: The bitterness of a concentrated shot of coffee is the perfect foil for the sugary strawberry profile.
- Culinary Variations:
- The Lemon Twist: Add lemon zest to the cream cheese filling to brighten the flavor profile.
- The Nutty Crunch: Sprinkle toasted crushed almonds or pistachios on the final layer for an added textural “lover.”
- The “Double Delight”: Swap 1 cup of strawberries for fresh blueberries or raspberries for a mixed-berry aesthetic.
Conclusion: The Final Verdict
The No-Bake Strawberry Delight is a timeless classic that persists because it perfectly understands what the human palate desires: a balance of creaminess, sweetness, and fresh, sharp fruit acidity. By mastering the method of aerating the cream and properly packing the crust, you are not just making a dessert; you are assembling a structure that delights the eye as much as the tongue.
As you take your first bite, you will notice how the graham cracker crust provides a sturdy, buttery foundation that anchors the ethereal, cloud-like filling. The fresh strawberries then provide a burst of sunshine, cutting through the richness and leaving you refreshed. It is the ultimate dessert for those who value efficiency, beauty, and taste in equal measure.
Reflections: Why This Dessert Remains a Favorite
In our fast-paced modern world, the beauty of the Strawberry Delight lies in its requirement for patience. You cannot rush the setting process. It demands that you prepare it, wait for it to firm up, and anticipate the final reveal. This “slow food” approach, even for a “no-bake” recipe, is what brings lovers of culinary arts back to it time and time again.
Whether you are a student looking for a reliable potluck dish or a home cook wanting to impress guests, this recipe is your foundation. Experiment with the fruits, refine your folding technique, and most importantly, enjoy the process of creating something beautiful from scratch. Happy chilling!