Title:
The Ultimate Strawberry Cheesecake Danish Pastry Recipe – Flaky, Creamy, and Irresistible
SEO Meta Description (for WordPress):
Learn how to make the ultimate strawberry cheesecake Danish pastry at home. This easy recipe delivers buttery, flaky layers filled with sweet cream cheese and juicy strawberry filling. Perfect for breakfast, brunch, or dessert. Includes step-by-step instructions, pro tips, and delicious variations.
Introduction
There’s something magical about biting into a warm, flaky Danish pastry. The crisp, golden exterior gives way to soft, buttery layers that melt in your mouth, revealing a rich, creamy filling bursting with sweet-tart strawberry flavor. If you’ve ever enjoyed a bakery-style strawberry cheesecake Danish, you know how addictive they can be. The good news? You don’t need to visit a fancy patisserie to enjoy them. With this comprehensive guide, you can recreate that perfect strawberry cheesecake Danish right in your own kitchen.
This recipe combines two beloved classics: the traditional Danish pastry dough (known for its delicate, laminated layers) and the creamy indulgence of cheesecake filling, all paired with a vibrant homemade strawberry filling. Whether you’re a beginner baker or an experienced home cook looking to elevate your brunch game, this detailed recipe will walk you through every step with clear instructions, troubleshooting tips, and creative variations.
Why make these at home? Store-bought versions often use preservatives and artificial flavors, while homemade Danish pastries taste fresher, richer, and infinitely more satisfying. Plus, the process of laminating dough—folding butter into dough to create those signature flaky layers—is incredibly rewarding once you master it.
In this 3000-word guide, we’ll cover everything: the science behind Danish pastry, ingredient breakdowns, equipment needed, detailed step-by-step instructions, storage tips, common mistakes to avoid, and even a few delicious twists on the classic recipe. By the end, you’ll be confident enough to bake a batch that rivals any professional bakery.
Let’s dive in and create something truly special.
What Is a Danish Pastry?
Danish pastry, or “wienerbrød” as it’s known in Denmark, originated in the 19th century when Austrian bakers brought their laminated dough techniques to Copenhagen. Today, Danish pastries are enjoyed worldwide in countless flavors. The hallmark of a great Danish is its light, airy texture achieved through a process called lamination—alternating layers of dough and butter that expand dramatically during baking.
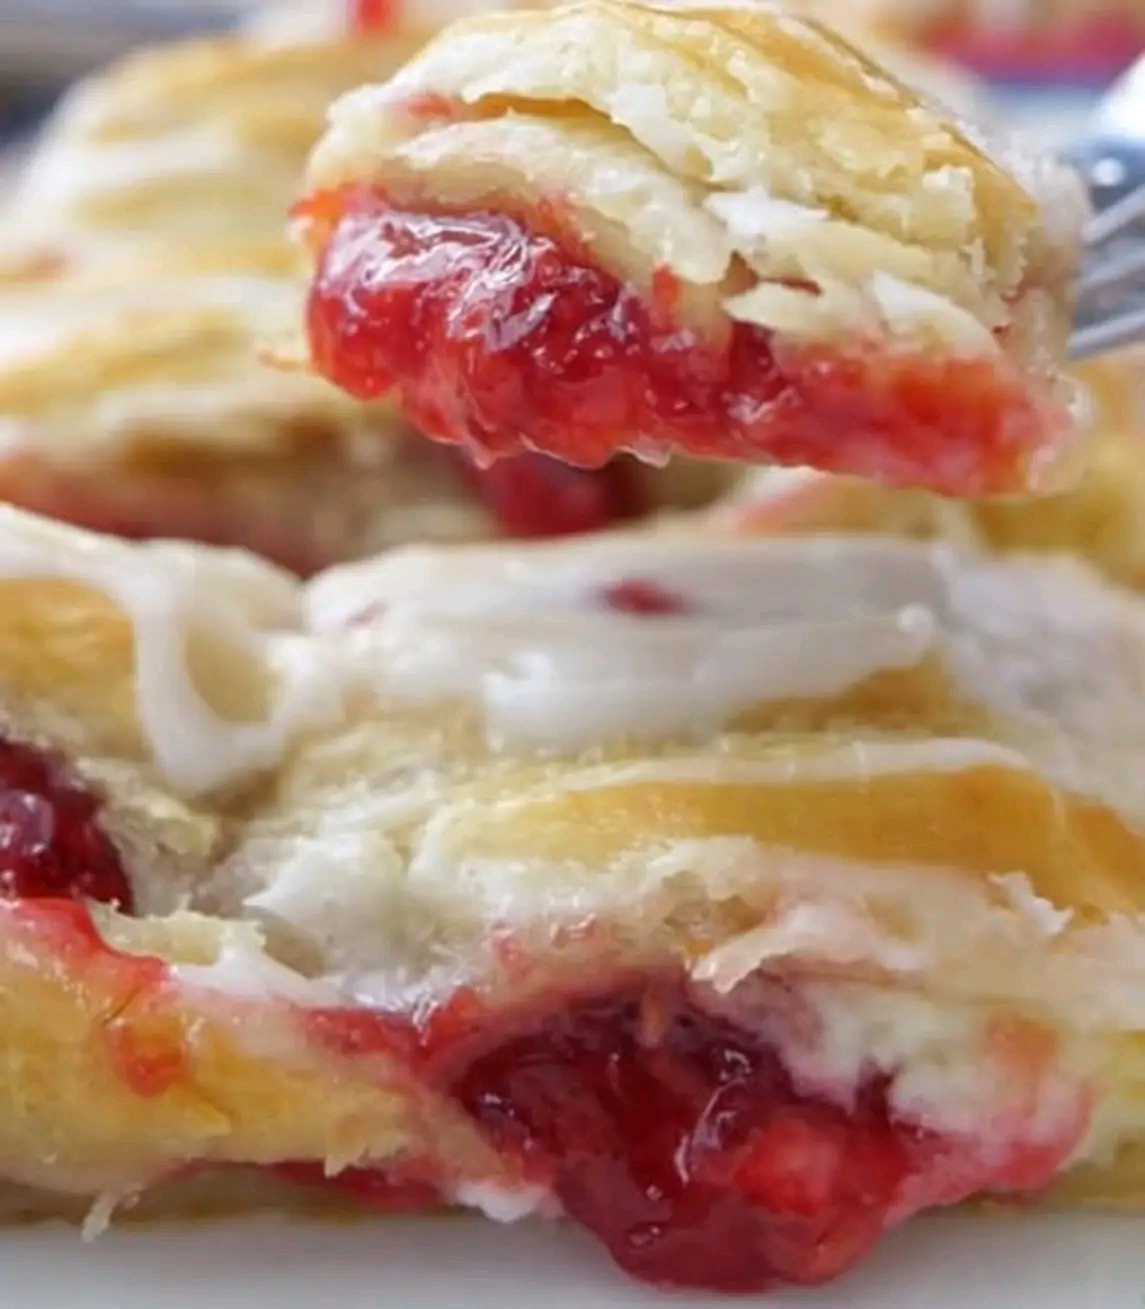
Our version takes this classic and elevates it with a cheesecake-inspired filling: smooth, tangy cream cheese sweetened just enough and swirled with a thick, glossy strawberry compote. The contrast between the buttery pastry, creamy filling, and bright fruit makes every bite unforgettable.
Why This Strawberry Cheesecake Danish Recipe Works
This recipe has been tested and refined for consistent results. Here’s why it stands out:
- Perfect Lamination: Clear instructions ensure you achieve those beautiful, flaky layers without frustration.
- Balanced Flavors: The cheesecake filling is tangy yet sweet, perfectly complementing the juicy strawberries.
- Make-Ahead Friendly: You can prepare the dough and fillings in advance, making it ideal for busy mornings or special occasions.
- Customizable: Easy to adapt with different fruits, glazes, or dietary substitutions.
- Foolproof for Beginners: Detailed explanations and troubleshooting sections help even novice bakers succeed.
Ingredients
This recipe makes approximately 12 large Danish pastries. All measurements are in both US customary and metric for your convenience.
For the Danish Pastry Dough (Detrempe + Beurrage):
- 4 cups (500g) all-purpose flour, plus extra for dusting
- 1/4 cup (50g) granulated sugar
- 2 1/4 teaspoons (7g) instant yeast (or one packet)
- 1 teaspoon (6g) salt
- 1 1/4 cups (300ml) cold whole milk
- 1 large egg, room temperature
- 1 teaspoon vanilla extract
- 2 sticks + 2 tablespoons (250g) unsalted butter, cold (for the butter block)
For the Strawberry Filling:
- 2 cups (300g) fresh strawberries, hulled and chopped (or frozen, thawed)
- 1/4 cup (50g) granulated sugar
- 1 tablespoon fresh lemon juice
- 1 tablespoon cornstarch mixed with 2 tablespoons cold water
- 1/2 teaspoon vanilla extract
- Pinch of salt
For the Cheesecake Filling:
- 8 oz (226g) full-fat cream cheese, softened
- 1/4 cup (50g) granulated sugar
- 1 large egg yolk
- 1 teaspoon vanilla extract
- 1 tablespoon fresh lemon zest
- 2 tablespoons heavy cream
For the Egg Wash:
- 1 large egg
- 1 tablespoon water or milk
For the Optional Glaze (Vanilla or Lemon):
- 1 cup (120g) powdered sugar
- 2–3 tablespoons milk or lemon juice
- 1/2 teaspoon vanilla extract or lemon zest
Optional Garnishes:
- Fresh strawberry slices
- Powdered sugar for dusting
- Toasted sliced almonds
Equipment Needed
- Large mixing bowls
- Stand mixer with dough hook (optional but helpful)
- Rolling pin
- Bench scraper
- Ruler or measuring tape (for even folding)
- Parchment paper
- Baking sheets
- Pastry brush
- Sharp knife or pizza cutter
- Offset spatula
- Plastic wrap
- Kitchen scale (highly recommended for accuracy)
Step-by-Step Instructions
Step 1: Prepare the Danish Dough (Detrempe)
In a large mixing bowl or the bowl of a stand mixer, combine the flour, sugar, yeast, and salt. Whisk to distribute evenly.
In a separate bowl, whisk together the cold milk, egg, and vanilla extract. Pour the wet ingredients into the dry ingredients. Mix on low speed (or by hand) until a shaggy dough forms. It should be soft but not sticky.
Knead the dough on a lightly floured surface for 5–7 minutes until smooth and elastic. Shape into a rectangle about 8×10 inches. Wrap tightly in plastic wrap and refrigerate for at least 1 hour (or up to 24 hours). Chilling relaxes the gluten and makes lamination easier.
Step 2: Prepare the Butter Block (Beurrage)
While the dough chills, prepare the butter. Place the cold butter between two sheets of parchment paper. Using a rolling pin, gently pound and roll the butter into a 7×9-inch rectangle about ½ inch thick. Keep the butter cold but pliable—it should be the same consistency as the dough for even lamination.
Wrap the butter block and refrigerate until needed.
Step 3: Laminate the Dough
Remove the dough from the refrigerator. On a lightly floured surface, roll the dough into a 12×16-inch rectangle. Place the butter block in the center of the dough, leaving a 1-inch border on the short sides.
Fold the top and bottom edges of the dough over the butter like a letter, completely enclosing it. Pinch the seams to seal.
Roll the enclosed dough gently into a 12×18-inch rectangle. Perform the first “book fold”: fold the short ends toward the center so they meet in the middle, then fold the dough in half like closing a book. Wrap and refrigerate for 30 minutes.
Repeat the rolling and folding process two more times (for a total of three folds), chilling the dough for 30 minutes between each fold. After the final fold, wrap the dough and refrigerate for at least 2 hours or overnight. This resting time is crucial for the layers to develop properly.
Step 4: Make the Strawberry Filling
In a medium saucepan, combine the chopped strawberries, sugar, lemon juice, and salt. Cook over medium heat, stirring occasionally, until the strawberries release their juices and the mixture begins to simmer (about 8–10 minutes).
Stir in the cornstarch slurry and continue cooking for 2–3 minutes until the filling thickens to a jam-like consistency. Remove from heat, stir in the vanilla extract, and let cool completely. The filling should be thick enough to hold its shape but still glossy and spreadable.
Step 5: Make the Cheesecake Filling
In a medium bowl, beat the softened cream cheese and sugar until smooth and creamy (about 2 minutes). Add the egg yolk, vanilla extract, lemon zest, and heavy cream. Beat until fully combined and silky. Avoid overmixing to prevent incorporating too much air. Refrigerate until ready to use.
Step 6: Assemble the Danish Pastries
Remove the laminated dough from the refrigerator and let it sit at room temperature for 10–15 minutes to make rolling easier.
On a lightly floured surface, roll the dough into a 16×20-inch rectangle about ¼-inch thick. Using a sharp knife or pizza cutter, trim the edges to create straight sides, then cut the dough into 12 equal 4×5-inch rectangles.
For each rectangle, place about 1 tablespoon of cheesecake filling in the center, leaving a ½-inch border. Top with 1–2 teaspoons of strawberry filling, gently swirling the two together with a toothpick or small knife for a marbled effect.
To shape the Danish, you have several options:
- Classic Envelope Shape: Fold the four corners toward the center, overlapping slightly and pressing gently to seal.
- Braided Shape: Cut slits along both long sides and fold alternating strips over the filling.
- Round Pinwheel: Cut from each corner toward the center (stopping ½ inch from the middle) and fold every other point into the center.
Place the shaped pastries on parchment-lined baking sheets, spacing them 2–3 inches apart. Cover loosely with plastic wrap and let them proof in a warm spot for 45–60 minutes until slightly puffed.
Step 7: Bake the Danish
Preheat your oven to 375°F (190°C). Prepare the egg wash by whisking the egg with water or milk.
Gently brush the exposed dough with the egg wash, being careful not to get any on the filling (it can prevent proper rising).
Bake for 18–22 minutes, rotating the pans halfway through, until the pastries are deep golden brown and the filling is set and bubbling. The internal temperature of the pastry should reach about 200°F if you have a thermometer.
Remove from the oven and let cool on the baking sheets for 10 minutes before transferring to a wire rack.
Step 8: Glaze and Finish
While the pastries are still slightly warm, prepare the glaze by whisking powdered sugar with milk (or lemon juice) and vanilla until smooth and pourable. Drizzle over the cooled pastries.
For extra flair, top with fresh strawberry slices, a dusting of powdered sugar, or toasted almonds.
Pro Tips for Perfect Danish Pastries
- Temperature Control is Everything: Keep the dough and butter cold throughout the lamination process. If the butter gets too soft, it will melt into the dough instead of creating distinct layers.
- Don’t Skip the Chilling: Each refrigeration period relaxes the gluten and firms the butter, resulting in flakier texture.
- Use High-Quality Ingredients: European-style butter with higher fat content (82%+) produces superior flavor and layers. Full-fat cream cheese ensures the richest cheesecake filling.
- Weigh Your Ingredients: Baking is a science. A kitchen scale ensures accuracy and consistent results.
- Proofing Environment: If your kitchen is cool, create a warm proofing spot by turning your oven on to its lowest setting for 1 minute, then turning it off and placing the pastries inside with the door slightly ajar.
- Avoid Overfilling: Too much filling can leak during baking and make the pastries soggy. Start with less and adjust in future batches.
- Sharp Tools: A clean, sharp knife or pizza cutter prevents dragging the dough and ruining the layers.
Common Mistakes and How to Avoid Them
- Butter Melting During Lamination: Solution: Work quickly and return the dough to the fridge the moment it feels soft.
- Tough Dough: Caused by over-kneading or insufficient resting. Follow the resting times exactly.
- Uneven Layers: Ensure the butter block and dough are the same thickness and temperature before enclosing.
- Filling Leaking: Seal the edges well and avoid cutting too close to the filling.
- Pale Pastries: Increase oven temperature slightly or extend baking time by 2–3 minutes for deeper color.
Storage Instructions
Room Temperature: Baked Danish pastries will stay fresh for 1–2 days in an airtight container.
Refrigerator: Store in an airtight container for up to 4 days. Warm in a 300°F oven for 5–7 minutes to restore flakiness.
Freezer: Unbaked assembled pastries can be frozen on a tray until solid, then transferred to a freezer bag for up to 2 months. Bake directly from frozen, adding 5–8 extra minutes to the baking time.
Baked pastries can also be frozen for up to 1 month. Thaw overnight in the refrigerator and reheat as above.
Make-Ahead Options
- Prepare the dough up to 24 hours in advance and keep refrigerated.
- Make both fillings up to 3 days ahead and store in airtight containers in the fridge.
- Assemble the pastries the night before, cover, and refrigerate. Let them come to room temperature and proof for 30–45 minutes before baking in the morning.
Delicious Variations
- Blueberry Lemon Danish: Replace strawberries with blueberries and add extra lemon zest to the cheesecake filling.
- Raspberry Almond: Use raspberry filling and sprinkle sliced almonds on top before baking.
- Cherry Cheesecake Danish: Swap strawberries for pitted cherries and add a touch of almond extract.
- Chocolate Hazelnut: Replace strawberry filling with chocolate-hazelnut spread and add chopped hazelnuts.
- Savory Version: Omit sugar from the dough and fill with cream cheese mixed with herbs, spinach, and feta for a brunch twist.
- Mini Danish Bites: Cut the dough into smaller 2×3-inch rectangles for party-sized treats.
Nutritional Information (Per Pastry, Approximate)
- Calories: 385
- Total Fat: 22g
- Saturated Fat: 13g
- Cholesterol: 85mg
- Sodium: 320mg
- Carbohydrates: 40g
- Fiber: 2g
- Sugars: 18g
- Protein: 7g
Note: Values can vary based on exact ingredients and portion sizes. For precise calculations, use a nutrition app with your specific brands.
Frequently Asked Questions
Q: Can I use store-bought puff pastry instead of making Danish dough from scratch?
A: Yes, for a quicker version. However, traditional Danish dough is enriched with milk, sugar, and egg, giving it a softer, more bread-like texture compared to puff pastry. If using puff pastry, reduce the proofing time and expect a flakier but less tender result.
Q: Why is my dough not rising during proofing?
A: Check your yeast expiration date. Ensure the proofing spot is warm (around 75–80°F) but not hot. Cold kitchens slow down yeast activity significantly.
Q: Can I make this recipe gluten-free?
A: Gluten-free laminated dough is challenging because gluten provides the structure for layers. Some bakers have success with high-quality gluten-free flour blends designed for pastry, but results will differ. Consider using a pre-made gluten-free puff pastry as an alternative.
Q: How do I prevent the strawberry filling from making the pastry soggy?
A: Make sure the filling is completely cooled and thickened. You can also brush the center of the dough with a thin layer of egg wash before adding the filling to create a moisture barrier.
Q: Can I use frozen strawberries?
A: Absolutely. Thaw them completely and drain excess liquid before cooking to avoid a watery filling. You may need to increase the cornstarch slightly.
Q: What’s the best way to reheat these pastries?
A: For the best texture, reheat in a preheated 300°F oven for 5–8 minutes. Avoid the microwave, as it can make the pastry chewy.
Final Thoughts
Mastering homemade strawberry cheesecake Danish pastries is a rewarding baking adventure that will impress family and friends. The combination of buttery, flaky layers with creamy cheesecake and vibrant strawberry filling creates a pastry that’s both comforting and elegant.
Remember, baking is as much about the journey as the destination. Don’t stress if your first attempt isn’t picture-perfect—each batch teaches you something new, and the flavor will still be incredible. With practice, you’ll develop an intuitive feel for the dough and create pastries that look and taste bakery-worthy.
Whether you serve these for a weekend brunch, holiday breakfast, or as a special treat after dinner, they’re guaranteed to disappear quickly. Pair them with fresh coffee or tea for the ultimate experience.
Now it’s your turn—gather your ingredients, roll up your sleeves, and enjoy the process of creating something delicious from scratch.
Happy baking!