Title: Ultimate No-Bake Layered Chocolate Cream Cake Recipe – Rich, Creamy, and Irresistibly Decadent
Meta Description (for Yoast or Rank Math): Discover the ultimate no-bake layered chocolate cream cake recipe with crisp ladyfingers, silky chocolate cream, and a glossy chocolate ganache topping. Perfect for parties, holidays, or whenever you crave something luxurious without turning on the oven. Step-by-step instructions, tips, variations, and storage guide included.
Introduction
If you’re looking for a show-stopping dessert that requires zero baking, this no-bake layered chocolate cream cake is about to become your new obsession. Imagine soft, coffee-kissed ladyfinger biscuits stacked between generous layers of luscious chocolate-infused cream, all crowned with a smooth, shiny chocolate ganache that cracks beautifully when you slice into it. The contrast of textures is pure magic: the slight crunch of the biscuits that soften just enough as they absorb flavors, the velvety smoothness of the cream, and the rich, bittersweet chocolate on top.
This dessert is inspired by classic European charlottes and tiramisu-style cakes but takes things to the next level with a thick, homemade chocolate cream that feels both elegant and comforting. It’s the kind of treat that makes guests ask for the recipe before they’ve even finished their first slice. Best of all, it’s make-ahead friendly, meaning you can prepare it the day before your gathering and let it set beautifully in the fridge overnight.
Whether you’re hosting a dinner party, celebrating a birthday, or simply treating yourself after a long week, this cake delivers maximum wow factor with minimal effort. No oven, no complicated techniques—just simple ingredients layered with love. In this comprehensive guide, we’ll walk through every detail: the ingredients, step-by-step assembly, expert tips for perfect layers, delicious variations, common mistakes to avoid, and even how to store leftovers (if there are any!).
Let’s dive into why this cake works so well and how you can recreate it at home.
Why You’ll Love This No-Bake Layered Chocolate Cream Cake
There are countless chocolate desserts out there, but this one stands out for several reasons:
- No Baking Required: Perfect for hot summer days or when your oven is already busy with the main course.
- Make-Ahead Convenience: It actually tastes better after chilling for 8–24 hours as the flavors meld and the ladyfingers soften to the ideal texture.
- Impressive Presentation: The clean layers visible when sliced make it look like it came from a high-end patisserie.
- Customizable: You can adjust the coffee strength, add liqueurs, incorporate nuts, or switch up the chocolate type to suit your taste.
- Crowd-Pleaser: It appeals to both chocolate lovers and those who prefer lighter, cream-based desserts.
The star of the show is the balance between the slightly bitter coffee soak, the sweet and creamy filling, and the intense chocolate topping. Each bite offers a harmonious mix of flavors and textures that keeps you coming back for more.
Ingredients
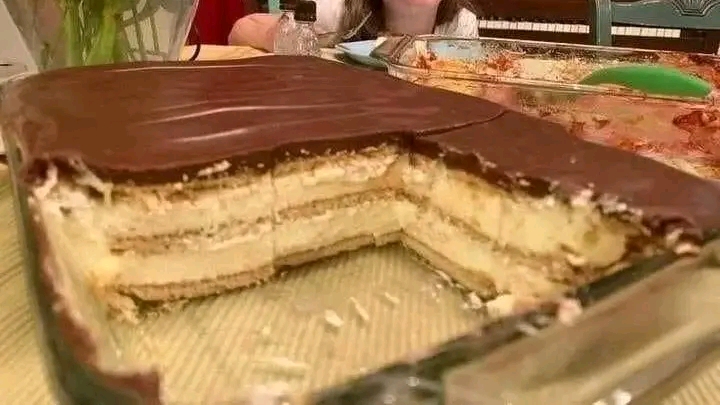
This recipe serves 10–12 generous portions in a standard 9×13-inch (23×33 cm) rectangular glass or ceramic baking dish, just like the one in the photo. All measurements are in both metric and imperial for your convenience.
For the Ladyfinger Layers and Soak:
- 40–45 ladyfinger biscuits (savoiardi) – approximately 2–3 standard packages
- 1 ½ cups (360 ml) strong brewed coffee or espresso, cooled to room temperature
- 2 tablespoons coffee liqueur (such as Kahlúa) or dark rum (optional but highly recommended)
- 1 teaspoon vanilla extract
For the Chocolate Cream Filling:
- 500 g (17.6 oz) mascarpone cheese, softened at room temperature
- 400 ml (1 ⅔ cups) heavy whipping cream (at least 35% fat), cold
- 200 g (7 oz) good-quality dark chocolate (60–70% cocoa), chopped
- 150 g (¾ cup) granulated sugar
- 4 large egg yolks (use pasteurized if concerned about raw eggs)
- 2 teaspoons instant coffee granules dissolved in 1 tablespoon hot water
- 1 teaspoon vanilla extract
- Pinch of salt
For the Chocolate Ganache Topping:
- 200 g (7 oz) dark chocolate, finely chopped
- 200 ml (¾ cup + 1 tablespoon) heavy cream
- 2 tablespoons unsalted butter, at room temperature (optional, for extra shine)
- 1 tablespoon light corn syrup or honey (optional, for smoothness)
Optional Garnishes:
- Cocoa powder for dusting
- Chocolate shavings or curls
- Fresh berries (raspberries or strawberries pair beautifully)
- Chopped toasted hazelnuts or almonds
Pro Tip on Ingredients: Use high-quality chocolate and mascarpone for the best results. Cheap chocolate can taste waxy, and low-fat cream won’t whip properly. Ladyfingers should be the crisp Italian savoiardi variety—not the soft sponge cake kind.
Equipment Needed
- 9×13-inch (23×33 cm) rectangular baking dish or deep serving platter
- Electric hand mixer or stand mixer with whisk attachment
- Large mixing bowls
- Heatproof bowl for melting chocolate
- Saucepan for ganache
- Rubber spatula and offset spatula for spreading
- Sharp serrated knife for clean slices
- Plastic wrap or aluminum foil for covering
Step-by-Step Instructions
Step 1: Prepare the Coffee Soak (5 minutes)
Brew a strong pot of coffee or espresso and let it cool completely. Stir in the coffee liqueur (or rum) and vanilla extract. Pour into a shallow bowl wide enough to dip the ladyfingers. This soak adds depth and prevents the biscuits from tasting dry.
Step 2: Make the Chocolate Cream Filling (15–20 minutes + chilling)
This is the heart of the cake. Begin by melting the chopped dark chocolate. Place it in a heatproof bowl over a saucepan of simmering water (double boiler method) or microwave in 20-second bursts, stirring until smooth. Let it cool slightly but remain pourable.
In a large bowl, beat the egg yolks with the sugar and dissolved instant coffee using an electric mixer until pale, thick, and ribbony (about 3–4 minutes). This creates a stable base for the cream.
Add the softened mascarpone cheese, vanilla extract, and pinch of salt. Beat on medium speed until smooth and fully combined. The mixture should be creamy but not too loose.
In a separate clean bowl, whip the cold heavy cream until it reaches stiff peaks. Be careful not to overwhip—it should hold its shape but still look glossy.
Gently fold the melted (and slightly cooled) chocolate into the mascarpone mixture until no streaks remain. Then, carefully fold in the whipped cream in three additions using a rubber spatula. Use a light hand to keep the mixture airy. The final cream should be thick, fluffy, and hold its shape when spooned.
Cover the bowl and refrigerate for 15–20 minutes while you prepare the base. This brief chill helps the cream firm up slightly for easier layering.
Step 3: Assemble the First Layer (10 minutes)
Line the bottom of your 9×13-inch dish with a single layer of ladyfingers. Quickly dip each biscuit into the coffee soak for 1–2 seconds per side—do not oversoak or they will fall apart. Arrange them snugly, breaking some if necessary to fit evenly.
Spread about one-third of the chocolate cream evenly over the ladyfingers using an offset spatula. Aim for a smooth, even layer about 1 cm (½ inch) thick. Gently tap the dish on the counter to settle any air pockets.
Step 4: Add Subsequent Layers (15 minutes)
Repeat the process:
- Dip and arrange another full layer of soaked ladyfingers over the cream.
- Spread another third of the chocolate cream.
- Add one final layer of soaked ladyfingers.
- Top with the remaining chocolate cream, spreading it smoothly to the edges.
You should end up with three layers of ladyfingers and three layers of cream. The top cream layer should be slightly thicker for a beautiful finish.
Cover the dish tightly with plastic wrap, making sure it doesn’t touch the cream surface. Refrigerate for at least 6 hours, preferably overnight (12–24 hours). This resting time is crucial—the ladyfingers will soften and absorb the coffee and cream flavors while the filling sets firmly.
Step 5: Prepare and Apply the Chocolate Ganache Topping (15 minutes + setting time)
About 1–2 hours before serving (or the next day), make the ganache.
Heat the heavy cream in a small saucepan over medium heat until it just begins to simmer (small bubbles around the edges). Do not let it boil.
Place the finely chopped dark chocolate in a heatproof bowl. Pour the hot cream over the chocolate and let it sit undisturbed for 2 minutes. Add the butter and corn syrup if using.
Stir gently with a spatula in circular motions until the mixture is completely smooth, glossy, and emulsified. Let it cool for 5–10 minutes until it thickens slightly but is still pourable (around 35–40°C / 95–104°F).
Remove the cake from the fridge and carefully pour the ganache over the top cream layer. Tilt the dish gently to help it spread evenly, or use a spatula for assistance. The ganache should flow smoothly and create that signature glossy top seen in the photo.
Return the cake to the fridge for 30–60 minutes to allow the ganache to set partially—it should be firm enough to slice cleanly but still soft when eaten.
Step 6: Serving
Remove the cake from the fridge 10–15 minutes before slicing to take the chill off slightly. Use a sharp, hot knife (dip in hot water and wipe dry between cuts) for clean, neat slices. The layers will be clearly visible, just like in your image.
Garnish each slice with a light dusting of cocoa powder, chocolate curls, or fresh berries if desired. Serve with a cup of strong coffee or espresso to complement the flavors.
Expert Tips for Success
- Dipping Technique: Dip ladyfingers very quickly—1 second per side is usually enough. They absorb liquid fast and can turn to mush if left too long.
- Temperature Matters: Ensure the melted chocolate is not too hot when added to the mascarpone, or it may seize or melt the cream.
- Whipping Cream: Always use cold cream straight from the fridge. Chill your bowl and whisk for even better volume.
- Make It Gluten-Free: Use gluten-free ladyfingers if available, or substitute with a layer of gluten-free chocolate cookies soaked lightly.
- Egg Safety: If raw egg yolks concern you, use pasteurized eggs or omit them and add 2 extra tablespoons of mascarpone for stability.
- Even Layers: Measure your cream portions roughly (about one-third each) to ensure balanced layers.
- Patience is Key: Don’t rush the chilling time. The cake needs time to set properly for those perfect slices.
Delicious Variations
- Coffee Lover’s Version: Double the coffee in the soak and add espresso powder to the cream.
- Nutty Twist: Fold toasted chopped hazelnuts or almonds into the cream layers and sprinkle more on top.
- Berry Infusion: Add a thin layer of raspberry or strawberry compote between the cream layers for a fruity contrast.
- White Chocolate Version: Substitute white chocolate in the cream and ganache for a sweeter, milder flavor.
- Alcoholic Kick: Add 2–3 tablespoons of Baileys, Amaretto, or Grand Marnier to the cream mixture.
- Individual Portions: Assemble in small glasses or ramekins for elegant single servings.
- Lighter Version: Use light mascarpone and reduce sugar slightly, though the texture will be less rich.
Common Mistakes to Avoid
- Oversoaking the ladyfingers, leading to a soggy bottom.
- Using warm cream when whipping, resulting in runny filling.
- Pouring hot ganache directly onto the cold cream, which can cause melting or separation.
- Skipping the overnight chill, causing the cake to fall apart when sliced.
- Using low-quality chocolate, which affects both taste and texture.
Storage and Make-Ahead Guide
This cake is ideal for advance preparation. Once fully assembled and topped with ganache, it will keep covered in the refrigerator for up to 4 days. The flavors continue to develop, making day-two slices even better.
For longer storage, freeze the cake (without ganache) for up to 1 month. Thaw overnight in the fridge, then add fresh ganache before serving.
Leftovers should be stored in an airtight container in the fridge. Individual slices can be wrapped in plastic and frozen for quick treats later.
Nutritional Information (Approximate per Serving)
Calories: 580–650
Fat: 42g
Carbohydrates: 45g
Protein: 8g
Sugar: 32g
(Note: Values vary based on exact brands and portion sizes. This is a rich, indulgent dessert meant for special occasions.)
Frequently Asked Questions (FAQ)
Can I make this cake without eggs?
Yes! Omit the egg yolks and increase the mascarpone by 100g. The texture will still be creamy and stable.
What if I can’t find ladyfingers?
You can substitute with thin slices of sponge cake or even chocolate wafer cookies, though the classic texture comes from savoiardi.
Is the ganache necessary?
It adds that beautiful glossy finish and extra chocolate intensity, but you can dust the top with cocoa powder instead for a simpler look.
Can I use instant pudding instead of homemade cream?
For a quicker version, yes—but the homemade mascarpone-chocolate filling tastes far superior and feels more luxurious.
How do I prevent the ganache from cracking too much?
Add the optional butter and corn syrup, and ensure the ganache is at the right temperature before pouring.
Final Thoughts
This no-bake layered chocolate cream cake is more than just a dessert—it’s a celebration of simple ingredients coming together to create something extraordinary. The rich chocolate, silky cream, and perfectly softened ladyfingers create a harmonious dessert that feels both sophisticated and deeply satisfying.
Once you try it, you’ll understand why it’s become a favorite in many households. It’s forgiving enough for beginners yet impressive enough to serve at the most elegant gatherings. The best part? You can make it your own with endless variations while keeping the core method the same.
So gather your ingredients, clear some space in the fridge, and treat yourself (and your loved ones) to this decadent delight. Your kitchen will smell amazing, and your guests will be impressed—without you ever turning on the oven.
If you make this recipe, I’d love to hear how it turned out! Leave a comment below with your favorite variation or any tips you discovered along the way.
Happy no-baking!