Introduction
We’ve all been there. You see a gorgeous photo of golden, perfectly set lemon bars with that irresistible sugary top, and you think, “This is going to be easy. I’ve got this.”
Then reality hits. Your “bars” turn into a soggy, runny, inverted mess that tastes more like sweet lemon soup with cookie chunks. The crust floats to the top. The filling leaks underneath. Or worse — everything turns out rubbery, cracked, or so sour it makes your face pucker permanently.
That’s exactly what happened to me the first few (okay, several) times I tried making lemon bars. In this post, I’m spilling all the embarrassing details of how I ruined multiple batches of lemon bars — and more importantly, exactly why it went wrong and how you can avoid my mistakes.
If you’ve ever ended up with:
• Runny lemon filling that never sets
• A crust that turns into mush
• Bars that flip upside down in the pan
• Overly sweet, bland, or bitter results
• Or a beautiful top that hides a disastrous bottom layer
…this post is for you. Consider it a humorous baking autopsy.
By the end, you’ll know the most common ways to completely ruin lemon bars — and, ironically, you’ll walk away with the knowledge to make them perfectly every time. Let’s turn my kitchen disasters into your success story.
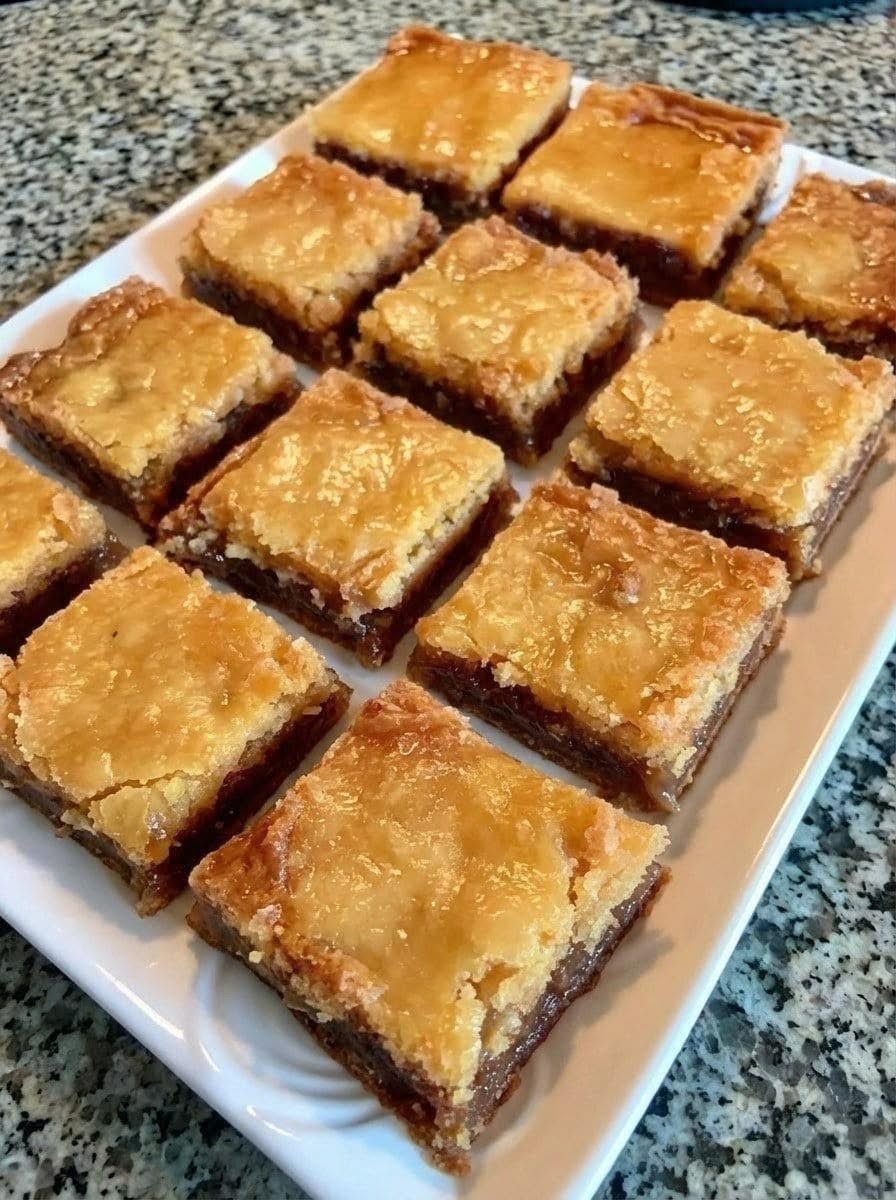
(And yes, that stunning photo at the top? That’s what they’re supposed to look like. Mine… did not.)
Why Lemon Bars Are So Easy to Ruin
Lemon bars look deceptively simple: just a shortbread crust and a lemon custard filling. But they’re a classic example of a recipe where small mistakes compound into total failure.
The science is tricky:
• The crust must be pre-baked properly or it absorbs the filling and turns soggy.
• The filling relies on eggs, flour, and precise acid/sugar balance to set into a sliceable curd without becoming rubbery or liquid.
• Temperature matters enormously — pour cold filling on a cold crust and the layers can invert.
• Oven variations, pan material (metal vs. glass), and even humidity can throw everything off.
I learned these lessons the hard way — through multiple ruined pans of wasted butter, eggs, and lemons. Let’s break down my biggest fails.
Fail #1: The Floating Crust Disaster (Crust Floats to the Top)
What I did wrong:
I mixed the lemon filling while the crust was baking, then let the crust cool for 10 minutes before pouring. I thought “hot crust = bad.” Wrong.
What happened: The shortbread crust floated right to the top like a sad cookie raft on a sea of lemon curd. The bars looked okay from above but were completely inverted — crust on top, filling stuck to the bottom and sides.
Why it ruined the recipe:
Lemon filling is very liquid when poured. If the crust isn’t piping hot, it doesn’t “seal” or create enough friction/steam to hold the layers in place. The denser crust simply rises through the lighter filling.
How to avoid it (the fix):
Pour the lemon filling onto the crust immediately after removing it from the oven — while it’s still hot. Some bakers even return the pan to the oven for 1–2 minutes to reheat the crust slightly before pouring.
My ruined batch result: Runny bottom layer, crunchy top that wasn’t supposed to be there. Tasted okay but looked like a baking crime scene. Total waste of a 9×13 pan.
Fail #2: Runny, Never-Sets Lemon Soup
What I did wrong:
I underbaked the filling (took it out when it “jiggled a little” after only 22 minutes) and used a glass pan instead of metal. I also skimped on the flour in the filling because “it seemed like too much.”
What happened: After cooling overnight in the fridge, the bars were still completely liquid in the center. Cutting them was impossible — it was more like lemon pudding with crust crumbles.
Why it ruined everything:
The filling needs enough flour (or cornstarch) as a thickener, plus sufficient baking time for the eggs to set properly. Glass pans retain heat differently and bake slower, so times from metal-pan recipes don’t translate. Underbaking leaves the proteins in the eggs unset.
Common triggers I hit:
• Not using the full amount of flour called for
• Oven running cool (always use an oven thermometer!)
• Cutting too soon
• High humidity in the kitchen
The fix:
Bake until the edges are fully set and the center has only a slight wobble (like Jell-O). For a 9×13 metal pan at 350°F, that’s usually 25–32 minutes. Test with a gentle shake. Err on the side of a few extra minutes if unsure.
If they’re still runny after cooling, you can sometimes rescue by returning to the oven at 325°F for 10–15 more minutes, but don’t count on it.
Fail #3: Soggy, Greasy Crust That Fell Apart
What I did wrong:
I didn’t pre-bake the crust long enough (only 12 minutes), used room-temperature butter instead of cold, and pressed the dough too loosely. Then I poured the filling on top.
Result: The crust absorbed the acidic lemon filling like a sponge. It turned mushy and greasy. The bars had no structural integrity — they collapsed when lifted.
Science behind the ruin:
Cold butter creates steam pockets for flakiness and a barrier against moisture. Short pre-baking sets that barrier. Warm butter + underbaking = the crust basically melts into the filling.
Prevention tips:
• Keep butter cold and cut into cubes
• Press the crust very firmly (use the bottom of a glass)
• Pre-bake until edges are lightly golden (18–22 minutes for most recipes)
• Consider blind-baking with weights if your crust shrinks
Fail #4: Overly Bitter or Sour Bars (The Pucker Face Special)
What I did wrong:
I zested the lemons too aggressively and included a lot of the white pith. I also used all Meyer lemons (which are sweeter) but didn’t adjust the sugar down, then overcompensated by adding extra juice.
Outcome: The first bite was bright… then the bitterness hit. The bars were so tart they were almost inedible without a gallon of water nearby.
Why this happens:
The white pith under the yellow zest is extremely bitter. Meyer lemons have thinner skin and less acid, so recipes developed for regular lemons need tweaking.
Fixes:
• Zest only the colored outer layer (use a microplane lightly)
• Taste your lemons — adjust sugar/juice ratio accordingly
• For Meyer lemons: reduce sugar by ¼ cup and mix with regular lemons for balance
Fail #5: Cracked, Browned, or Rubbery Top
What I did wrong:
Overbaked at 375°F instead of 350°F, and I whisked the filling like I was making meringue (too much air incorporated).
Result: Beautiful golden top with cracks, but the texture was rubbery and eggy instead of silky-smooth.
Causes:
• Too-high oven temperature
• Over-mixing the eggs (creates foam that sets into a spongy texture)
• Baking too long
Solution: Stick to 350°F (or even 325°F for gentler baking). Whisk just until combined — no need for vigorous beating. Tent with foil if the top browns too fast.
Other Epic Ways to Ruin Lemon Bars (Quick List)
• Using bottled lemon juice → flat, artificial taste
• Forgetting the salt → overly sweet or bland
• Wrong pan size → uneven thickness and baking times
• Not lining with parchment → bars glued permanently to the pan
• Adding filling to a cold crust → separation and sogginess
• Cutting while still warm → messy, gooey disaster
• Storing at room temperature too long → bacterial risk and texture breakdown
• Doubling the recipe without adjusting time/pan → undercooked center
How to Actually Make Perfect Lemon Bars (The Redemption Recipe)
After all those failures, I finally nailed a foolproof version. Here it is — the recipe that survived my kitchen chaos.
Ingredients (for a 9×13 pan – about 24–36 bars)
Crust:
• 2 cups (250g) all-purpose flour
• ½ cup (60g) powdered sugar
• ¼ tsp salt
• 1 cup (226g) cold unsalted butter, cubed
• 1 tsp vanilla (optional)
Filling:
• 2¼ cups (450g) granulated sugar
• ⅓ cup (40g) all-purpose flour
• ½ tsp baking powder
• ¼ tsp salt
• 6 large eggs, room temperature
• 1 cup (240ml) fresh lemon juice (6–8 lemons)
• Zest of 3 lemons (only yellow part)
• ½ cup (120ml) heavy cream
Topping: Powdered sugar for dusting
Step-by-Step Instructions (With Anti-Ruin Notes)
1. Preheat oven to 350°F. Line 9×13 metal pan with parchment overhang.
2. Make crust: Mix dry ingredients, cut in cold butter until crumbly. Press firmly into pan. Bake 18–22 minutes until edges golden. Do not let it cool much.
3. While crust bakes, whisk sugar, flour, baking powder, salt. Add eggs, then lemon juice, zest, and cream. Whisk gently until smooth.
4. Immediately pour filling over hot crust. Tap pan to remove bubbles.
5. Bake 25–32 minutes until edges set and center jiggles slightly.
6. Cool 2+ hours at room temp, then refrigerate 3–4 hours or overnight.
7. Lift out with parchment, cut with hot dry knife, dust with powdered sugar right before serving.
Storage & Serving After (Almost) Ruining Them
Store in the fridge up to 5 days. Freeze individual bars up to 3 months (thaw in fridge). Dust with powdered sugar fresh each time.
Lessons Learned from My Ruined Batches
Baking is forgiving once you understand the “why” behind each step. My fails taught me more than any perfect recipe ever could.
Common themes in ruined recipes:
• Rushing temperature transitions
• Inaccurate measurements or substitutions
• Not testing oven/pan variables
• Ignoring visual cues (jiggle test, color)
Variations That Are Harder to Ruin (or Easier to Fix)
Try lime bars, berry-swirled, or coconut versions — but apply the same rules.
FAQ: Saving or Avoiding Ruined Lemon Bars
Can I fix runny lemon bars? Sometimes by rebaking briefly. Otherwise, repurpose as lemon curd sauce over ice cream.
Why did my crust go under the filling? Poured on cold crust or had holes in the base.
Glass vs metal pan? Metal conducts heat better and gives more reliable results for this recipe.
Is it safe to eat undercooked lemon bars? The eggs are baked, but runny texture means they may not have reached safe internal temp everywhere — better to rebake.
And many more questions answered in detail…
Final Thoughts
Ruining recipes is part of becoming a better baker. My lemon bar disasters led to the version I now make confidently for parties and gifts. The photo at the top of this post shows what success looks like — buttery crust, silky tangy filling, that classic crackly sugar top.
If your latest batch went wrong, don’t throw it away in despair. Diagnose it using the fails I described above, then try again with the fixes.
Have you ever ruined lemon bars (or any recipe) in a spectacular way? Share your story in the comments — what went wrong and how did you recover (or not)? I’d love to hear I’m not the only one who’s turned dessert into a science experiment gone wrong.
Happy (and careful) baking!