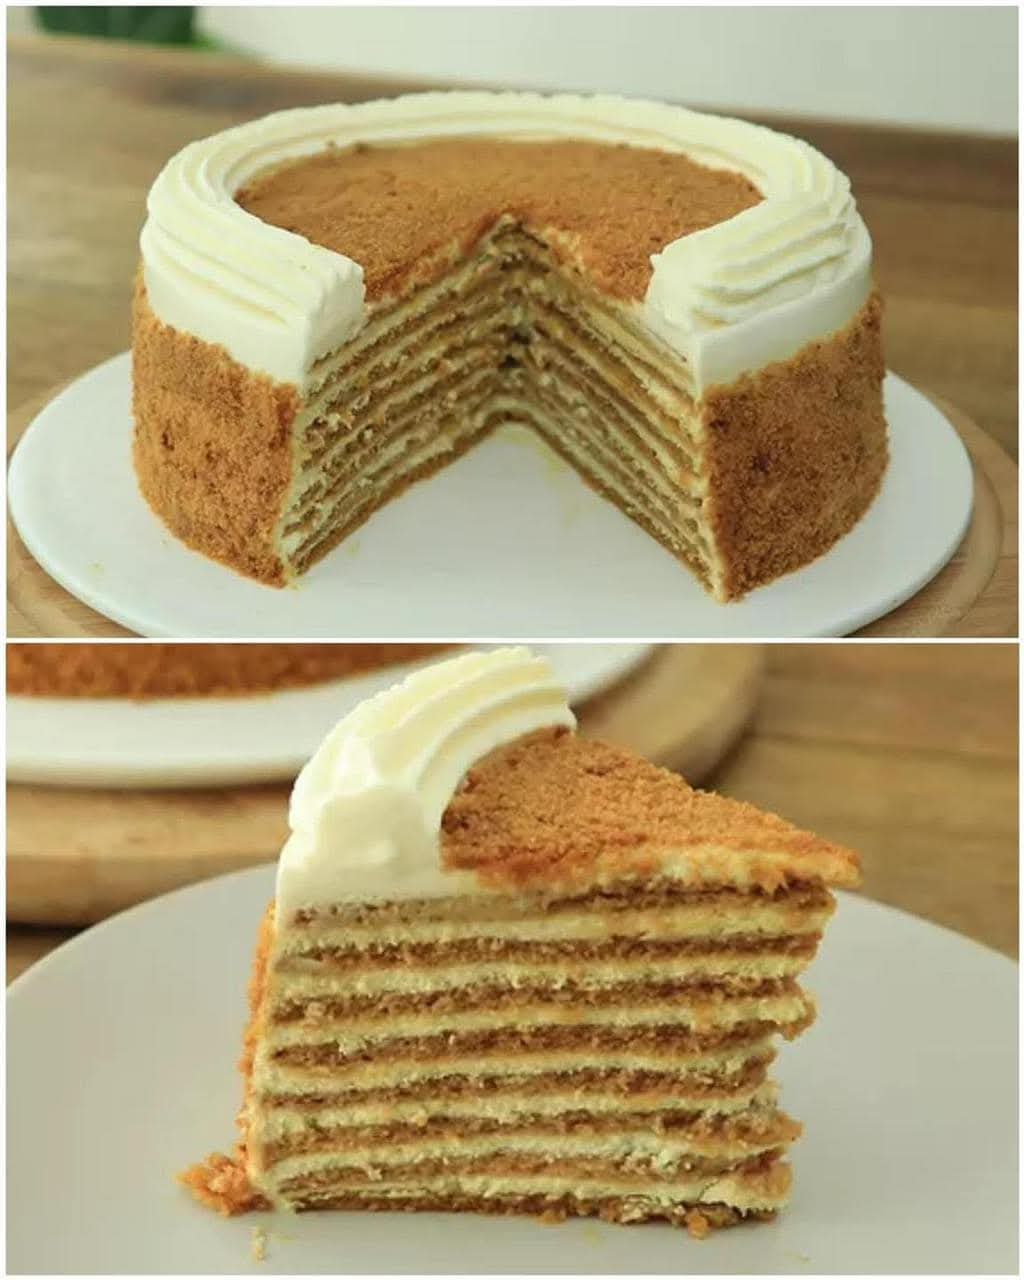
Russian Honey Cake (Medovik) is an iconic layered dessert from the former Soviet Union, celebrated for its delicate, thin honey-infused cake layers alternated with a rich, tangy cream filling. The photo showcases a stunning slice revealing multiple even layers of golden-brown sponge, coated in a light crumb exterior and topped with fluffy white frosting—classic Medovik presentation. This cake, also known as “Medovik” (from the Russian word for honey, “med”), features a caramelized honey flavor that deepens during baking, paired with a creamy filling that soaks into the layers over time for perfect tenderness.
Medovik is more than just a cake; it’s a labor of love requiring patience for rolling, baking, and assembling thin layers (typically 8-12). The result is a sophisticated yet comforting treat: not overly sweet, with balanced honey notes, subtle caramelization, and creamy contrast. It’s a staple at celebrations, family gatherings, and holidays across Russia, Ukraine, and Eastern Europe.
This detailed guide provides an authentic, home-bakable version inspired by traditional recipes, with thorough explanations, tips, variations, history, and troubleshooting—ideal for a comprehensive WordPress post. No photos included, just in-depth text.
The History and Origin of Medovik
Medovik’s origins are shrouded in legend and folklore. One popular tale dates to the 19th century during the Russian Empire, when a young chef, unaware of Empress Elizabeth Alexeievna’s (wife of Tsar Alexander I) aversion to honey, created a honey cake to impress her. To his surprise, the empress adored it, forgiving the oversight and rewarding the chef. While charming, this story lacks historical documentation—no 19th-century Russian cookbooks mention it.
More reliably, Medovik emerged in the 20th century, particularly during the Soviet era, when honey cakes became popular homemade treats. The first printed recipes appear in mid-20th-century publications, like Ukrainian cookbooks from the 1950s-1960s. Honey, a traditional sweetener in Slavic cultures before refined sugar dominated, was key. The cake’s layered style may draw from earlier honey-based pastries, but modern Medovik—with thin, cookie-like layers and sour cream filling—solidified in the Soviet period as a beloved dessert. Today, it’s a symbol of nostalgic Eastern European baking, with regional twists (e.g., condensed milk fillings or nut additions).
Why You’ll Love Making Russian Honey Cake
The magic lies in transformation: the dough starts sticky and cooks into crisp-yet-tender layers that soften beautifully as the cream soaks in over 12-24 hours. The honey provides warm, floral depth (use good-quality honey for best flavor—dark varieties add caramel notes). The filling—often sour cream-based—cuts sweetness with tanginess. It’s make-ahead friendly (flavors improve with time), impressive in presentation, and adaptable. Perfect for special occasions, yet rewarding for weekend baking.
Ingredients (Serves 10-12; makes an 8-10 inch cake with 8-10 layers)
For the Honey Cake Layers:
- 360g (3¼ cups) all-purpose flour (plain flour), plus extra for dusting
- 8g (2 tsp) baking powder (or 1 tsp baking soda in some variations)
- 170g (½ cup) honey (good-quality, preferably floral or dark for richer flavor)
- 150g (¾ cup) granulated sugar
- 100g (7 Tbsp) unsalted butter
- 3 large eggs, room temperature
- 1 tsp vanilla extract (optional, for extra aroma)
- Pinch of salt
- Optional: ½ tsp ground cinnamon or cardamom for subtle warmth
For the Cream Filling:
- 800g (about 3½ cups) full-fat sour cream or smetana (Russian-style sour cream; Greek yogurt can substitute but drain well)
- 400ml (1¾ cups) heavy whipping cream (double cream), cold
- 150-200g (1-1½ cups) powdered sugar (icing sugar), adjust to taste
- 1-2 Tbsp honey (for extra honey flavor)
- 1-2 tsp vanilla extract or seeds from 1 vanilla pod
- Optional: 200g dulce de leche or condensed milk for a richer, caramelized version
For Decoration:
- Reserved cake crumbs (from trimming layers)
- Optional: Chopped nuts (walnuts, hazelnuts), chocolate shavings, or fresh berries
Equipment Needed
- Medium saucepan or heatproof bowl for dough
- Stand mixer or hand mixer
- Rolling pin
- Parchment paper or silicone mats
- Round cake pan or plate (for templates; 8-9 inch diameter)
- Baking sheets
- Offset spatula or knife for spreading
- Cake stand or plate
- Plastic wrap for chilling
Step-by-Step Instructions
1. Prepare the Honey Dough (20-30 minutes + chilling)
In a medium saucepan over low-medium heat, combine butter, granulated sugar, honey, and salt. Stir until melted and smooth—do not boil vigorously. Remove from heat.
In a bowl, lightly beat eggs with vanilla. Slowly whisk eggs into the warm honey mixture (to temper and avoid scrambling). Return to low heat and cook 2-3 minutes, stirring constantly, until slightly thickened.
Remove from heat. Sift in flour and baking powder (or add baking soda dissolved in a splash of vinegar for lift in some recipes). Stir vigorously—the dough will thicken quickly into a soft, sticky ball. If too sticky, add 1-2 Tbsp more flour, but keep it soft.
Divide dough into 8-10 equal portions (about 100-120g each). Wrap in plastic and chill 30-60 minutes (or overnight)—chilling makes rolling easier.
2. Roll and Bake the Layers (45-60 minutes)
Preheat oven to 180°C (350°F). Line baking sheets with parchment.
On floured surface or between parchment sheets, roll each portion into a thin circle (about 2-3mm thick, 20-22cm diameter). Use a plate or pan as template to cut perfect circles—save scraps!
Transfer to baking sheet (parchment helps). Prick with fork to prevent bubbling.
Bake 5-7 minutes per layer until golden and firm (they crisp as they cool). Do not overbake—edges should be light golden.
Cool completely on wire rack. Layers will harden like cookies initially.
3. Make the Cream Filling (10 minutes)
Whip cold heavy cream with powdered sugar and vanilla to stiff peaks.
In separate bowl, beat sour cream with remaining powdered sugar and honey until smooth. Gently fold whipped cream into sour cream mixture—do not overmix to keep airy.
Taste and adjust sweetness—should be tangy-sweet.
4. Assemble the Cake (20-30 minutes + chilling)
Place first layer on serving plate. Spread generous layer of cream (about 3-4 Tbsp). Repeat for all layers, stacking evenly.
Apply thin crumb coat of cream to sides/top. Chill 30 minutes to set.
Frost fully with remaining cream. Press reserved crumbs (crush trimmings) onto sides and top for classic rustic look.
5. Rest and Serve
Wrap loosely and refrigerate at least 12 hours (ideally 24)—layers soften, cream absorbs, flavors meld.
Slice with sharp knife dipped in hot water. Serve chilled or room temp.
Tips for Success
- Use quality honey—floral varieties shine; buckwheat adds robust note.
- Roll thin—thicker layers stay chewy; thin become tender.
- Bake in batches—rotate sheets for even color.
- Cream ratio: More sour cream = tangier; more whipped = lighter.
- Make-ahead: Layers freeze well; assemble day before.
- Crumb coat hides imperfections.
- For even layers: Weigh dough portions.
Variations
- Condensed Milk Version: Mix dulce de leche or cooked condensed milk into cream.
- Nutty: Add ground walnuts/hazelnuts to crumbs or filling.
- Chocolate: Drizzle melted chocolate or add cocoa to dough.
- Fruit-Infused: Layer with berries or jam.
- Gluten-Free: Use GF flour blend.
- Lighter: Use yogurt-based filling.
Serving Suggestions
- With tea/coffee—pairs beautifully with black tea.
- Holidays: Birthdays, New Year, weddings.
- Sides: Fresh fruit or berries for contrast.
- Leftovers: Store refrigerated up to 5 days—flavors deepen.
Common Mistakes and Troubleshooting
- Dough too sticky? Chill longer or add minimal flour.
- Layers crack? Roll gentler or warm slightly.
- Dry cake? Underbake slightly or add more cream soak.
- Runny filling? Whip cream stiffer; use full-fat sour cream.
- Uneven layers? Use template consistently.
Russian Honey Cake (Medovik) rewards patience with elegant, melt-in-mouth results. The honey warmth, creamy tang, and layered texture make it unforgettable. Bake it for loved ones—it’s sure to impress!