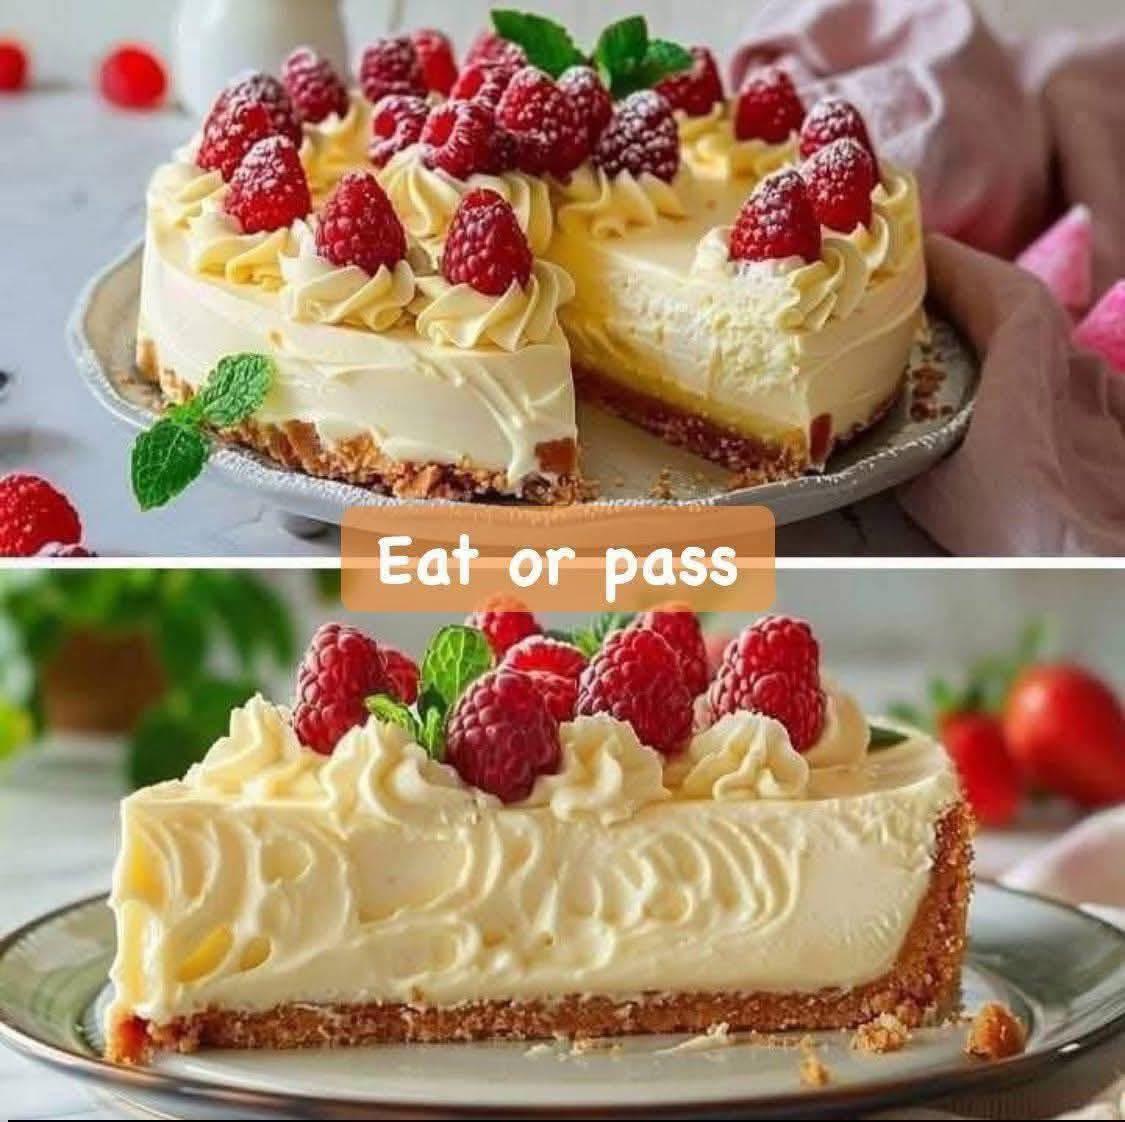
Delicious No-Bake Raspberry Cheesecake: A Creamy, Fruity Delight
If you’re craving a luxurious dessert that’s effortless to make and bursting with fresh fruit flavor, this no-bake raspberry cheesecake is the perfect choice. With its buttery graham cracker crust, velvety smooth cream cheese filling swirled with tangy raspberry puree, and a topping of fresh raspberries dusted with powdered sugar, this cheesecake is a showstopper for any occasion—be it a summer gathering, holiday celebration, or simply a treat for yourself.
What makes this recipe stand out is its simplicity: no oven required, minimal ingredients, and it comes together in under an hour of active prep time (plus chilling). The result is a light yet indulgent dessert that’s creamy, tart, and sweet all at once. The natural brightness of raspberries cuts through the richness of the cream cheese, creating a balanced flavor profile that’s refreshing and satisfying.
This no-bake version avoids the common pitfalls of baked cheesecakes, like cracking or overbaking. Instead, it sets beautifully in the refrigerator, developing a mousse-like texture that’s incredibly smooth. Whether you’re a beginner baker or a seasoned pro looking for a quick win, this recipe delivers professional results with home-kitchen ease.
Why You’ll Love This No-Bake Raspberry Cheesecake
No-bake cheesecakes have surged in popularity for good reason. They offer all the decadence of traditional cheesecake without the hassle of a water bath or long baking times. This particular raspberry variation shines because:
- Fresh and Seasonal Flavor: Raspberries add a vibrant, tangy contrast to the creamy base. You can use fresh berries in season or frozen for year-round enjoyment.
- Make-Ahead Convenience: Prepare it a day in advance—it actually tastes better after chilling overnight as the flavors meld.
- Versatile and Customizable: Swap raspberries for strawberries, blueberries, or even a mix of berries. Add lemon zest for extra zing or white chocolate for richness.
- Crowd-Pleaser: Serves 10-12 slices, making it ideal for parties, potlucks, or family dinners.
- Healthier Twist: Compared to baked versions, it’s lighter and can be adapted with reduced-sugar options.
In total, this recipe yields a stunning 9-inch cheesecake that’s about 300-400 calories per slice (depending on portions), packed with protein from the cream cheese and antioxidants from the berries.
Ingredients
For the Graham Cracker Crust:
- 2 ½ cups (about 250g) graham cracker crumbs (from roughly 18 full sheets)
- ½ cup (113g) unsalted butter, melted
- ¼ cup (50g) granulated sugar (optional, for extra sweetness)
For the Raspberry Puree/Sauce:
- 12 oz (340g) fresh or frozen raspberries (about 3 cups)
- ½ cup (100g) granulated sugar
- 2 tablespoons cornstarch
- ¼ cup water
- 1 tablespoon fresh lemon juice (for brightness)
For the Cheesecake Filling:
- 24 oz (680g, three 8-oz packages) full-fat cream cheese, softened to room temperature
- 1 ½ cups (180g) powdered sugar
- 1 teaspoon pure vanilla extract
- 1 tablespoon fresh lemon zest (optional, for a lemon-raspberry twist)
- 1 ½ cups (360ml) heavy whipping cream, cold
- ½ cup raspberry puree (reserved from the sauce above)
For Garnish:
- Fresh raspberries (about 1-2 cups)
- Powdered sugar, for dusting
- Mint leaves (optional)
Equipment You’ll Need
- 9-inch springform pan
- Food processor or zip-top bag and rolling pin (for crumbs)
- Mixing bowls
- Electric mixer (stand or hand-held)
- Spatula
- Fine-mesh sieve (for straining seeds, optional)
Step-by-Step Instructions
Step 1: Prepare the Graham Cracker Crust
Start with the base—it’s the foundation that holds everything together and provides that satisfying crunch.
Crush the graham crackers into fine crumbs using a food processor or by placing them in a zip-top bag and rolling over them with a pin. You want a sandy texture with no large chunks.
In a medium bowl, combine the crumbs with the melted butter and sugar (if using). Stir until the mixture resembles wet sand and holds together when pressed.
Pour the crumb mixture into your springform pan. Use the bottom of a measuring cup or glass to press it firmly and evenly across the bottom and slightly up the sides (about ½ inch). This ensures a sturdy crust that won’t crumble when sliced.
Place the pan in the refrigerator to chill while you prepare the other components. Chilling helps it set and makes assembly easier.
Step 2: Make the Raspberry Puree
The raspberry element is what elevates this from a plain cheesecake to something special. A homemade puree adds intense flavor and beautiful swirls.
In a medium saucepan over medium heat, combine the raspberries, sugar, cornstarch, water, and lemon juice. Stir gently to dissolve the cornstarch and sugar.
Cook the mixture, stirring frequently, until the raspberries break down and the sauce thickens—this should take about 5-8 minutes. You’ll see it bubble and turn glossy.
For a seedless puree (recommended for smoother texture), strain the mixture through a fine-mesh sieve into a bowl, pressing with a spatula to extract as much liquid as possible. Discard the seeds.
Reserve about ½ cup of the puree for swirling into the filling. Let the remaining sauce cool completely. You can speed this up by placing it in the fridge.
This puree can be made up to 3 days in advance and stored in the fridge.
Step 3: Whip the Cream
The secret to a light, airy no-bake cheesecake is properly whipped cream. It adds volume and prevents the filling from being too dense.
In a large, chilled bowl, beat the cold heavy whipping cream with an electric mixer on medium-high speed until stiff peaks form. This takes about 3-5 minutes—watch carefully to avoid overwhipping into butter.
Stiff peaks mean when you lift the beaters, the cream holds its shape firmly.
Set the whipped cream aside in the refrigerator until needed.
Step 4: Prepare the Cream Cheese Filling
This is the heart of the cheesecake—creamy, tangy, and perfectly sweetened.
In a large mixing bowl, beat the softened cream cheese with powdered sugar, vanilla extract, and lemon zest (if using) on medium speed until completely smooth and lump-free. This takes about 2-3 minutes. Scrape down the sides of the bowl as needed.
Gently fold in the reserved ½ cup of cooled raspberry puree using a spatula. Don’t overmix—you want visible swirls for that marbled effect.
Now, carefully fold in the whipped cream in three additions. Use a gentle folding motion to incorporate air and keep the mixture light. The filling should be thick, fluffy, and pipeable.
Step 5: Assemble the Cheesecake
Remove the chilled crust from the fridge.
Pour the raspberry-swirled filling over the crust. Smooth the top with a spatula or offset knife for an even surface.
For extra swirls on top, drop spoonfuls of the remaining raspberry puree onto the filling and use a toothpick or knife to create pretty patterns.
Cover the pan loosely with plastic wrap and refrigerate for at least 6-8 hours, preferably overnight. This allows the cheesecake to set firmly.
Step 6: Garnish and Serve
Once fully chilled, run a knife around the edges of the pan and release the springform sides.
Transfer to a serving plate. Arrange fresh raspberries on top in a decorative pattern—pile them high in the center for drama.
Dust lightly with powdered sugar just before serving for a snowy effect. Add mint leaves for color if desired.
Slice with a sharp knife dipped in hot water for clean cuts.
Tips for Success
- Room Temperature Cream Cheese: This is crucial for a smooth filling without lumps. Leave it out for 1-2 hours.
- Don’t Skip Chilling: Overnight is best for the firmest set and best flavor development.
- Seedless vs. Seedy: Straining removes seeds for elegance, but if you like texture, skip it or add a few back.
- Frozen Raspberries: Thaw and drain excess liquid before using to avoid a watery sauce.
- Make It Lighter: Use light cream cheese and reduced-fat whipped topping, though full-fat yields the creamiest results.
- Gluten-Free Option: Swap graham crackers for gluten-free cookies.
- Vegan Adaptation: Use dairy-free cream cheese, coconut cream, and vegan butter.
Variations to Try
This recipe is incredibly adaptable:
- Lemon-Raspberry: Increase lemon zest and juice for a brighter, tangier version.
- White Chocolate Raspberry: Melt 4 oz white chocolate into the filling.
- Layered Bars: Make in a 9×13 pan and top with a full layer of raspberry sauce for bars.
- Mini Cheesecakes: Portion into muffin tins for individual servings.
- Mixed Berry: Use a blend of raspberries, strawberries, and blueberries.
Storage and Make-Ahead
Store leftovers covered in the fridge for up to 5 days. For longer storage, freeze slices wrapped in plastic and foil for up to 2 months—thaw overnight in the fridge.
This cheesecake freezes beautifully, making it great for meal prep or unexpected guests.
Nutritional Information (Per Slice, Based on 12 Servings)
- Calories: ~420
- Fat: 32g
- Carbs: 35g
- Protein: 5g
- Sugar: 25g
(Approximate; varies with exact ingredients.)
Why This Recipe Works So Well
The combination of whipped cream and cream cheese creates a stable yet ethereal texture. The cornstarch-thickened raspberry puree ensures it sets without gelatin (though you can add 1 packet dissolved in water for extra firmness if preferred). It’s foolproof, forgiving, and always impresses.
Whether you’re celebrating a special occasion or just indulging on a weekday, this no-bake raspberry cheesecake will become your go-to dessert. It’s elegant, delicious, and effortlessly impressive. Enjoy every creamy, fruity bite!