Don’t Throw Away That Cherry Pit Here’s How to Grow a Plant at Home in Only 7 Days
Cherries are one of summer’s most beloved fruits — sweet, juicy, and packed with vitamins. But did you know that after enjoying this delicious treat, you can use its pit to grow your very own cherry tree at home? It may sound too good to be true, but you can sprout a cherry seed and jump-start its growth in as little as seven days!
Here’s your ultimate, step-by-step guide, complete with all the secrets you need for success — from preparation to long-term care.
Introduction
Growing a cherry tree from a pit is surprisingly simple. Cherry seeds hold all the genetic information to sprout into healthy trees — all they need is proper care and the right environment. With patience and the right setup, you can begin this fun and educational gardening journey. Whether you want to enhance your garden or involve your kids in a small science experiment, this is an exciting, easy-to-follow process that yields big rewards.
Ingredients & Materials
Before you get started, make sure you have the following:
- Fresh cherry pits** (washed and dried)
Paper towels** - Water** (filtered if possible)
- Plastic zipper bag or airtight container**
- Seedling pot** with drain holes
- Seed-starting mix** or well-draining potting soil
- A warm, sunny windowsill**
- A refrigerator** (for cold stratification)
Instructions: Step-by-Step Guide
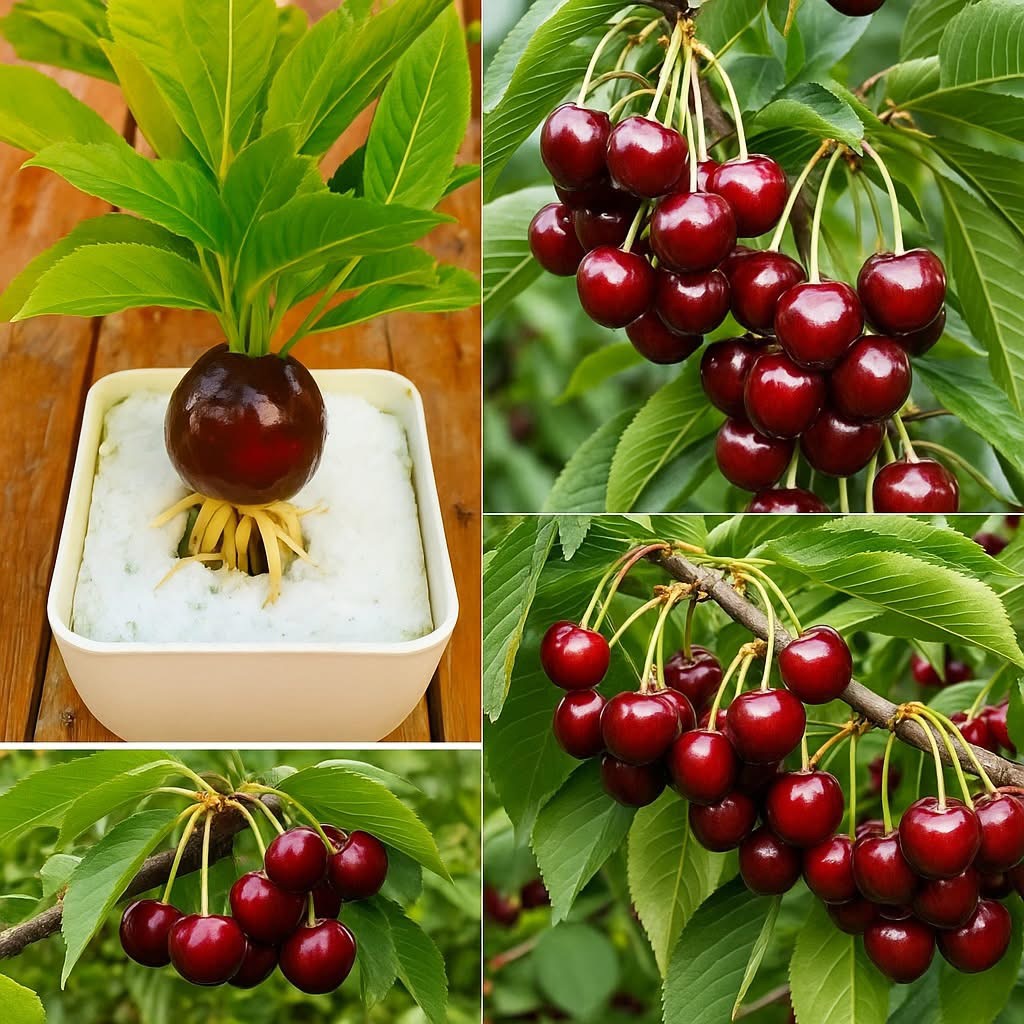
1. Gather and Clean Pits
Enjoy a handful of ripe cherries and carefully save the pits. Rinse them thoroughly under water to remove any leftover fruit flesh — this prevents mold and rot.
2. Dry & Prepare
Let the pits dry on a clean towel for a few hours.
3. Cold Stratification (optional, but highly recommended)
Cherry seeds naturally require a cold period to sprout — mimicking winter!
- Wrap the cleaned pits in a damp paper towel.
- Place them in a plastic zipper bag or container and seal it.
- Put the container in the refrigerator for 1–2 days at a minimum, up to a week for faster germination.
(This cold period will jump-start germination. Even a couple of days can help you grow your seed faster!)
4. Check for Germination
After a few days in the fridge, check the seeds. Some may already show tiny roots. If you see white sprouts emerging — you’re halfway there!
5. Planting the Seeds
- Fill your pot with seed-starting mix or light potting soil.
- Gently plant the sprouted seed about 1 inch (2.5 cm) deep.
- Water lightly and cover the pot with plastic wrap to hold in moisture.
Methods & Pro-Tips for Faster Growth
- Keep warm & moist:** Place your pot in a warm, bright spot (but not in direct harsh sunlight). Maintain soil moisture by misting or light watering.
- Use a heat mat:** Placing a seedling heat mat under the pot can greatly improve germination.
- Patience pays off:** Even if the pit hasn’t visibly sprouted yet, wait 7-10 days — your seed might germinate under the soil.
History of Growing Cherries at Home
Cherries have been cultivated for thousands of years. Originating from the region between the Caspian and Black Seas, these fruits were spread across Europe by the Romans. Even George Washington was famous for his cherry tree! Growing them at home became popular among gardeners who loved both the beauty of the blossoms and the tasty fruit. Even a small cherry tree can produce up to 100 pounds of cherries per year when it reaches maturity — making this a cherished practice around the world.
Benefits of Growing Cherry Plants
Fresh fruits at your fingertips**
Educational & fun gardening project**
Eco-friendly & zero-waste** — turn a pit into a plant
Adds beauty to your home & garden**
Boosts your well-being** — caring for a plant is relaxing and rewarding
Formation & Care
Once the sprout emerges and develops a set of true leaves, it’s important to:
- Move the pot to a sunnier spot.
- Gradually introduce the young plant to outdoor conditions if you plan to transplant into your garden.
- Fertilize lightly every 2–3 weeks with a balanced organic fertilizer.
Conclusion for Cherry Lovers
Whether you’re a cherry aficionado or simply someone looking to grow their green thumb, this quick and easy project is as rewarding as it is delicious. With a bit of patience and care, you’ll get to witness your tiny cherry seedling flourish into a thriving young plant — a true gift from nature.
Nutrition at a Glance
While your seedling grows, it’s worth knowing cherries are:
- Rich in antioxidants
- Packed with vitamin C
- Great for heart health and reducing inflammation
- Low in calories and high in fiber
Conclusion
With these simple instructions, you’ll never look at a cherry pit the same way again! By dedicating just a few days to this fun process, you can experience the magic of growth — and someday, harvest your own cherries. Plus, you can pass this knowledge on to friends and loved ones who will appreciate the beauty of watching life take root.