The Complete Guide to Growing Potatoes at Home
Growing potatoes is one of the most satisfying gardening activities you can do—especially when you see those golden tubers emerging from the soil. Whether you’re a gardening novice or a seasoned grower, potatoes are a great crop because they’re relatively low-maintenance, productive, and fun to grow. This guide will walk you through the full process, from planting to harvest, using a simple sprouted potato and a little care.
Why Grow Potatoes at Home?
Potatoes are a staple in many households. They’re affordable, versatile, and packed with nutrients such as potassium, vitamin C, and dietary fiber. Growing them at home allows you to control how they’re cultivated, ensuring they’re organic and chemical-free
Step 1: Choose and Prepare Seed Potatoes
What Are Seed Potatoes?
Seed potatoes are simply regular potatoes that have been allowed to sprout. You can purchase certified seed potatoes or use leftover sprouted potatoes from your kitchen.
How to Prepare Them
- Choose firm potatoes with multiple “eyes” or sprouts.
- If the potatoes are large, cut them into pieces with at least one sprout per section. Let them sit out for a day or two to allow the cut sides to callous over. This prevents rotting in the soil.
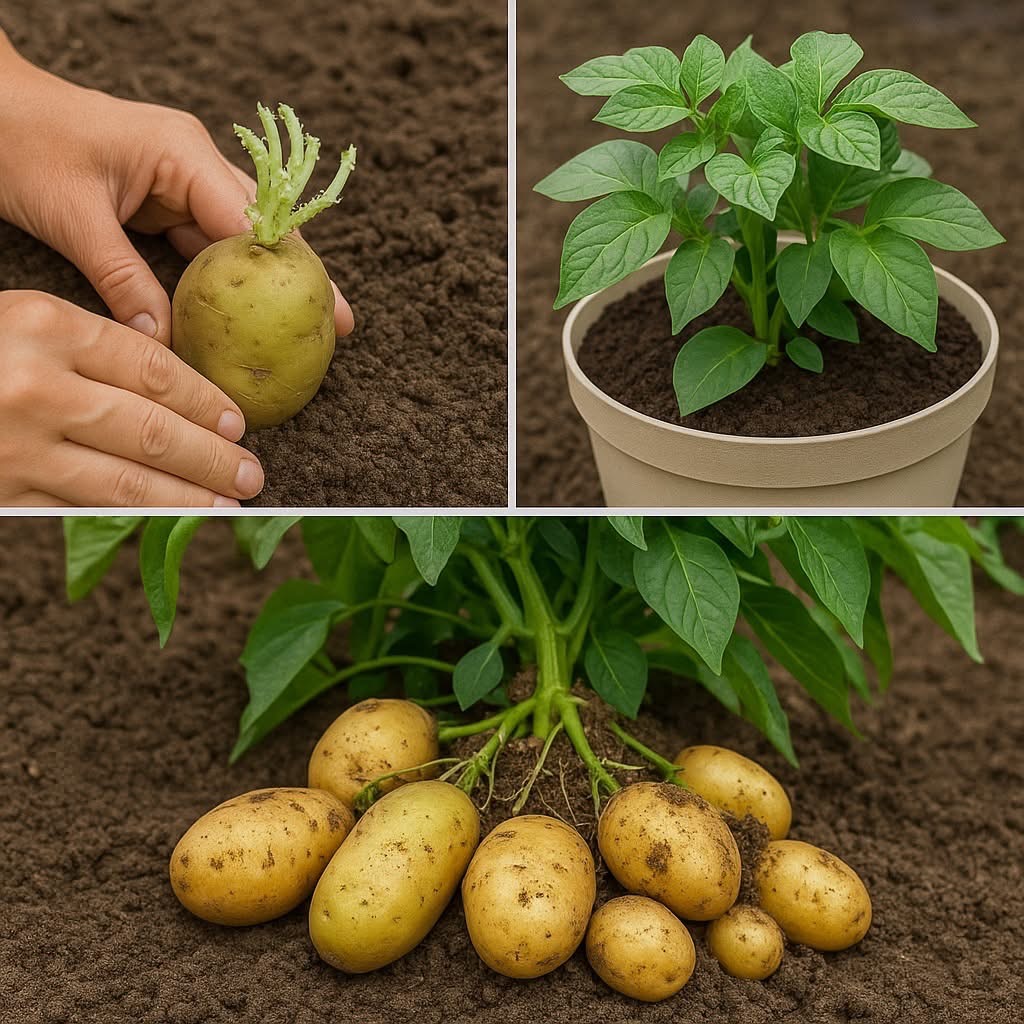
Image reference (top left): A hand planting a sprouted potato in the soil, illustrating the first step.
Step 2: Planting the Potato
- Location: Choose a sunny spot with well-drained, loose soil.
- Depth: Dig a trench about 4 inches deep.
- Spacing: Space seed potatoes 12 inches apart with sprouts facing up.
- Covering: Lightly cover with soil. As the plant grows, continue to mound soil around the base to encourage more tuber growth.
Step 3: Potato Plant Growth
In a few weeks, green shoots will break through the soil. These will develop into bushy, leafy plants. Ensure the plants get at least 6-8 hours of sunlight per day and water them consistently—keeping the soil moist but not waterlogged.
Image reference (top right): A healthy potato plant growing in a pot, showcasing early foliage development.
Step 4: Hilling the Plants
As the potato plant grows taller, “hill” the soil around the stem by mounding additional soil around the base. This helps protect the developing tubers from sunlight, which can cause them to turn green and become toxic. Hilling also encourages more tuber production.
Step 5: Harvesting the Potatoes
About 2-4 months after planting, depending on the variety, your potato plants will begin to flower. This is a sign that tubers are developing below the soil. Once the foliage turns yellow and begins to die back, it’s time to harvest.
- Use your hands or a garden fork to gently dig around the base of the plant.
- Avoid stabbing the tubers.
- Shake off excess soil and let the potatoes dry in a cool, shaded area.
Image reference (bottom): A cluster of fresh potatoes emerging from the soil, revealing the fruits of your labor.
Tips for Success
- Rotate crops: Avoid planting potatoes in the same soil year after year to prevent disease.
- Container gardening: If you don’t have space for a garden, potatoes grow well in pots, bins, or grow bags.
- Avoid green potatoes: Exposure to light causes solanine buildup, which is toxic. Always cover tubers with soil.
Storage and Use
Once cured, store your potatoes in a cool, dark, and well-ventilated area. Avoid refrigeration, as cold temperatures can convert starches into sugars. Properly stored, your homegrown potatoes can last several months.
Use them in a variety of delicious dishes—mashed, baked, fried, or roasted. There’s no better feeling than cooking with produce you grew yourself.
Conclusion
Growing potatoes at home is not just rewarding—it’s easy, budget-friendly, and great for the environment. With just a sprouted spud, some soil, and a bit of patience, you can harvest a bountiful supply of one of nature’s most beloved comfort foods.
Whether you’re gardening in a backyard, balcony, or pot, this step-by-step process can lead you from planting to plate in just a few months.